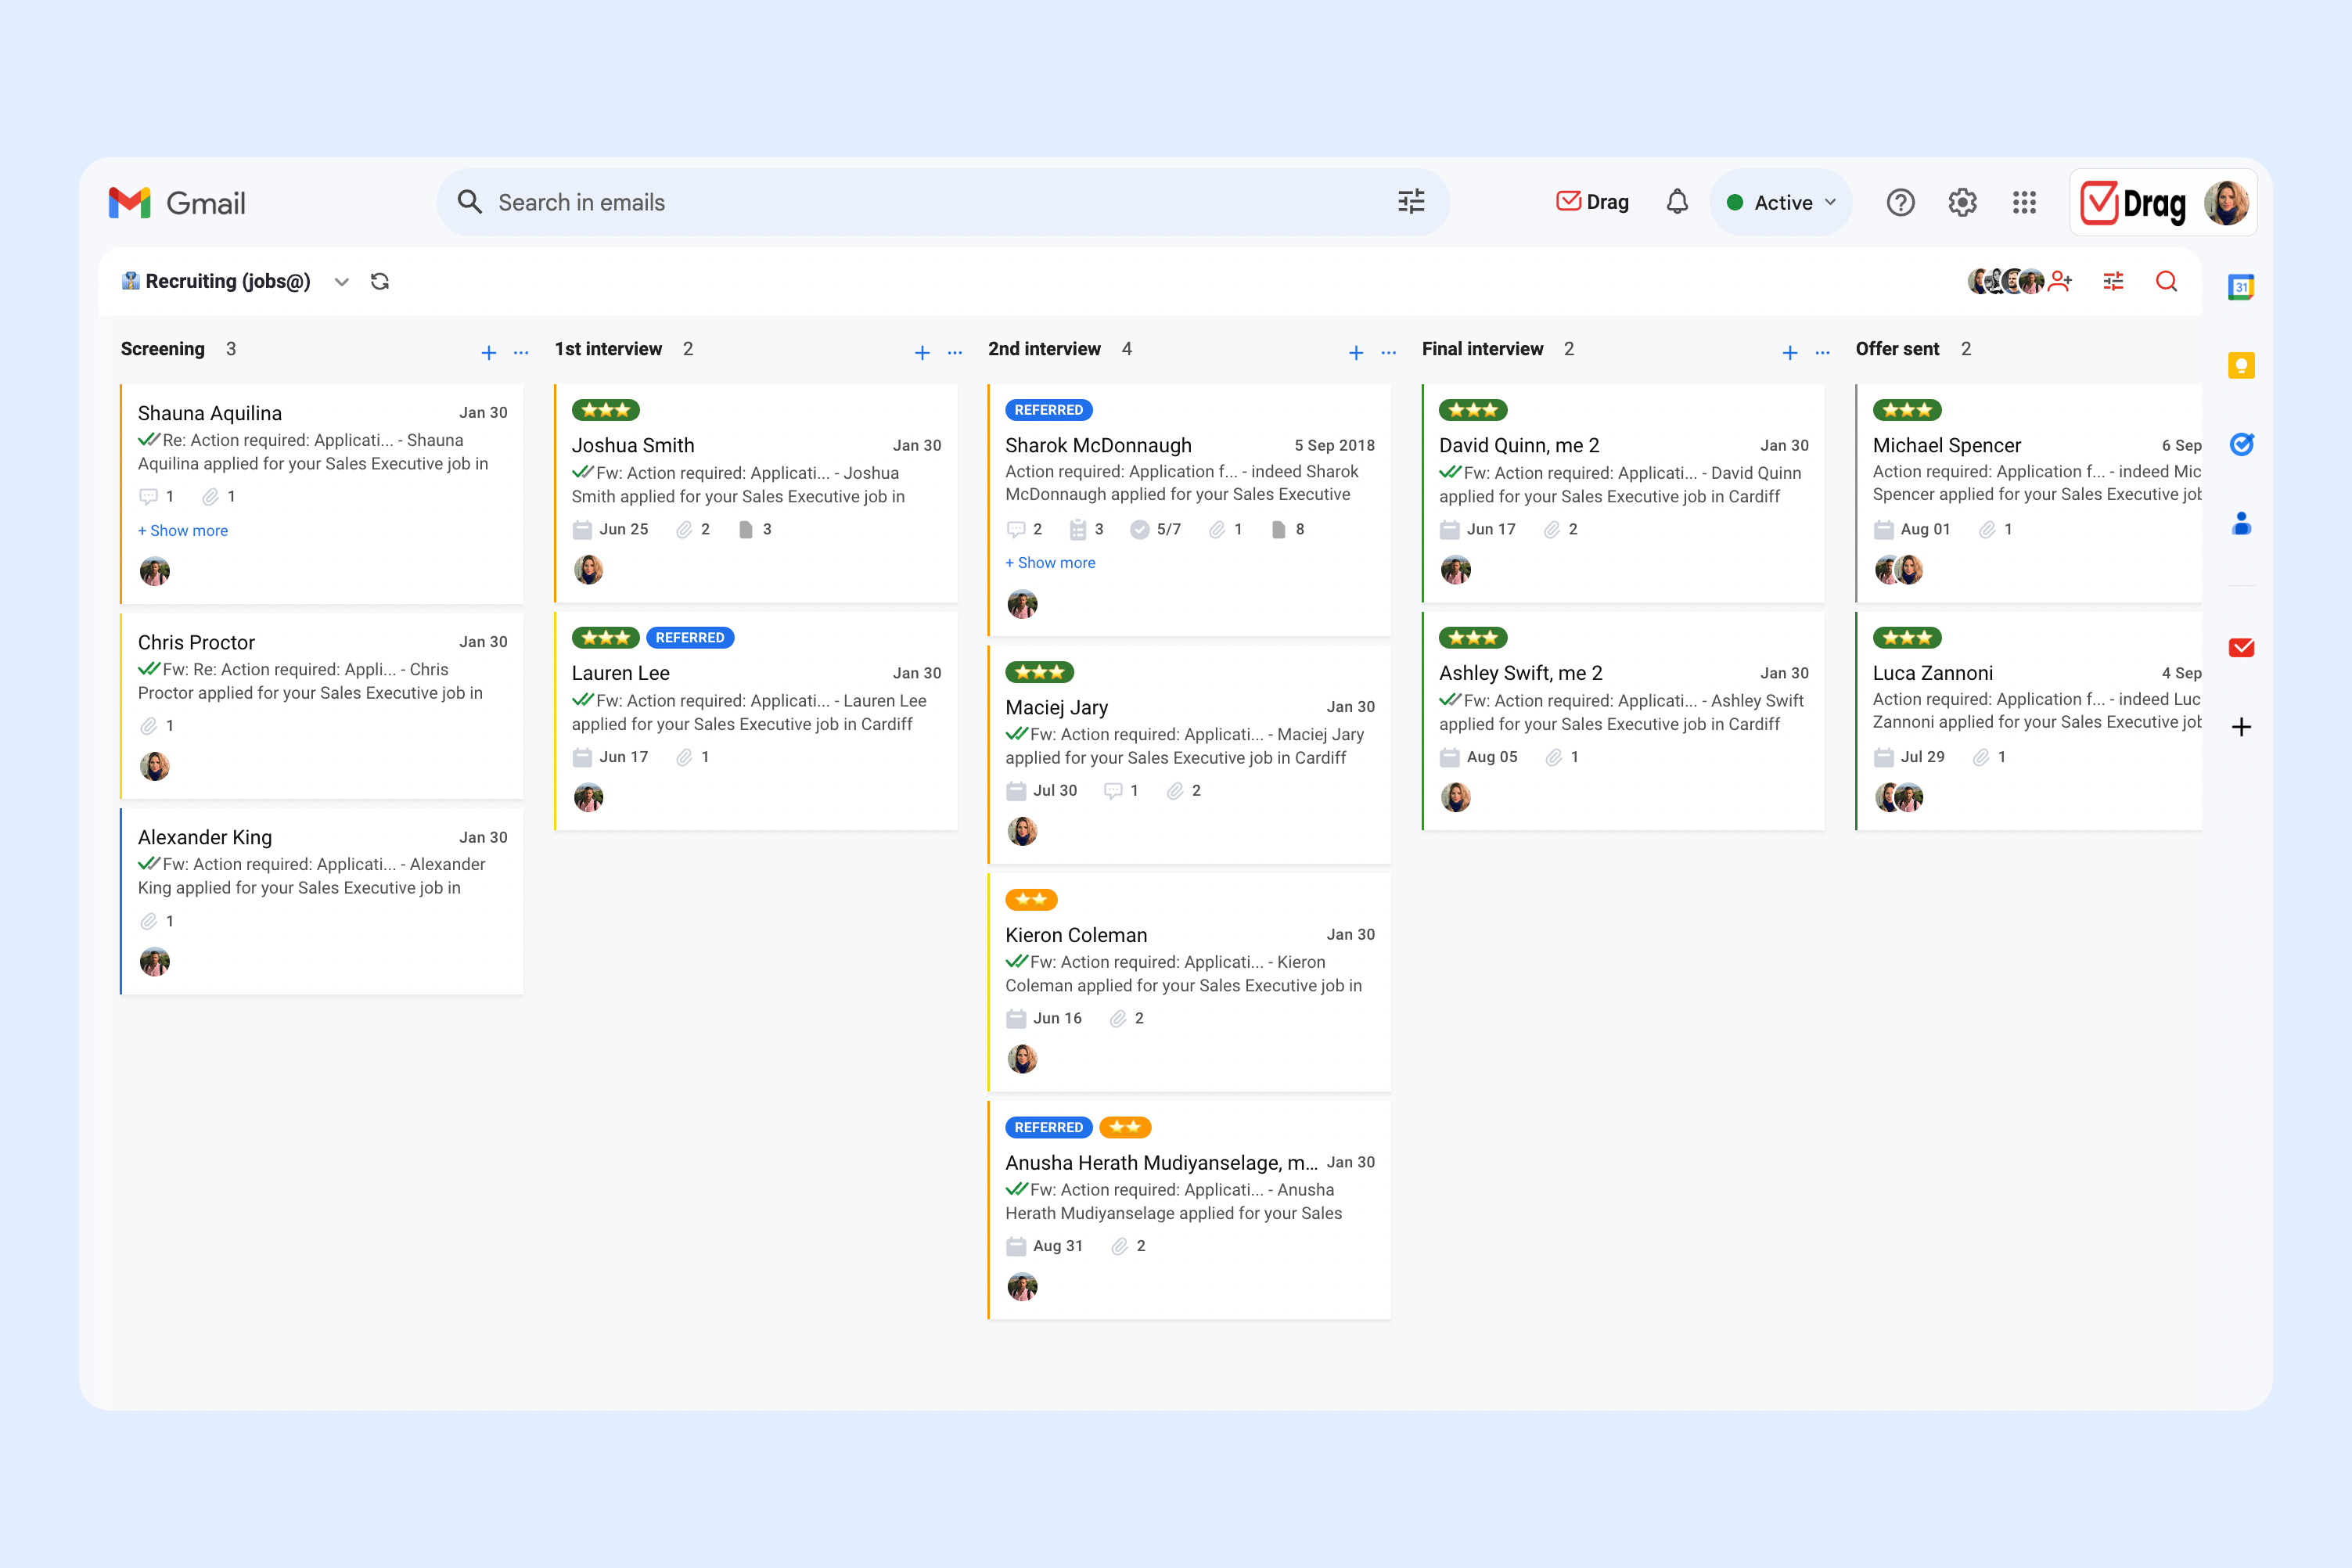
Just imagine how much your work will improve if you automate Gmail to manage all your emails. Forget about constantly cleaning up your main inbox manually, or even replying to the same emails over and over again. Forwarding and copying messages all the time? Why would you still be using these features anyways?
In this article, you will learn how to manage email overload in Gmail without spending time and effort, eliminating most of the manual processes you usually make daily. With these five strategies, you will be able to focus more on the actual work, than on managing emails:
- Automate Gmail with Drag
- Set up Gmail filters
- Create an email folder system with Labels
- Build Gmail templates
- Use Auto-reply in Gmail
1. How to automate emails in Gmail with Drag
Drag is an all-in-one software that helps teams manage their entire workflows in Gmail. It is a specialized shared inbox that works inside Gmail, allowing teams to receive and manage team emails in real-time without logging into different accounts. All the features are focused on facilitating collaboration and visibility in projects, so teams can work together seamlessly.
It can be used for multiple purposes such as task and project management, marketing, CRM, Helpdesk, and more.
Workflow and email automation
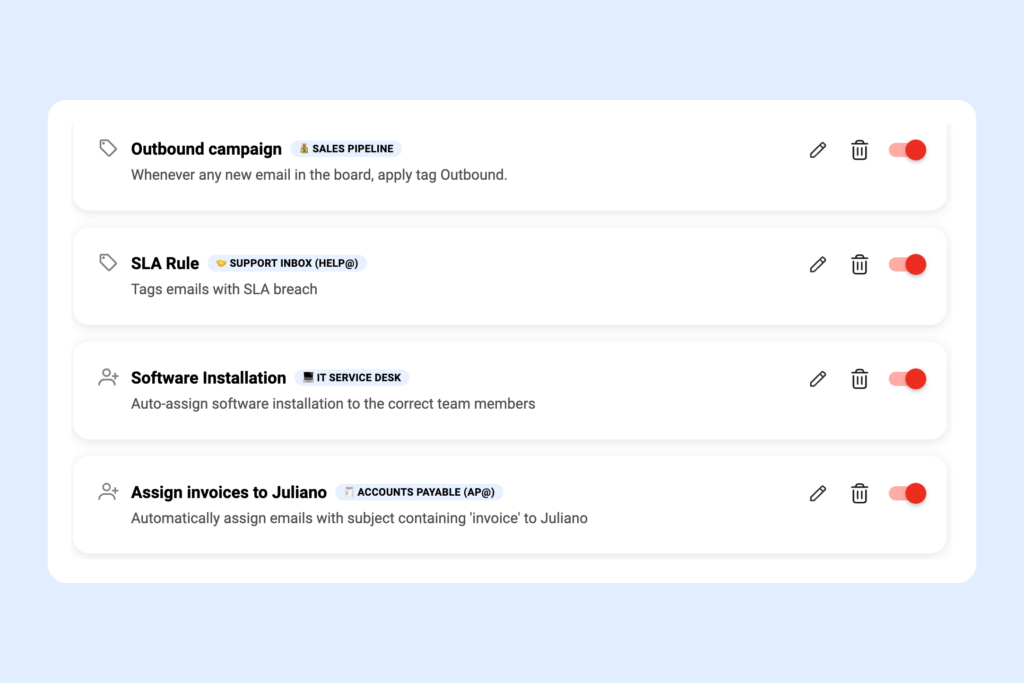
Since Drag allows users to create boards to separate different workflows, it’s also necessary to place the respective emails into each one of them. That’s why you can let Drag organize incoming emails for you sending emails from a client or supplier to their respective boards. If emails are coming from online forms, you can move them into exactly the right place where actions are taken.
Also, you don’t need to manually tag an email, you can set rules to place them automatically. Moreover, there is an option to assign emails to teammates whenever it’s necessary.
Shared email templates
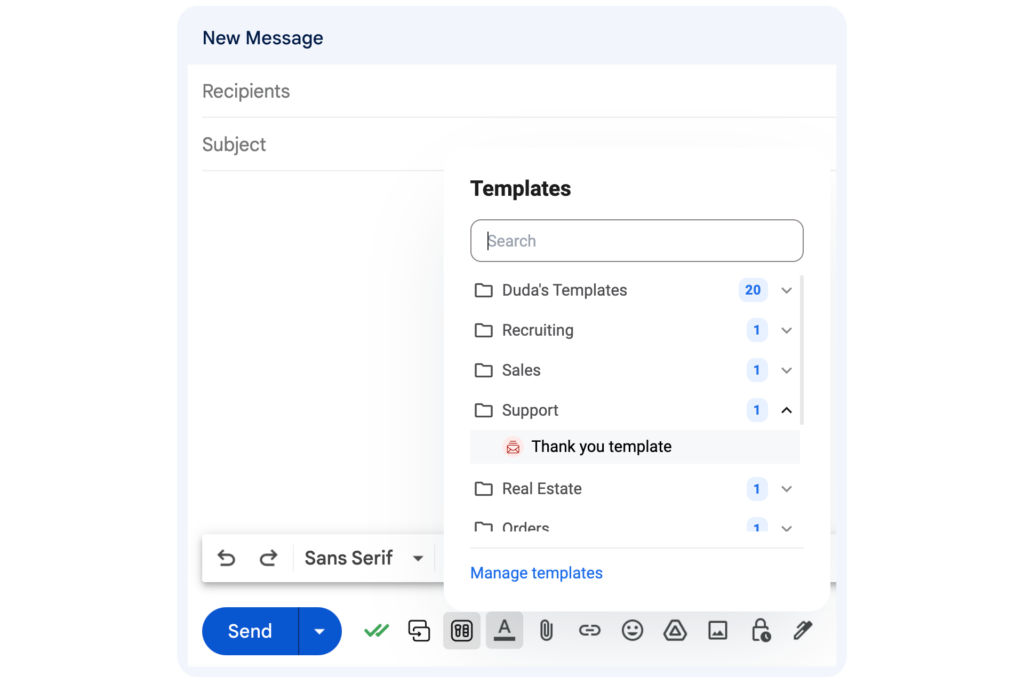
You don’t need to type the same emails over and over. With Drag you can create templates for the emails you send frequently. Besides you can share them with other team members to keep the consistency of communication across your organization.
There are also custom fields to add unique information to the email receiver such as First Name, Last Name, and Company. This way you can give your personal touch to messages. These custom fields are automatically inserted into email follow-ups, so you don’t need to fill them manually every time.
To send an email template with Drag in Gmail, you can simply select the one you want to send in 1 click in the compose box.
Email sequences
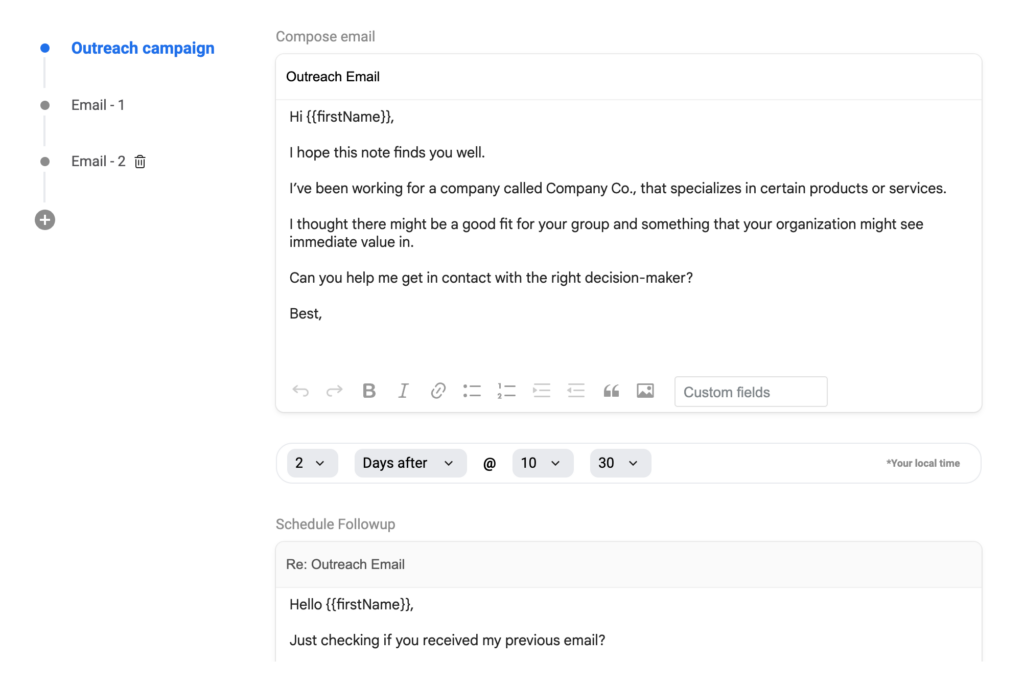
Drag can send email follow-ups automatically, so you don’t need to worry about writing and sending new follow-ups. You can select when you want to schedule the follow-up emails and then share these email sequences with your team for consistency.
2. Set up Gmail Filters
Gmail filters work as automation rules to manage any incoming or existing email messages in your inbox. It helps to sort out emails automatically, allowing you to organize and control your inbox without spending time selecting and handling them.
You can choose which criteria an email should have so Gmail can filter it, as also which action to take once it is filtered. For example, if you are receiving many emails from a specific sender, you can set a filter to make Gmail automatically archive or delete the messages that come from it.
How to create a Gmail filter
You can create an email filter in Gmail in 3 different ways. Each one of them is convenient depending on what you are doing in your inbox at the moment, so it’s interesting to know all of them.
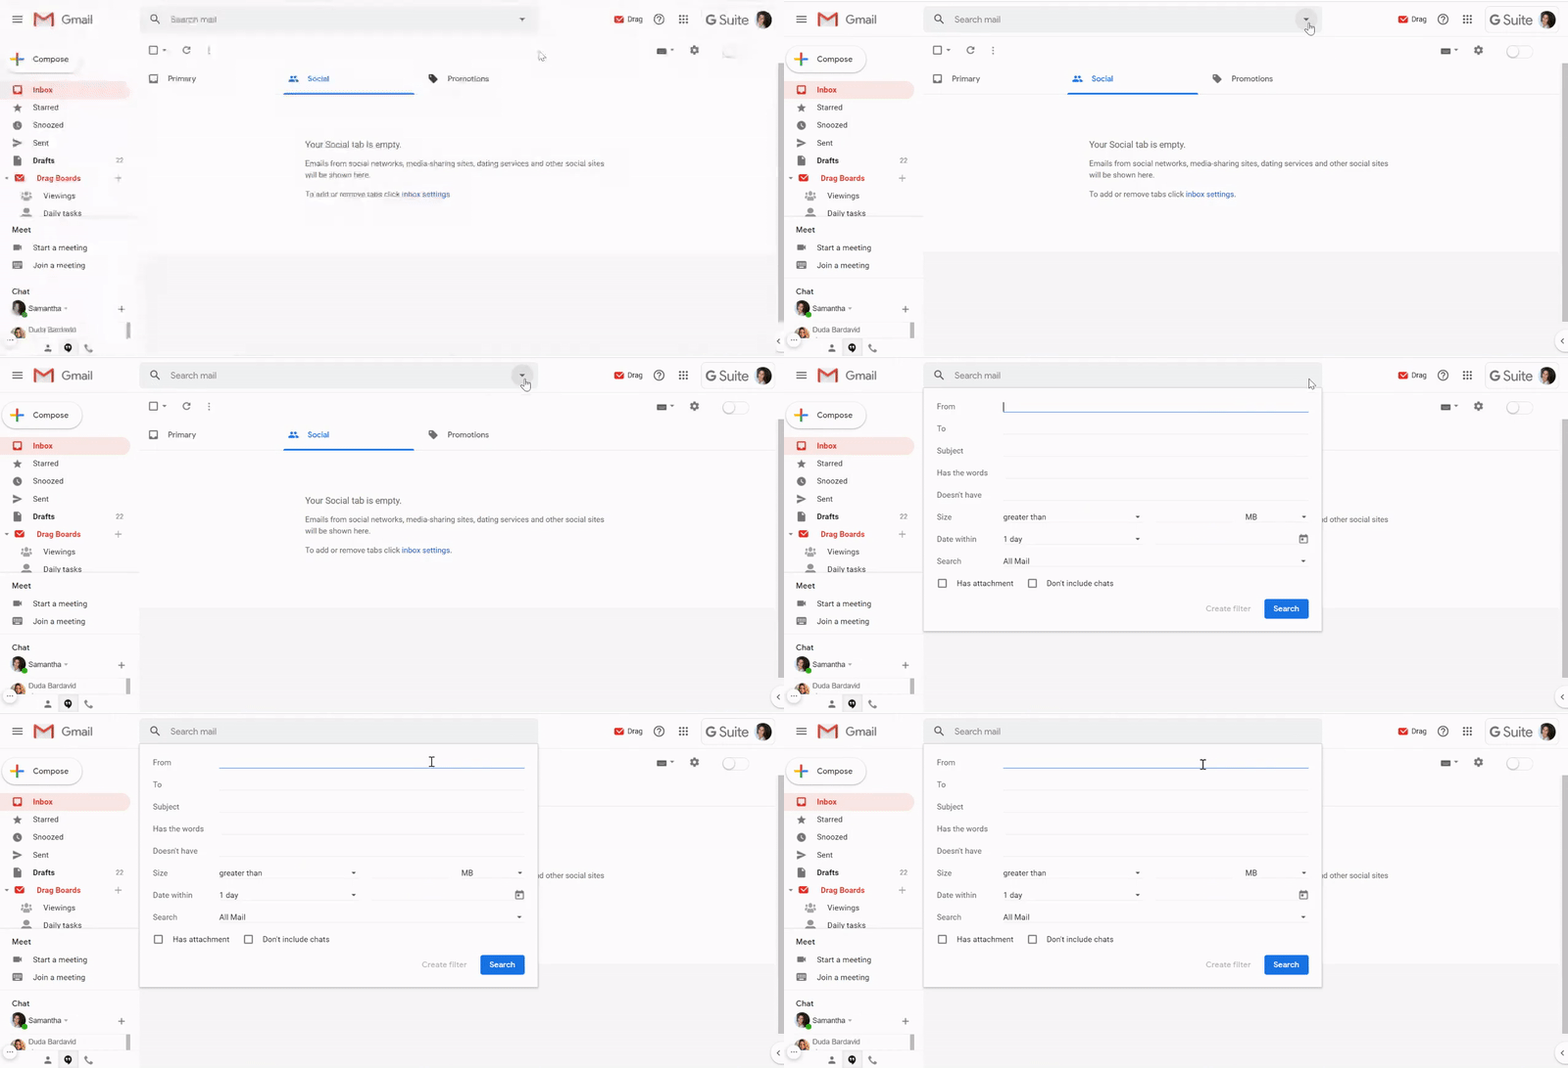
The first one is the easiest: click the down-arrow in the search bar, and a pop-up will appear.
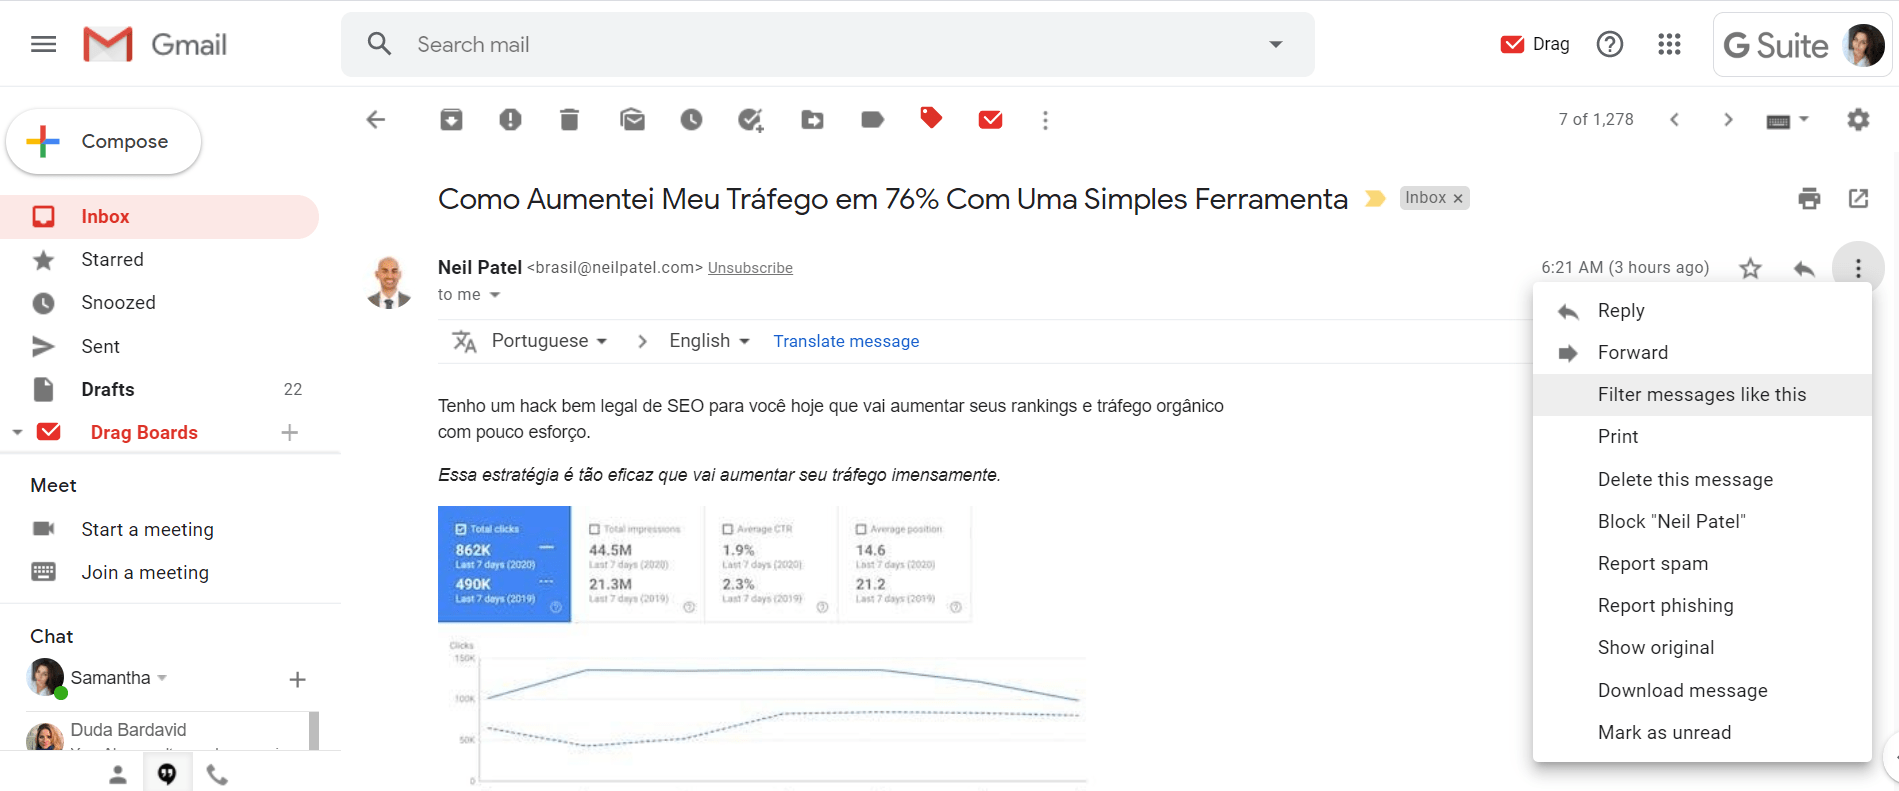
The second way is creating filters from opened emails. Click the three-dots on the right of the email window and choose “Filter messages like these.†The same pop-up from the previous method will open.
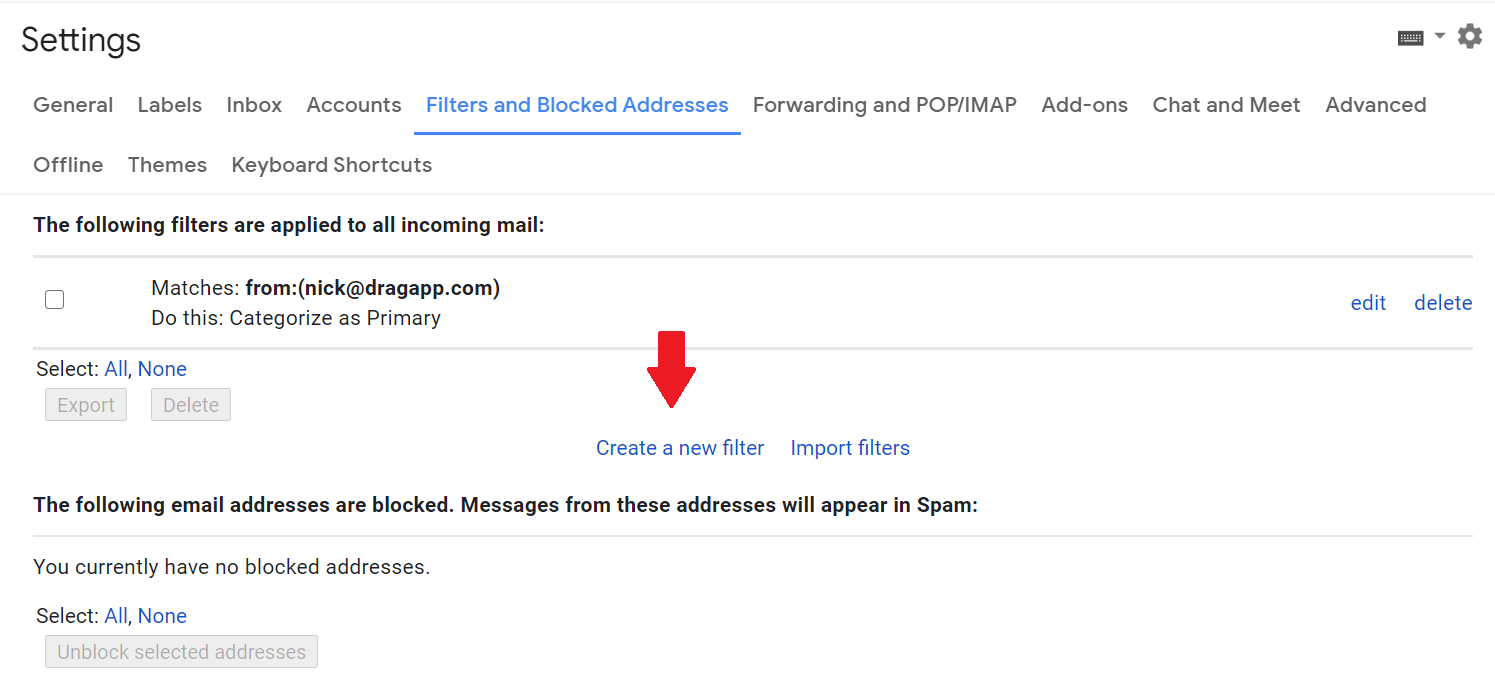
It’s also possible to create a new filter in Gmail, on the settings menu. Click the gear icon on the top-right of your window, then choose “Settingsâ€. After that, select the tab “Filters and Blocked Addressesâ€, and click the “Create a new filter†link.
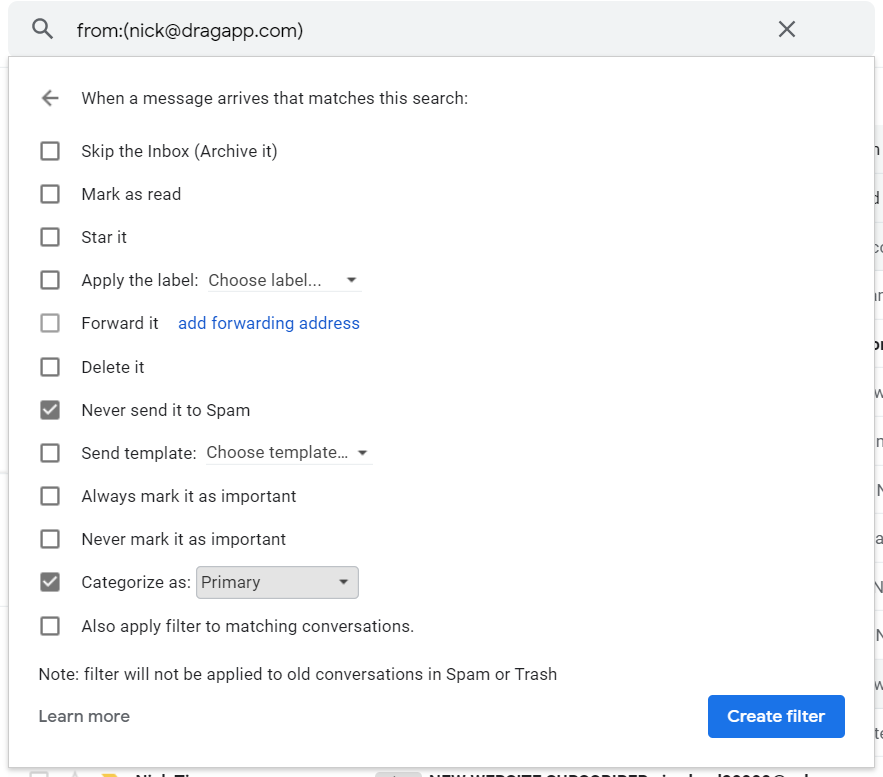
On either of the three options, a popup will open, and you can start filling in the criteria your filter needs to have, such as sender or recipient information, subject, date, and others.
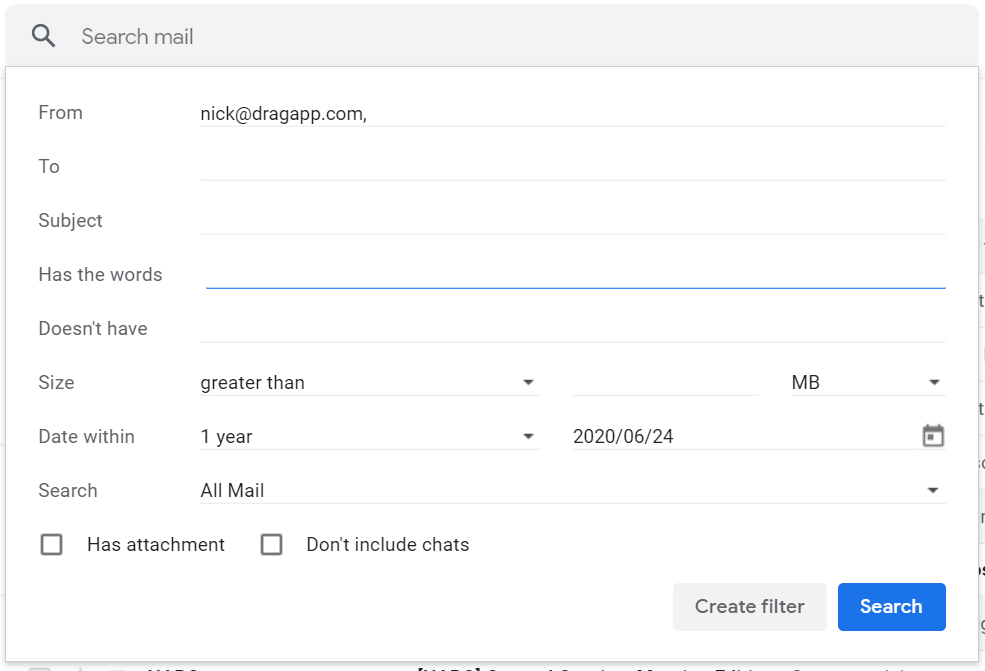
You can search for emails with the selected information or create a filter to let Gmail trigger an action. Once you click “Create filter” another pop-up will appear with actions such as “Delete it”, “Mark as read” or “Forward it”. Choose the ones you want to apply and hit the button “Create filter” once again.
3. Create an email folder system with Labels (and filters)
This is one of the easiest and most effective ways to automate Gmail. Using labels is a simple way of categorizing things. In other words, it is basically attaching a tag that gives some information about something. With emails in Gmail, you can do the same, to improve the organization and visualization of your inbox.
You can label all the emails in your inbox —the ones you send, receive, and even the drafts. Also, you can apply as many tags as you want to one email, which makes it possible to organize your email account in infinite ways, personalized to your own experience.
It’s a partially manual process you can follow, but a way of keeping a folder system to handle related emails faster, and avoiding a complete mess in your inbox.
How to create labels in Gmail
There are three different ways to create a new label in Gmail. It’s interesting to know all of them because depending on what you are doing at the moment in your inbox, they can be handy.
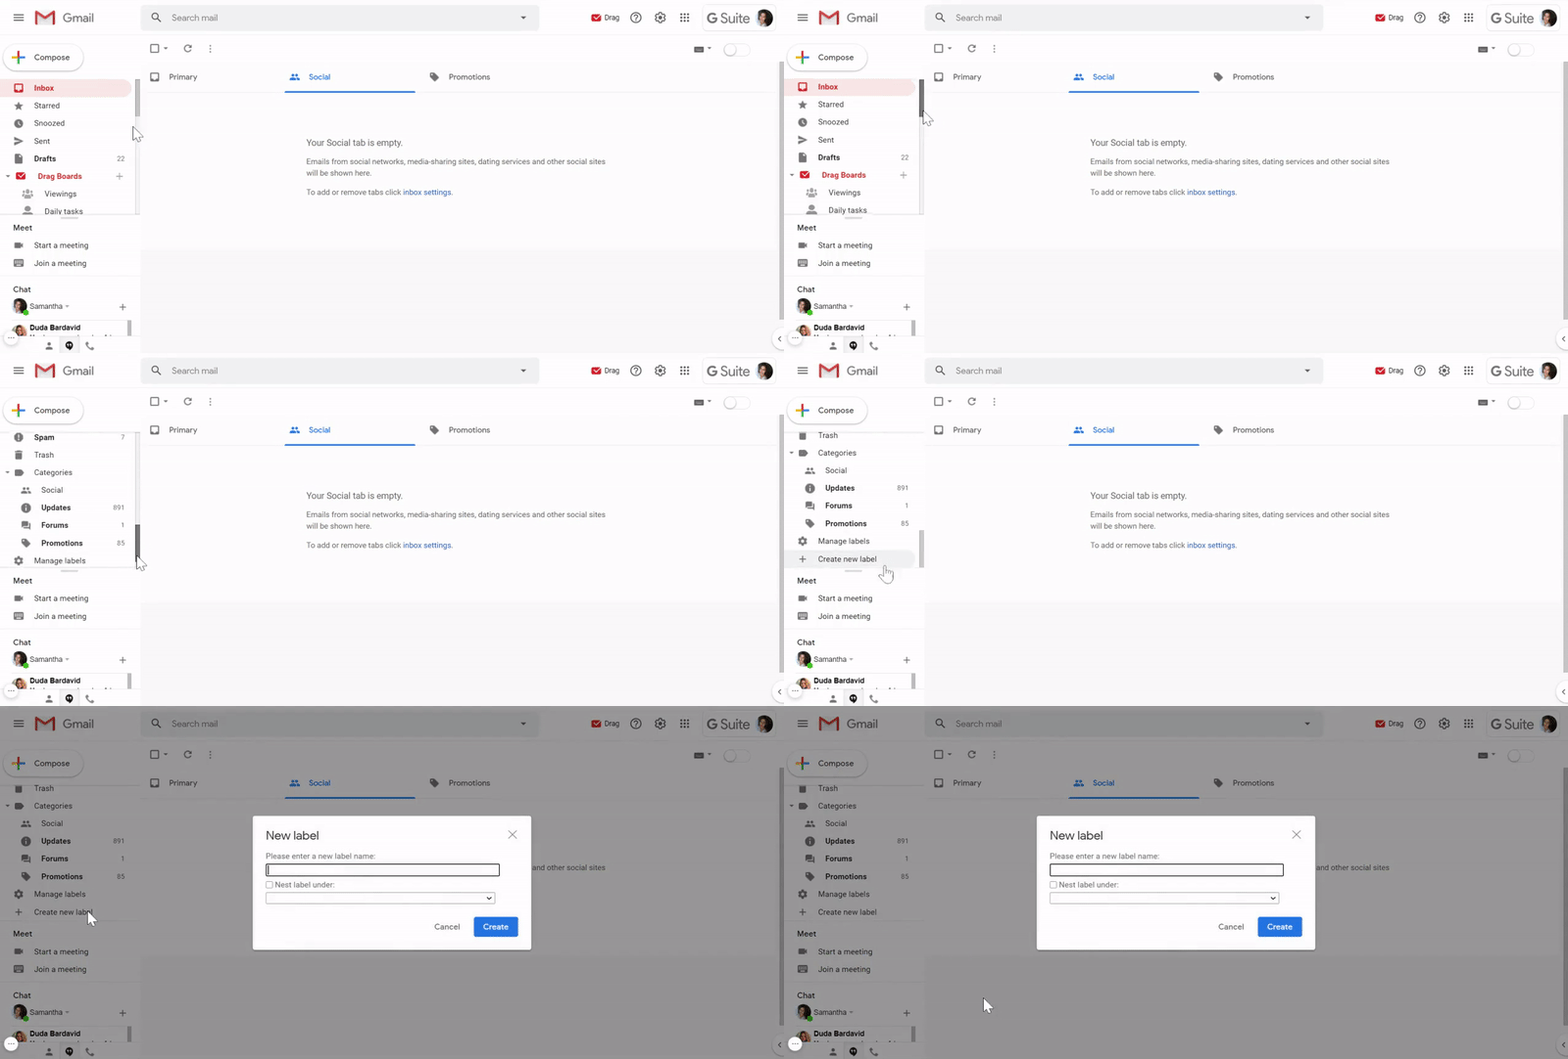
On the left side menu, scroll down until you find the button “Create new labelâ€. You may need to click “More†to display all the options on the menu, to locate this button. Click on it, and a pop-up to create the new label will appear.
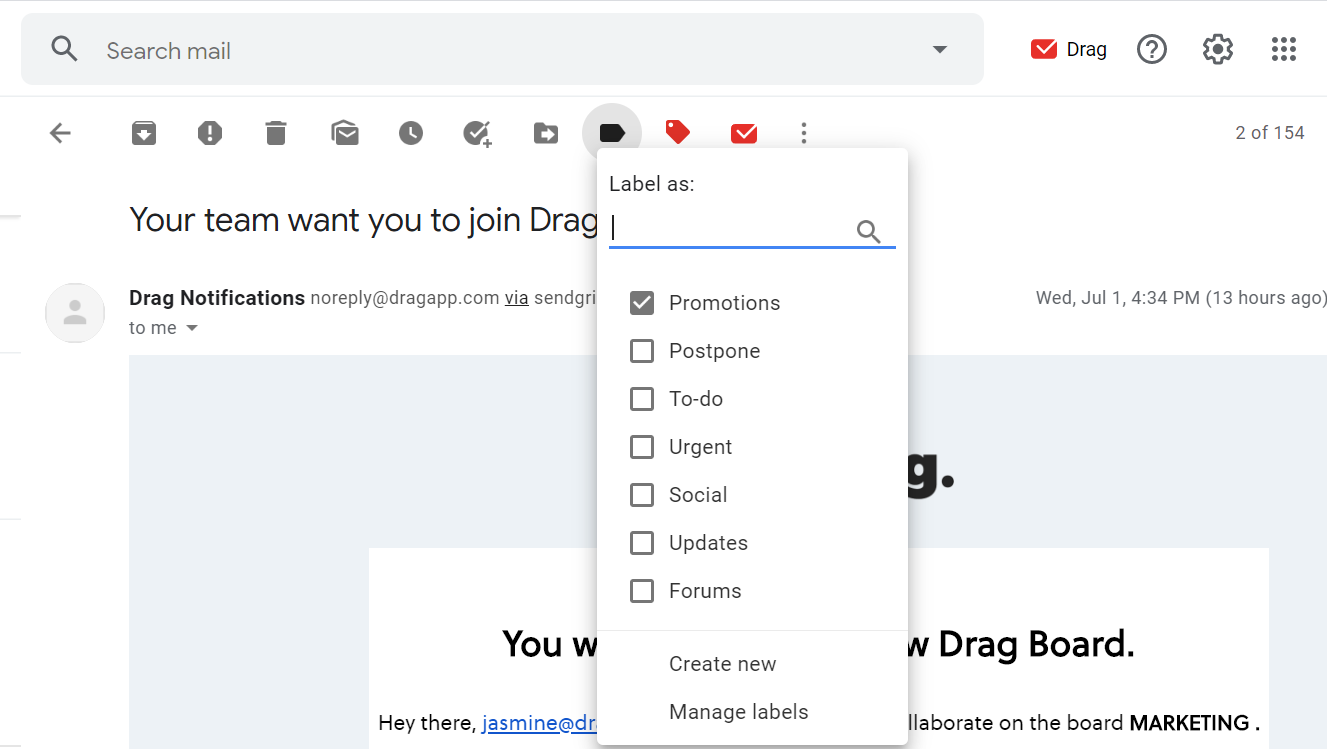
You can also label emails, by selecting them in your inbox. Once you choose emails, a toolbar pops up right under the search bar. Click the tag icon to show a drop-down menu with all the labels you have, and at the bottom, you will find the option to create a new label.

You can proceed the same way when you have an opened email:
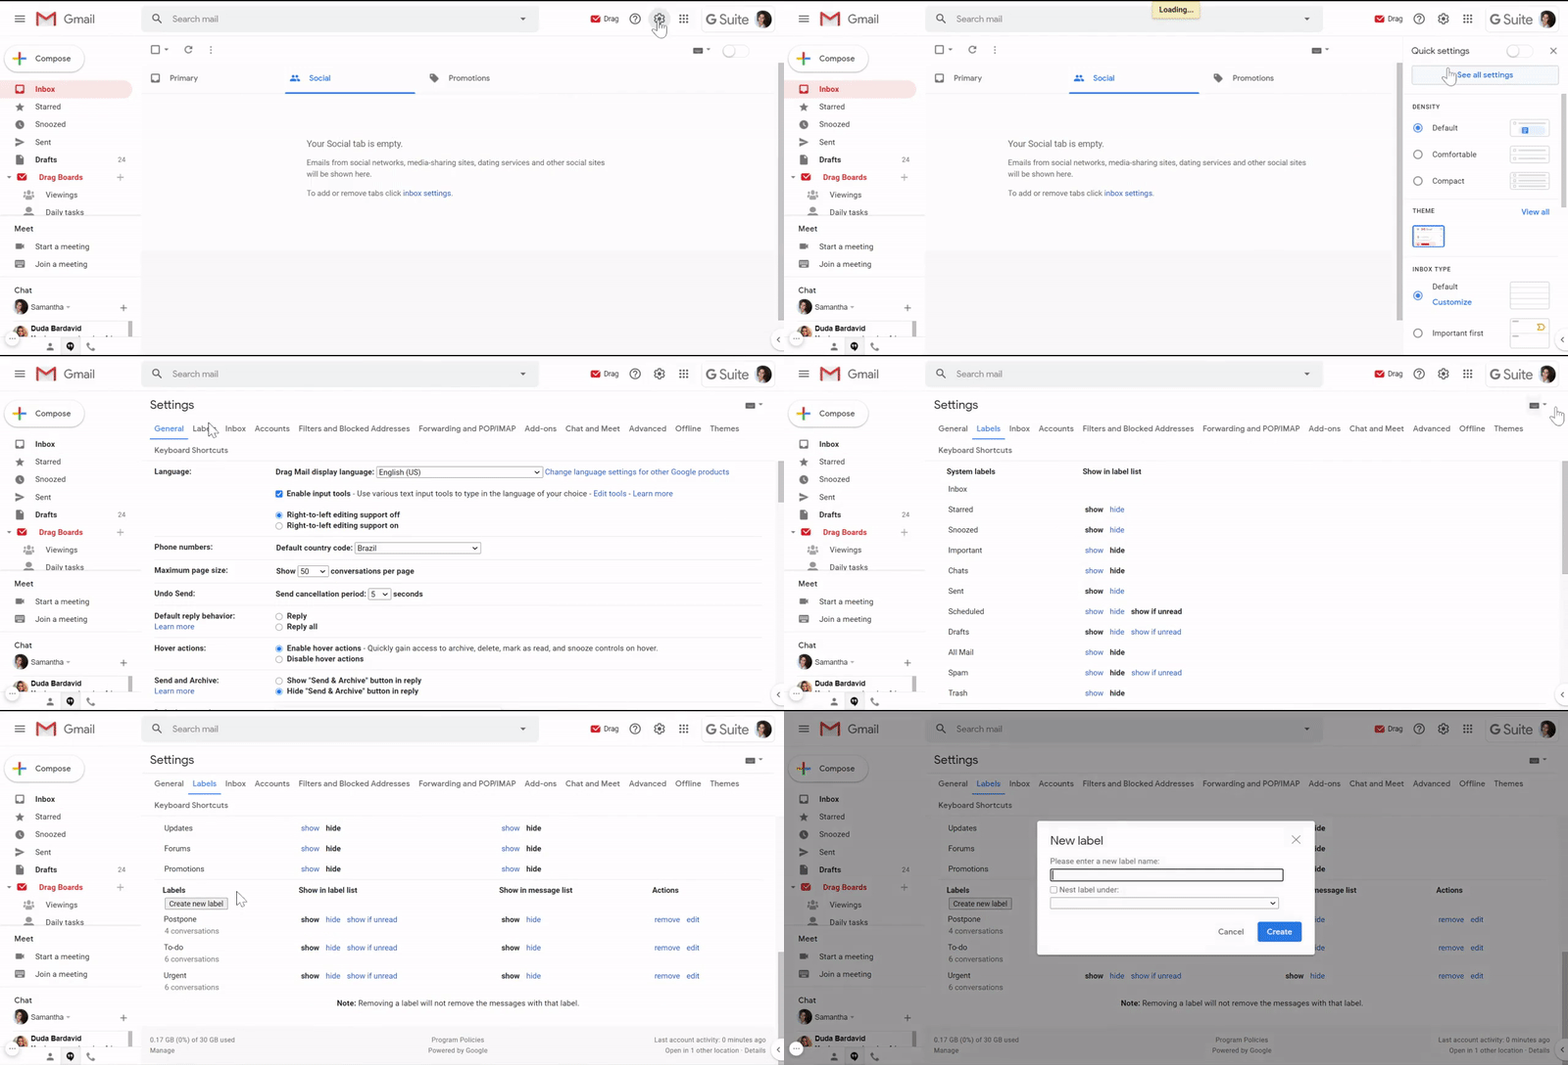
And the third way is not so simple as the previous one we have mentioned and requires many more steps. Mainly because you need to go to settings and start setting up labels on this section. Click the gear icon on your screen’s top-left corner, then hit “See all settings”.
Then select the tab Labels, scroll down until you find the button “Create new label”.
How to use filters to automate Gmail labeling
If you need to tag emails automatically as they arrive in your inbox, you can create a filter. Set the criteria you want to filter and then choose the action “Apply the label” and choose the desired one in the list.
If you want to apply the same action to existing emails don’t forget to also select the option “Also apply filter to matching conversations”. Otherwise, the filter will only start working when you receive new emails.
4. Build Gmail templates
Writing the same messages repeatedly can be not only exhausting but a time waste. And it’s also not necessary, because there is a resource right inside Gmail to help you create and send templates. Gmail templates were once called canned responses, but they are still a way of simplifying the contact with customers, and people to whom you usually need to send standard replies.
Before creating templates, you must enable them on Gmail settings. Follow these steps:
- Click on the gear icon (Settings) in the top right corner of your screen.
- Then click the button “See all settings.â€
- Select the tab “Advancedâ€.
- In the section “Templates†choose “Enable.â€
- Finally, click “Save Changes†at the bottom of the menu.
Once you save the changes, you can start creating templates, which is another simple process:
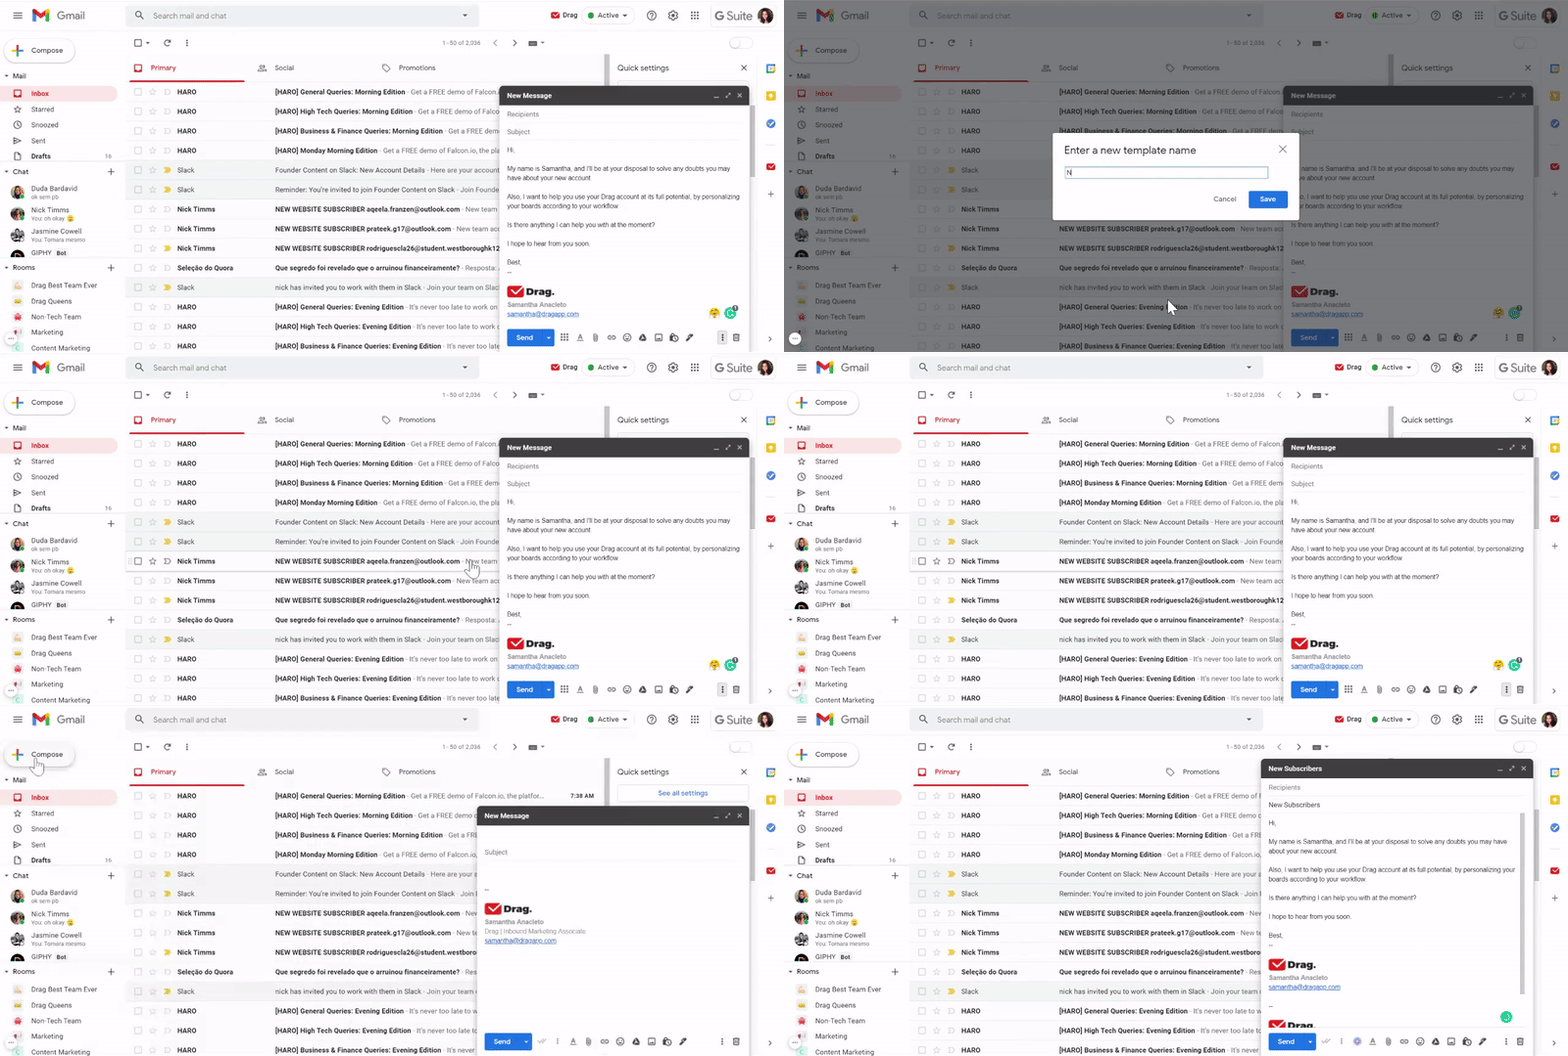
- Click the “Compose†button in the top left corner of your screen to open the New Message window.
- Start writing your email message and when you finish it, click on the three dots on the bottom-right corner of the compose window.
- Hover the option “Template†and next on “Save draft as template.â€
- Chose the option “Save as new template.â€
- Enter the name of the new template, then hit the save button.
How to send email templates
To send a new message using a template you will only need a few clicks:
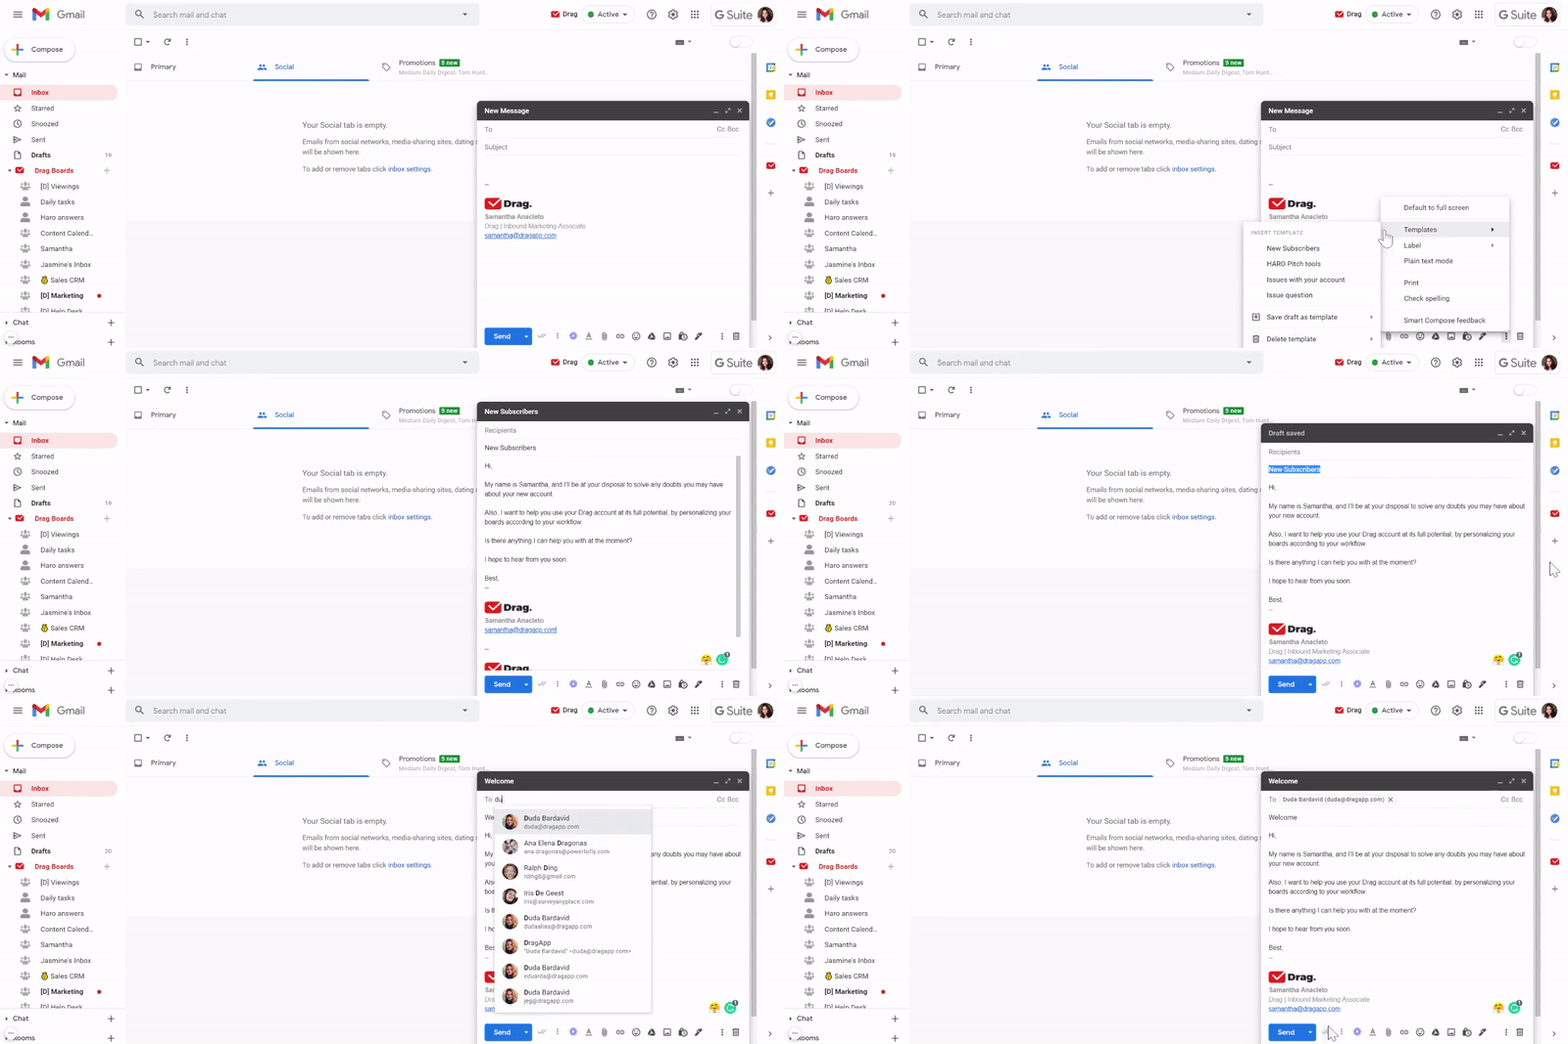
- Start a new email draft by clicking the “Compose†button.
- Click the three dots in the bottom right corner of the compose window.
- Hover the cursor on “Templatesâ€
- Choose the template you want to use.
- The template will appear on the compose window, and you will be able to edit it before hitting “Sendâ€.
5. Use auto-replies to automate Gmail
We can’t talk about Gmail automation without talking about auto-replies. You can also send automated emails in Gmail, by using the vacation auto-reply, or specific filters.
Vacation auto-reply
- In the top right, click Settings, then in “See all settings”.
- Scroll down to the “Vacation responder” section.
- Select “Vacation responder on”.
- Fill in the date range, subject, and message.
- Under your message, check the box if you only want your contacts to see your vacation reply.
- At the bottom of the page, click “Save Changes”.
Using filters and templates
If you are sure you can automatically send replies, and they don’t need to be customized, this option will be very handy. It’s possible to set a filter with an action to send a template automatically as a reply.
For example, if you want all the emails coming from a certain address to be replied to with a template, just type it on the first tab that appears when you create a filter. Then choose the option “Send template”, selecting the template you desire.
Wrapping up
Now you won’t need to wonder how to automated Gmail. Once you follow these strategies to automate Gmail you will realize how much time you will save to concentrate your efforts working on projects.
Nonetheless, you will have a much more organized inbox, being easier to find and share crucial information, giving more visibility to your email workflow.
The best way to automate Gmail.
Drag turns Gmail into your Team’s Workspace – One single place to support customers, manage tasks and close deals, from the place teams love: Gmail. We are a Techstars-backed Company, trusted by 30,000 users around the World.


