Google Workspace Email: A Complete Guide
Here is everything you need to know about the Google Workspace email, how to set it up and use it properly in your business.
Table of contents
- What is Google Workspace Email
- How to set up an individual email account
- How to create Email aliases in Google Workspace
- How to create Google Workspace group email
- Steps to Verify Your Domain for Google Workspace
- Powering up the Google Workspace email with Drag
- Wrapping up
- Take your experience with Google Workspace email to another level.
Google Workspace, formerly known as G Suite, is not just a new name for one of the most used business suites in the entire world. It integrates all the tools available for organizations in just one place:
"With secure, ad-free email as a foundation, you can also chat, make voice or video calls, and stay on top of project work with shared files and tasks — all right in Gmail."
It means that more than just an email server, Google Workspace offers a tool to centralize teamwork. That's why many organizations, searching to reduce the number of tools they use, opt for this Google suite. This article will guide you through totally understanding Google Workspace email, how to set it up properly for security and collaboration, ways of using it for group emails, and finally, how to power it up.
What is Google Workspace Email
Google Workspace email server is actually Gmail for businesses. Some people still don't know, but Gmail has two versions, which are the free one and the Google Workspace version. The difference is very simple. While normal Gmail is focused on being an email inbox, the business version offers collaboration and communication features in your inbox. Besides the Google Workspace Gmail offering collaboration features it also provides organizations customizable domains. So instead of having accounts like "peter@gmail.com", you can have business email addresses with "@yourorganization.com".
How to set up an individual email account
These are the steps the Google Workspace admin needs to follow because all the individual email accounts can only be created on the Workspace admin panel. More than just creating new user email addresses, to make Google Workspace a place for safe and effective collaboration with your team, it's necessary to set it properly.
1. Create user accounts
It's necessary to set up a Google Workspace account for each user in your organization who will use Gmail. Every time you create an account you need to provide a username, a temporary password, and an email address with your domain. Keep in mind that each account also counts as a license, so be aware of the limit of users your current plan offers you. Logged as an admin, add one user account, and open the Google Admin console and follow these instructions. Or if you have a large organization you can add users in bulk for up to a thousand accounts.
2. Set up MX records to direct your mail to Google servers
If you haven't verified your domain yet, you can use MX records to verify it and then set up Gmail as your professional email. If you already use an email with your domain, by setting it up you’ll start receiving messages in Gmail instead of with your old email provider. Notice that this process needs to be done after creating user accounts for people who will be using Gmail with your organization's domain. Related Post: How to Create a New Gmail Account Without Phone Number
3. Import users existing email to Google Workspace
If your users already use other email servers that are not Google Workspace, it's possible to redirect data to Google servers. For example, if your email data is on Microsoft Outlook, you can direct them to your new Google account. Thanks to Google support Drag created a migration guide that helps you move your organization’s data, such as email, calendar, contacts, folders, files, and permissions, to Google Workspace. You can also check Google's official support here.
4. Authorize your senders with SPF
The fourth step is to add SPF records to your domain's DNS settings. This will prevent spammers from making messages using your business address. Also, the messages sent from your domain won't be mistaken for spam. If you don't want your messages to clients and important recipients ending up in the spam folder, we highly recommend you add these SPF records.
5. Help prevent spoofing, phishing, and spam in your account
Besides adding SPF records, you can also set up other protections against forged spam and spoofing. Google has a complete guide teaching how to set up Gmail authentication, with SPF, DKIM, and DMARC.
6. Add your other domain names
Some organizations own multiple domain names, and it's possible to add all of them to your Google Workspace account. By doing this, the users can own an email address at just one or more of your domains. Related Post: How to Use Gmail for Business Email
7. Set up integrated Gmail for your organization
Besides accessing and handling email messages, Google Workspace email users can also have chat, tasks, and video meetings in Gmail. Instead of using a third-party tool for chatting with your team, you can use Google Chat right in Gmail. For that, you need to turn on Chat and opt into Chat preferred in the Admin panel, by going to Apps > Google Workspace > Google Chat: 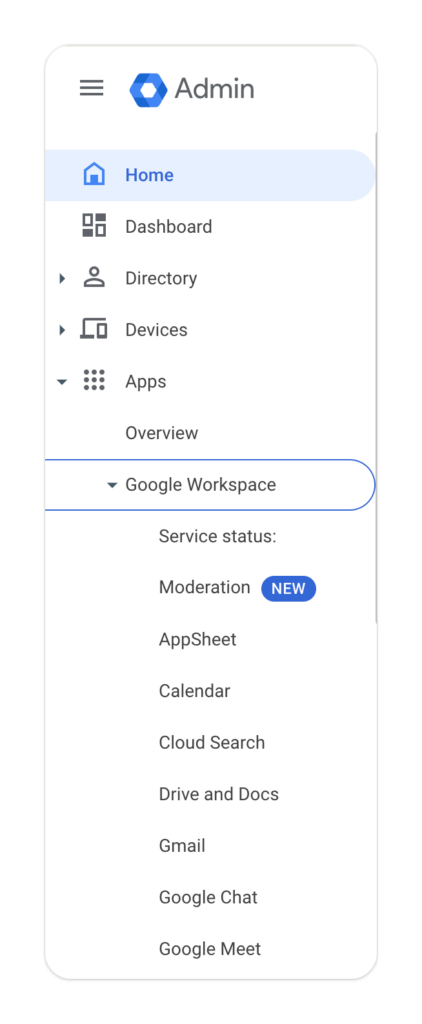 Then have your users turn on Chat in Gmail on each one of their accounts by going to Gmail Settings > Chat and Meet:
 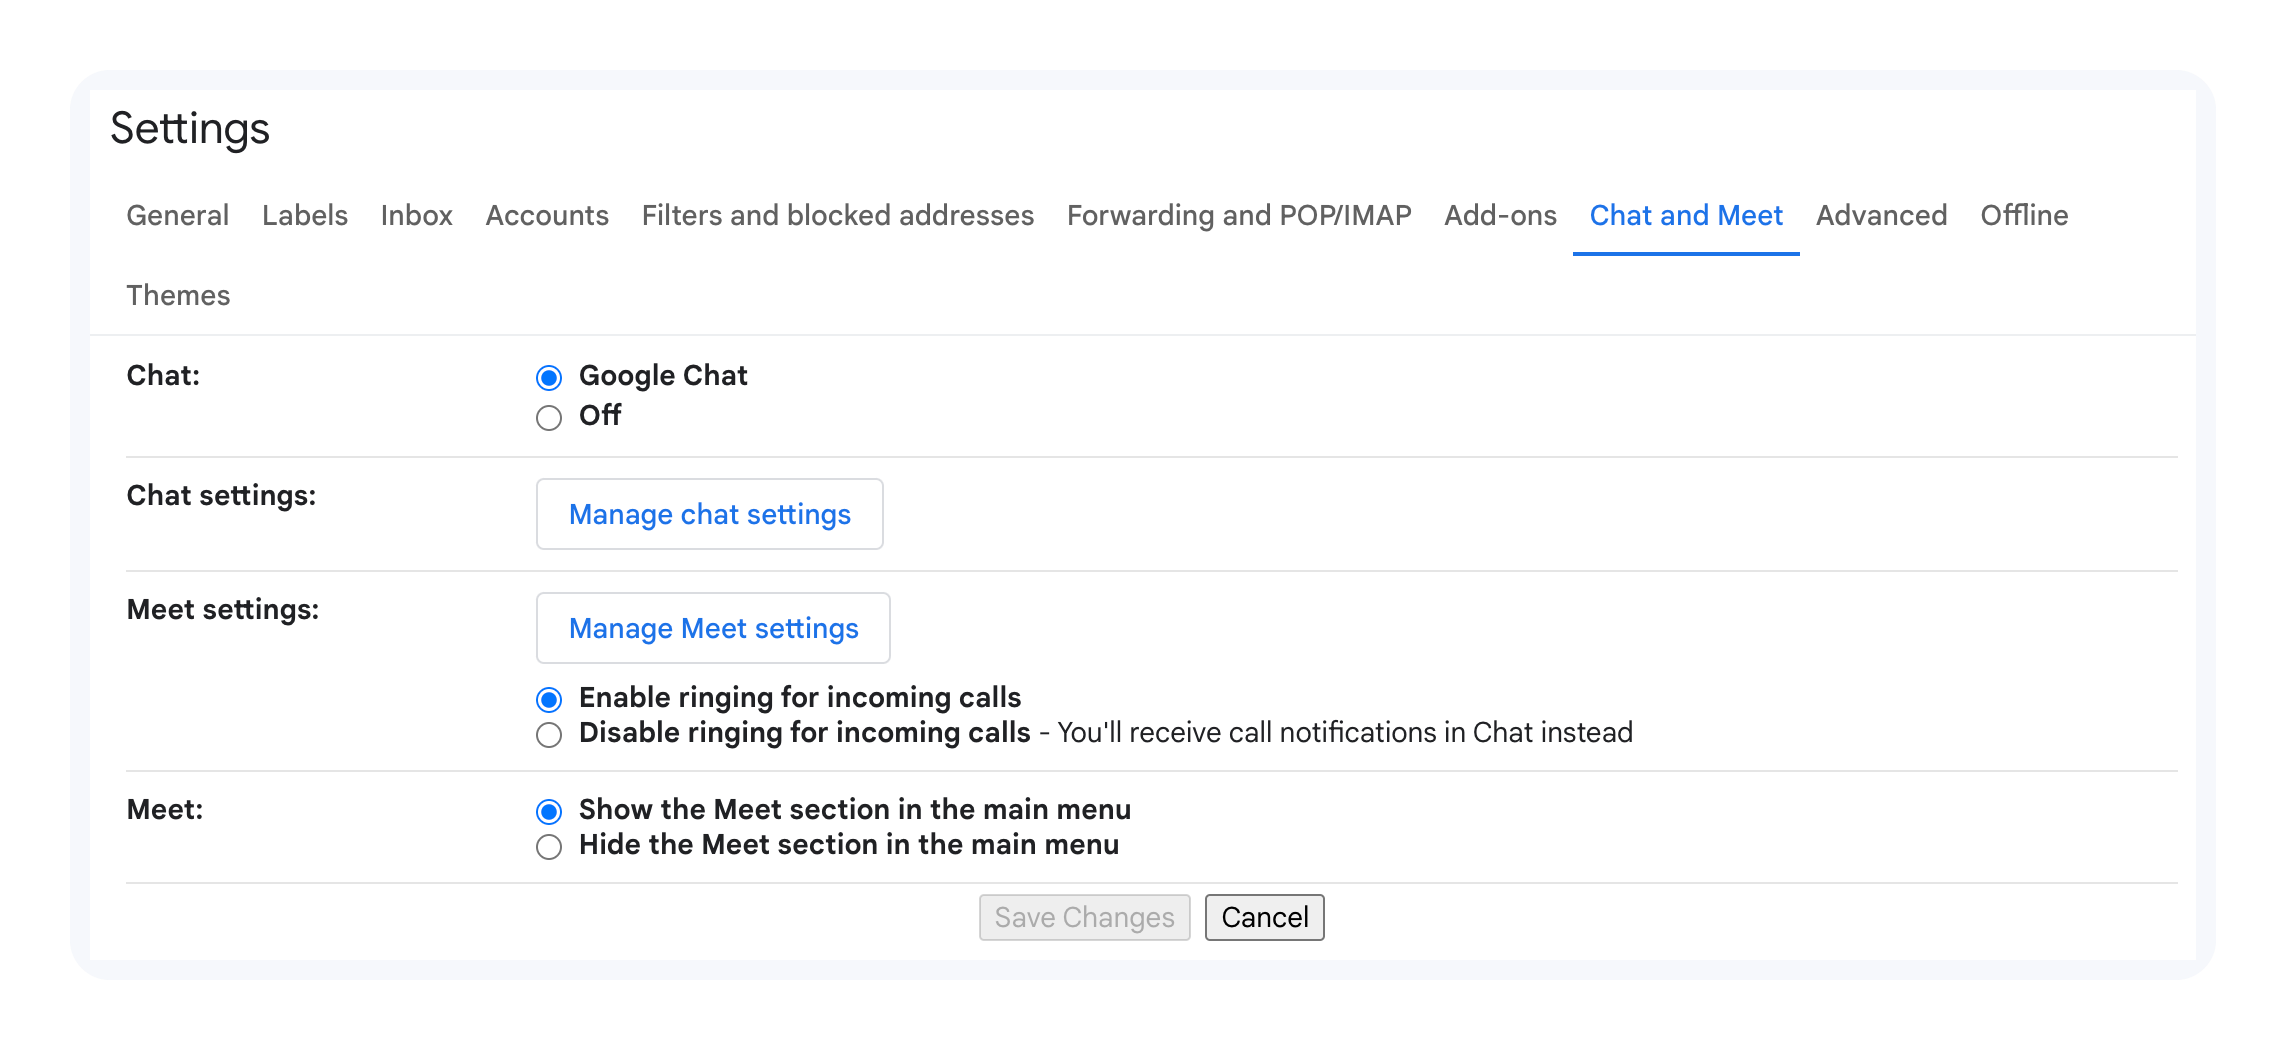 The same applies to Google Meet: if you want it displayed in your Gmail sidebar, and easily create and access video meetings in Gmail, turn it on in the admin console. Don't forget to ask the users to go to their Gmail settings, and choose to show Meet in the Gmail sidebar. And users don't need to leave their inboxes to manage their schedules in Google Calendar. You can choose to show upcoming meetings and appointments in My Meetings, by turning on Calendar. Notice that if Calendar is off, for Gmail, your upcoming meetings won't show in the Meet tab but users can still create and join meetings. Drive is also another integration with Gmail you can use in your Workspace account. This integration lets your users store and share files from their account, and upload files to chat rooms in Gmail. In the admin panel turn on Drive and Docs to make it possible, and let the users know the need to turn on Drive and Google Docs to view or edit files shared in chat rooms. At last, to collaborate with your team using tasks in rooms, turn on Tasks for your entire organization, not just for a set of users.
How to create Email aliases in Google Workspace
Google Workspace email aliases are a helpful way for individuals to receive mail sent to another address all in one place. For instance, aliases are useful for sales and support staff who want a memorable, public email address. You can also use an email alias to send emails from a different address or alias. First of all, we need to emphasize that only Google Workspace administrators can create email aliases. It's possible to create email aliases for a user so they can send and receive emails from another address at your domain. Every user in a Google Workspace account has a primary address for signing in to their account and receiving mail. If a user wants another email address, you can create an email alias for them. For example, helen@dragapp.com from the HR team wants a separate email address to receive job applications. The admin can set up the email alias careers@dragapp.com. Any email sent to either of the two addresses will go directly to Helen's inbox. You can add up to 30 email aliases for each user at no extra cost. Users must continue to sign in to their Google Workspace account with their primary address, not their email alias. Similar Post: Contact Management in Google Workspace
AI Platform
The inbox your team and your AI work in together
Shared inbox, live chat, and AI in Gmail, with an MCP server your AI tools can drive.
How to create Google Workspace group email
It's also possible to create groups for departments, teams, or other groups of users in your organization, and then add members either in your Admin console or Google Groups. However, only groups created in your Admin console can be used as a configuration group. A Google Workspace group email can be used for communication or collaboration between teams. With a group users can:
- Send an email to all group members with a single address
- Invite group members to a meeting
- Share content with members, including documents, sites, videos, and calendars
- Participate in discussions or a Collaborative Inbox at Google Groups (requires turning on Groups for Business)
- Feature or service configuration
This is the step by step to create a group in Google Workspace:
- On the Admin console Home page, go to Groups.
- In the upper left corner, click Create group.
- Enter the following information: Setting Description, Name, Name that identifies the group in lists and messages.
- Click next.
- Choose settings for each category of users. These settings will define the user permissions in the group. It's also possible to set role-based permissions for the group in Google Groups, groups.google.com.
- Click Create Group.
- Then add the group members
You can also use Google Groups to create Google Workspace email groups, but this option requires turning on Groups for Business in the admin panel. Google Groups provides additional features for groups such as a collaborative inbox, where members with permissions can assign conversations to each other, then track the status of a response. You can also use Google Groups to add features to a group such as a welcome message, message moderation, auto-replies to group messages. Here is the step-by-step to create a group in Google Groups:
-
Sign in to Google Groups.
-
In the upper left corner, click Create group.
-
Enter information and choose settings for the group, and click Create group.
-
Wait for a while before sending a message to the group, because it takes a couple of minutes for it to be available.
Steps to Verify Your Domain for Google Workspace
Domain verification is a crucial step in setting up Google Workspace. It confirms your domain ownership and prevents unauthorized use.
Follow these steps to complete the process:
Step 1: Access the Google Workspace Admin Console
- Log in to the Google Workspace Admin Console (admin.google.com) using your administrator account.
- Look for a notification on your dashboard about domain verification.
Step 2: Navigate to Domain Verification
- If you see the notification:
- Click "Verify Domain" directly from the notification.
- If you don’t see the notification:
- Go to Account > Domains > Manage Domains.
- Find your domain and click "Verify Domain".
Step 3: Get Your Verification Code
- In the Admin Console, click "Next" on the welcome message.
- Click "Verify" to proceed.
- Select "Continue" to verify your domain using a TXT record (the most common method).
- Copy the TXT record (verification code) provided by Google.
Step 4: Add the TXT Record to Your DNS Settings
- Log in to your domain registrar’s website (e.g., GoDaddy, Hostinger, Squarespace).
- Navigate to the DNS management or DNS editor section (location varies by provider).
- Add a new TXT record with the following details:
- Type: TXT
- Name/Host:
@or leave blank (represents the root domain) - Value/Content/Record: Paste the verification code from Google
- TTL (Time To Live): 3600 (or use the registrar's recommended value)
- Save or apply the changes.
Step 5: Complete Verification in Google Workspace
- Return to the Google Workspace Admin Console.
- Click "Verify My Domain" or "Protect".
- Google will check for the TXT record to confirm ownership.
- Wait for verification to complete (this may take a few minutes).
- Once successful, you’ll see a confirmation message with a checkmark
Powering up the Google Workspace email with Drag
Drag is a shared inbox tool that works inside Gmail. This means you and your team can collaborate inside your Google Workspace email inbox, to improve the process you have to perform together, and also eliminate possible obstacles you may be facing lately. A shared inbox allows a team to share an email address -such as sales@ or support@- without the need for everybody to use the same account. Each person works from their own accounts and has shared boards that load emails from the aliases we've mentioned. In Drag boards, everybody in the team knows exactly what each of them is working on at the moment, avoiding misunderstandings, duplicated answers, and other common mistakes during teamwork. Besides that, with a shared inbox, you can stop using Gmail “FWD”, “CC’s, and “BCC’s”, since everybody receives the emails in real-time on the collaborative inbox. But Drag is not just a shared inbox, it also offers a bunch of features that can help to improve your workflow. Let's check all of them Similar post: Google Workspace Email Forwarding
Customizable view
In Drag, you can have the Kanban View in your boards, which turns your inbox just like Trello. Inside each Drag board, you can create columns, which will have names with stages that your tasks and projects usually go through while handling emails. By default, you have three columns named “To-do”, “Doing” and “Done”, which are the simplest stages for task or email management. Inside these columns, you can create cards containing tasks. Emails also arrive as cards inside the team shared inbox. Easily drag and drop these cards between columns to keep track of your progress, and let your teammates know in what emails you are working on. You can also add tags to your emails, with key information your team will understand with just a glance. And even add a color code, defining certain colors for more urgent cards. 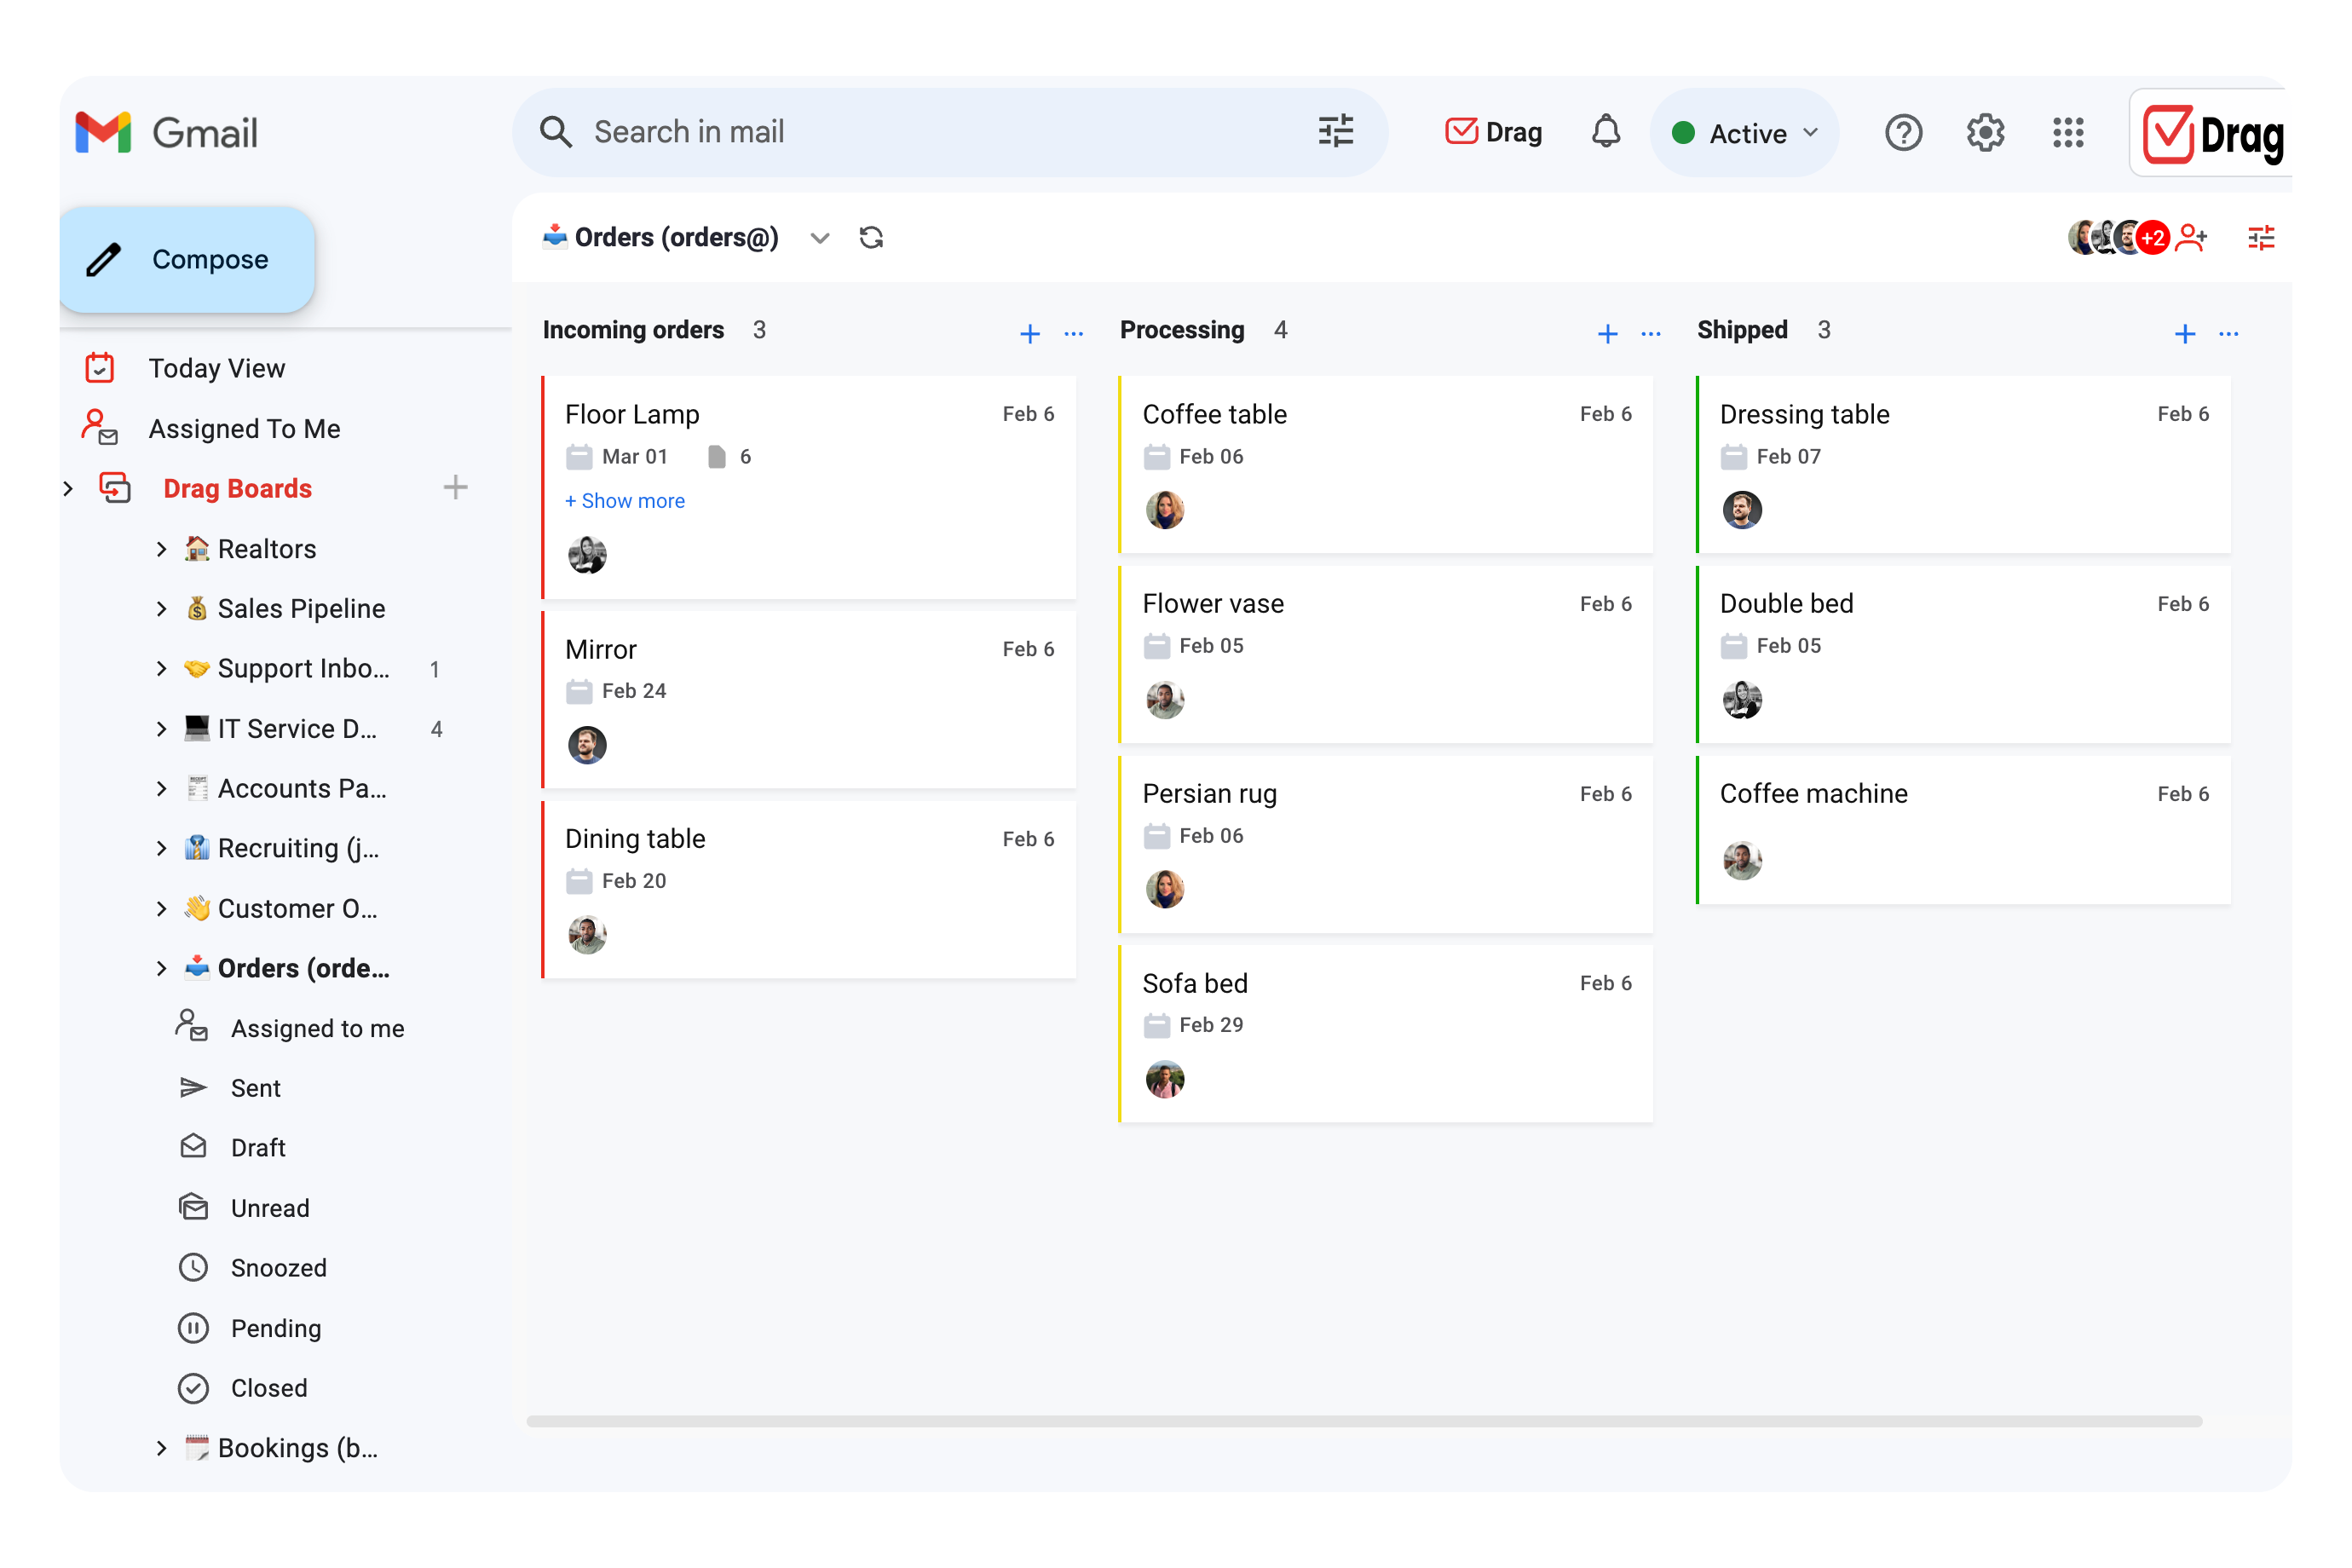 As an example, take a look at the image above. If you work with customer support, you can automatically turn emails into tasks or tickets, and manage them while they go through different stages. Then add tags with the kind of issue the customer is facing and color code the cards according to the time zone the customer is based, so you can know exactly when to get in touch with them. Related Post: Email Management Best Practices
Integration with Google Calendar
It’s common to have deadlines for certain tasks while working on a team. On native Gmail, you don’t have the option of setting due dates inside an email. But with Drag every time you set a date and time to a task or email it’s automatically added to your Google Calendar. 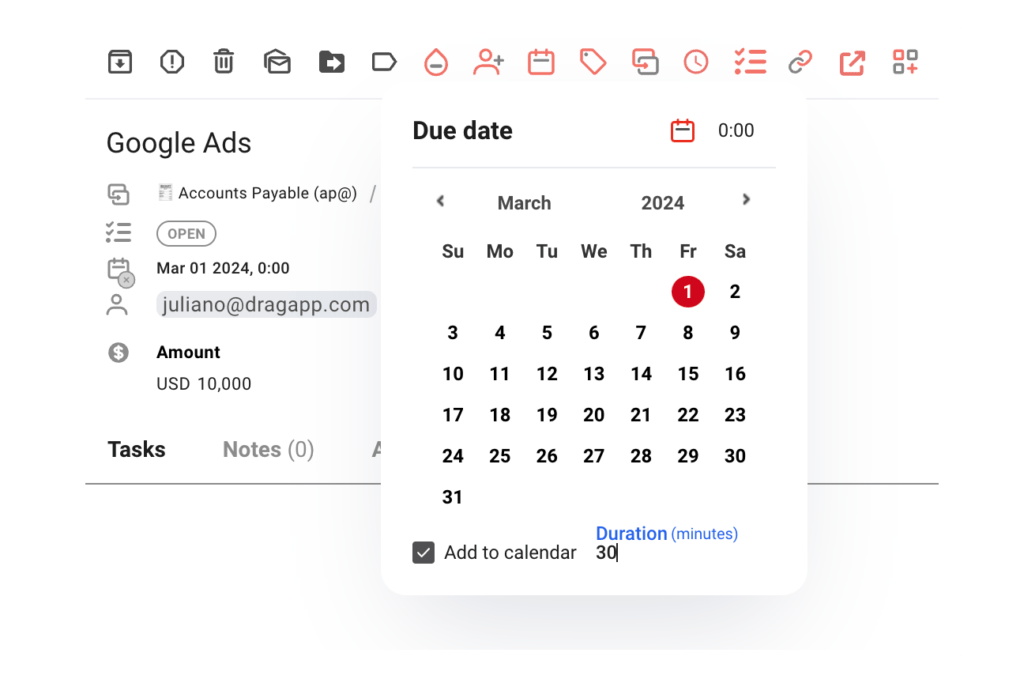 The due dates are displayed on your cards, so your team never misses a deadline.
Workflow Automation
You can stop doing so many manual steps while handling your inbox. With Drag you can preset rules to automate your whole workflow, according to all your needs. 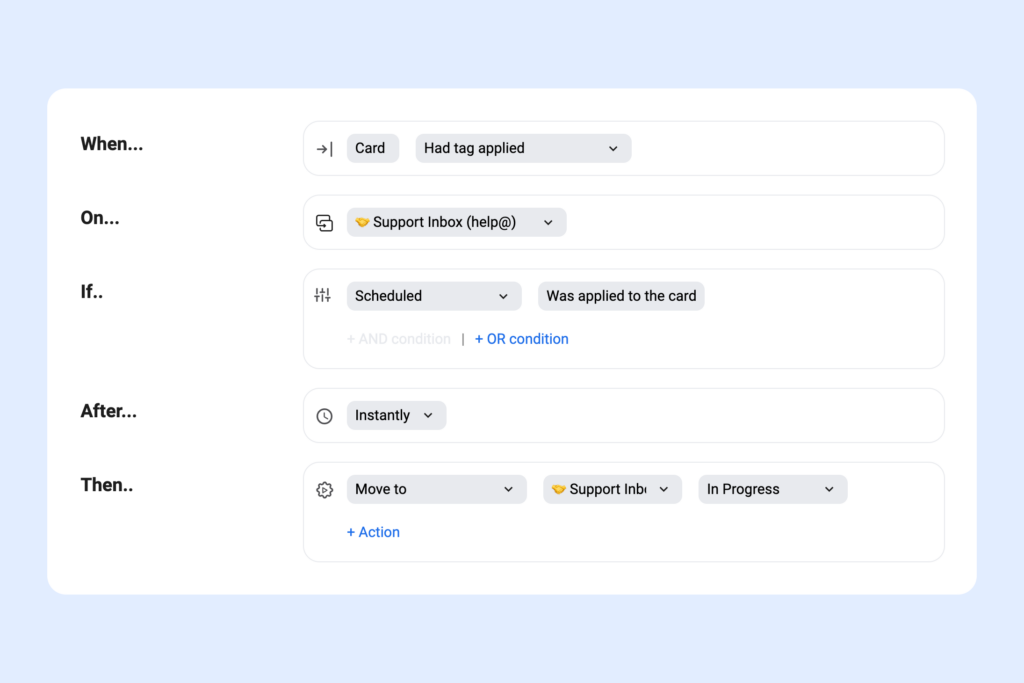 For example, you can pre-determine which emails will load to a board, according to the sender's email address, or the subject. It's also possible to apply tags automatically based on similar parameters. Related Post: Google Workspace Project Management Apps
Email Delegation
With Drag you can easily assign emails and tasks to other team members, with just a few clicks. For that, the person you need to delegate the card must be in the same shared inbox as you.
Group Live Chat
Drag also offers a chat inside your inbox, so you can communicate seamlessly with your team. 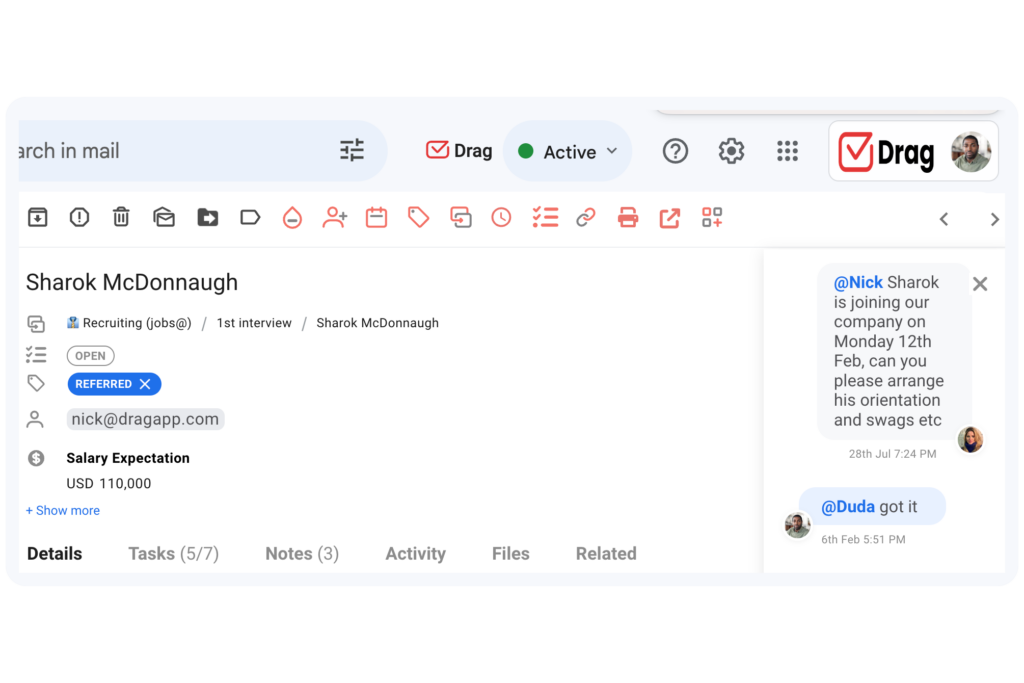 In addition, it’s possible to mention people inside the chatbox, so they will receive an email notification with a direct link to the conversation. They will be sent to the specific card you started the chat with.
Wrapping up
Now that your Google Workspace email accounts are all set up, you can enjoy a complete collaboration suite, where your team will be able to manage more than emails. Having all that you need in just one place can highly increase your productivity and speed up your work. And when you add a shared inbox to all of these aspects of Google Workspace, you can create the perfect centralized workflow. Consider powering up your Workspace account with Drag. You will definitely experience a huge enhancement in communication and teamwork with all the available features.
Take your experience with Google Workspace email to another level.
Co-founder
Building Drag for nearly ten years: shared inboxes, boards, and now the AI and agent layer, all on Gmail, plus HeyHelp for the personal inbox. Writes the honest versions of the comparisons.