Google Drive: The 2026 Definitive Guide
Start using Google Drive at its best potential. Understand how it works and all the great tips you can use on this definitive guide.
Table of contents
More than just a cloud storage tool that frees your computer from having lots of GBs, Google Drive is a platform that unites all the Google Workspace apps. It's where you can use everything you need for work: Google Docs, Google Sheets, or Google Slides and also store them. This Google Drive guide will teach you more about the advantages of using this Google storage app, how you can use it the best way possible, as also tips and tricks to make your life a lot easier.
What is Google Drive exactly?
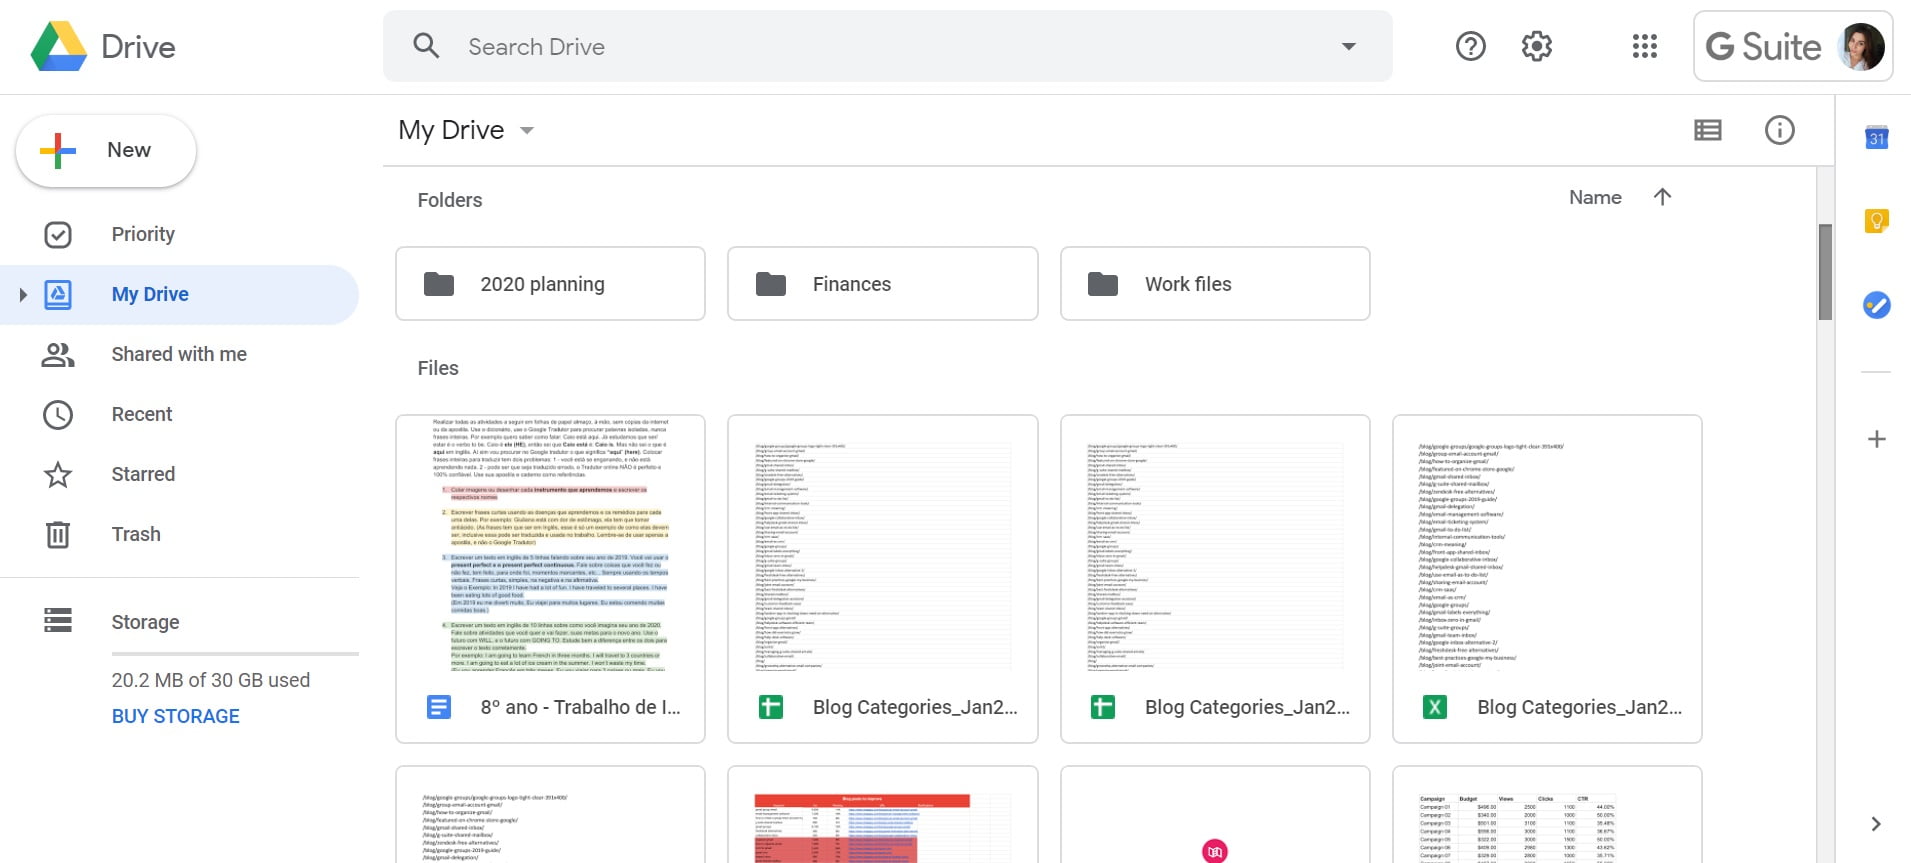 Google Drive is part of Google Workspace, and it is responsible for synchronizing your files between different devices and the internet, in its storage space within Google. All that simply using your Google account. With Google Drive, you can upload your files, create new ones inside folders, and also download from the app to your computer. It's an amazing integration that at the same time frees you from having a lot of files on your HD, also allows you to have your things online to be accessed anywhere, any time. Along with all these aspects, Google Drive is one of the best free cloud storage services on the market, mainly because it offers 15 GB, against 2 GB from its biggest competitor Dropbox. Paid storage starts with Google One at $1.99 per month for 100 GB on personal accounts, while businesses get pooled storage through Google Workspace plans from $7 per user per month.
Reasons why to use Google Drive
There are lots of benefits to using Google Drive nowadays, not only for personal reasons but also for work. When you migrate to a cloud storage system, you become freer to take your files with you, without the need for carrying your computer around with you, for example. This is just the tip of the iceberg of how great Google Drive can be. Let's see all the reasons why you should start using this Google app as soon as possible.
Mobility
The most valuable benefit of having everything you need in the cloud is to access your files anywhere you need to. The only thing you need is to log in to Google Drive with your Google account on the desired device. You can work anywhere you need to, without worrying about remembering to share your files to a pen drive or external HD. Sometimes when you need to present at a meeting, this aspect can be very useful. But be careful to always log out of the device, when it is public or it doesn't belong to you.
Synchronization
This is related to the mobility Google Drive allows you to have. Mostly because it can keep your documents synchronized in different devices with the help of the internet. You can also upload the files from your computer, cellphone, and others to Google Drive with the automatic sync.
Collaboration
The Google Workspace apps were created with this amazing feature: collaboration. With regular computer software, you need to follow many steps to share a file with someone such as uploading to an email attachment. Google thought about this particular pain and made our lives a lot easier while using its apps. With Google Drive, you can collaborate in many forms, from sharing a whole folder or specific files. This can be a great way to store your company files and allow your team to collaborate, saving time and money you would spend with an internal system.
Intuitive interface
Google's interface is always simple and intuitive, and with Drive, it couldn't be any different. It's really easy to learn how to use it. Besides that, when you are not sure what a button does, you can just hover over it. Then its name will appear, usually, a name that explains what the action will be triggered when you click on it.
Ways of using Google Drive
There are two ways of accessing Google Drive. The first one is through synchronization with your computer (Windows or Mac), by downloading the app. The second one is through a web client, just accessing the website. Notice that both of the options require a Google account.
Accessing through the app
Some people may not know this yet, but it's possible to install the Google Drive app on your computer. Google's desktop client is Drive for desktop, which streams files on demand or mirrors chosen folders locally, replacing the retired Backup and Sync app. To download the app just log in to your account, and in the superior menu on the right, click on Settings (represented by the gear symbol). Choose the option Get Drive for Desktop. Or you can just access google.com/drive/download/ and download it directly. On this page, you can also access links to download it for Android or iOS.
How to install the Google Drive app
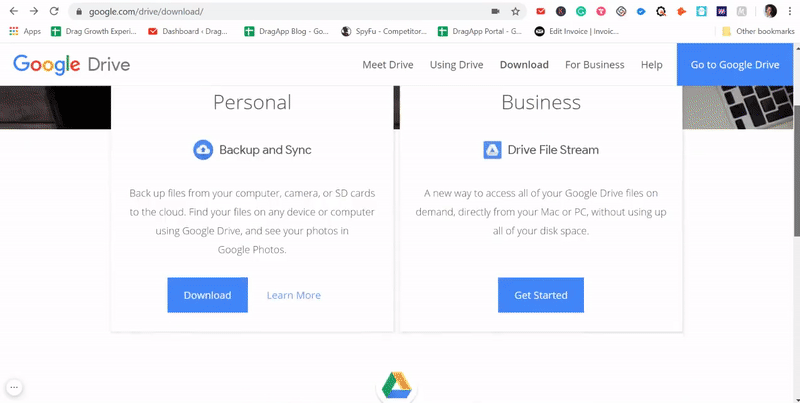 After choosing between Personal and Business apps click on Download. You need to accept the Terms of Service first, then the download will start. Click on the installer to start the installation, which will last around 2 and 3 minutes. Then a configuration window will appear and the first step is to log in to your Google's account. You can choose to log in directly to the app or your browser.
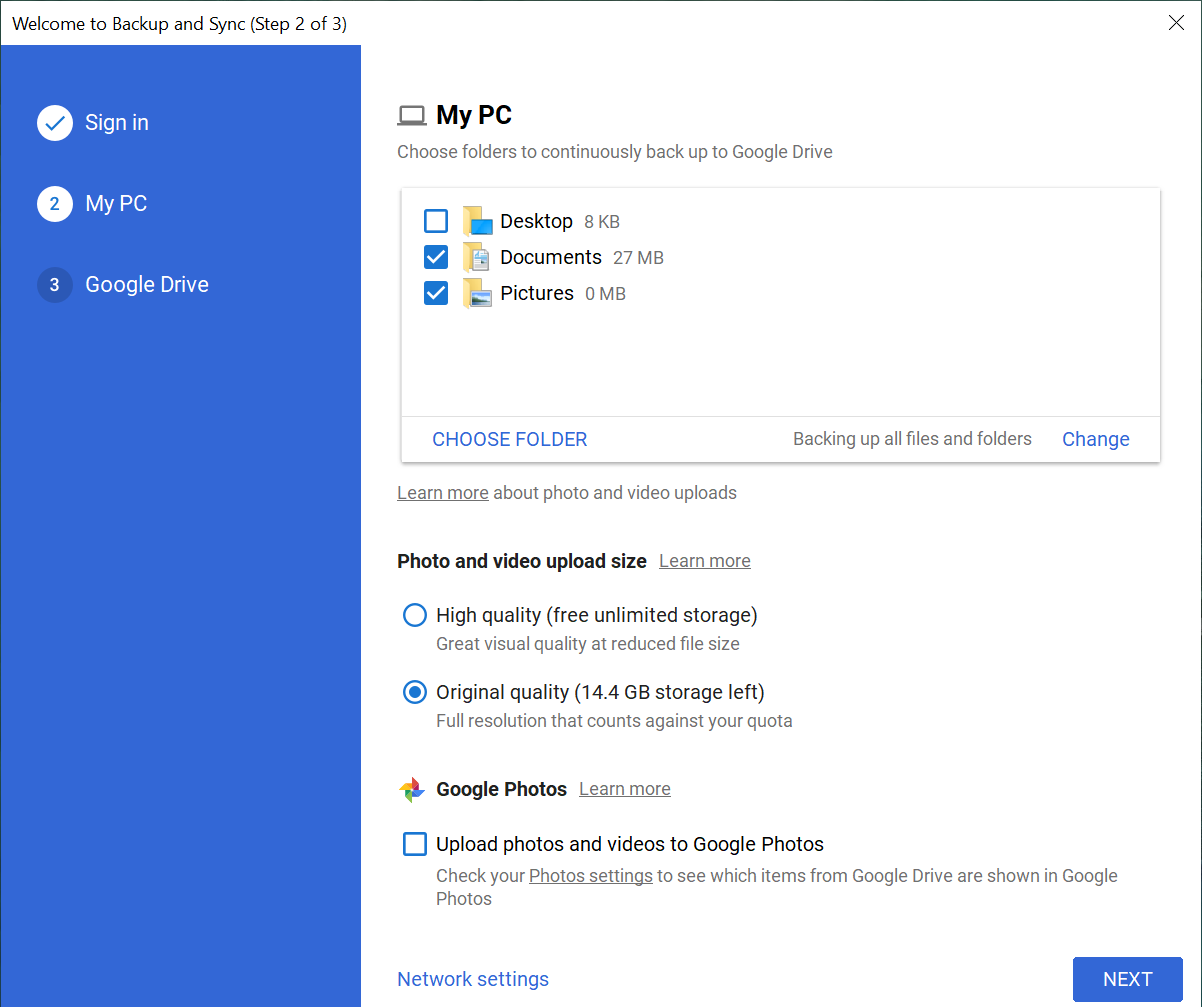
 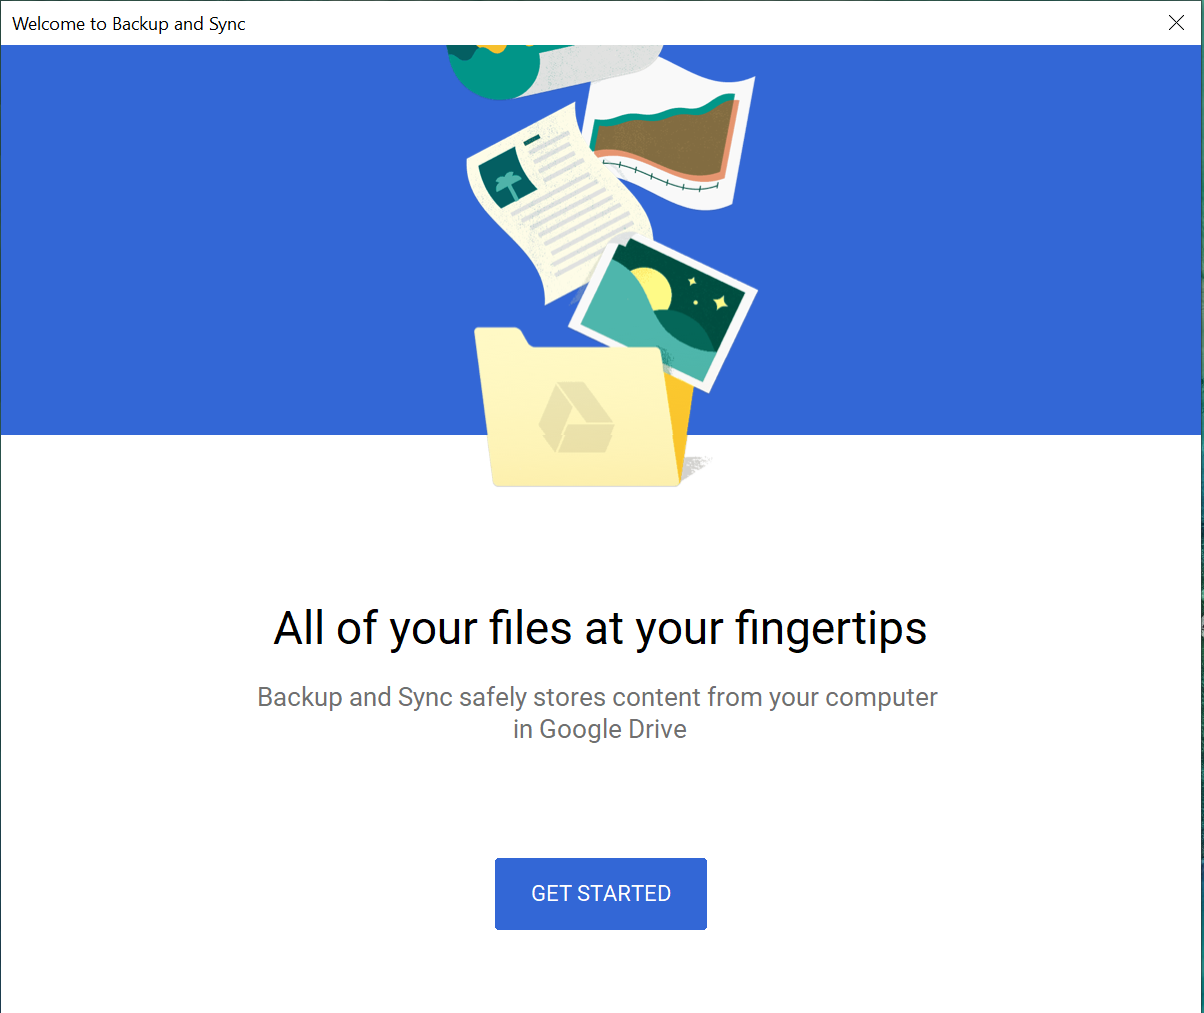 The second step consists of choosing the folders you want Drive always to back up. If there are photos and videos included on these folders you can choose the size they will have after the upload: High quality or Original quality. Furthermore, you can also choose to upload photos and videos to Google Photos.
 The third and last step consists of setting the Drive folder on your computer. You can select the option to sync your Google Drive to the computer if you want, which is highly recommended. It's also possible to change the folder location. Moreover, you can select the option to sync everything in your computer, or just some folders. The last option is valid when you don't want to mix work with personal files, for example.
 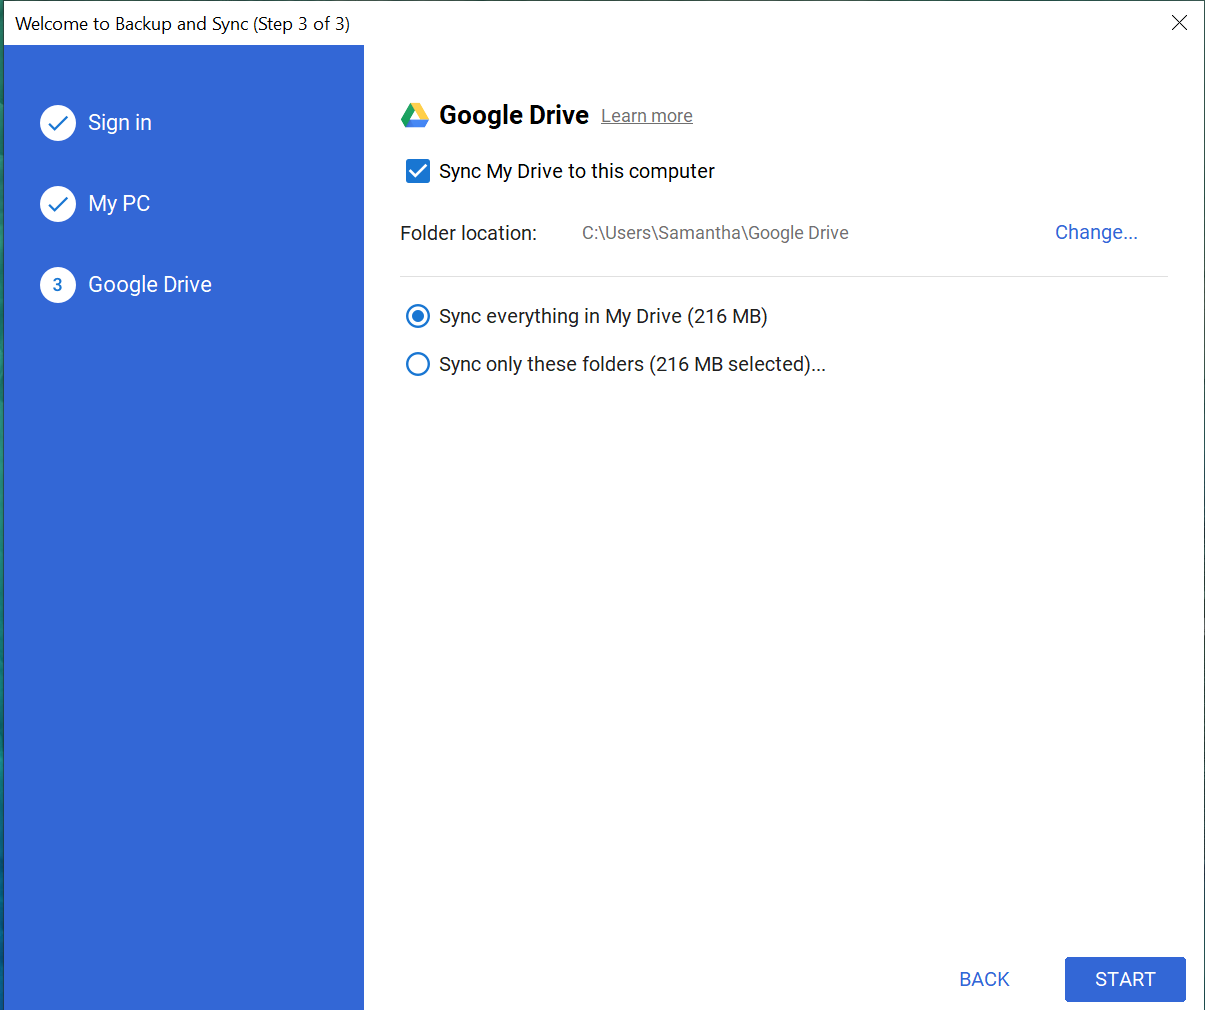 On your notification bar, next to the clock, there will be a new cloud icon with an up-arrow. Click on it to see the synchronized files. You can also use shortcuts to visit Drive on the web browser, open your Google Drive folder on the computer or visit Google Photos on your computer.
 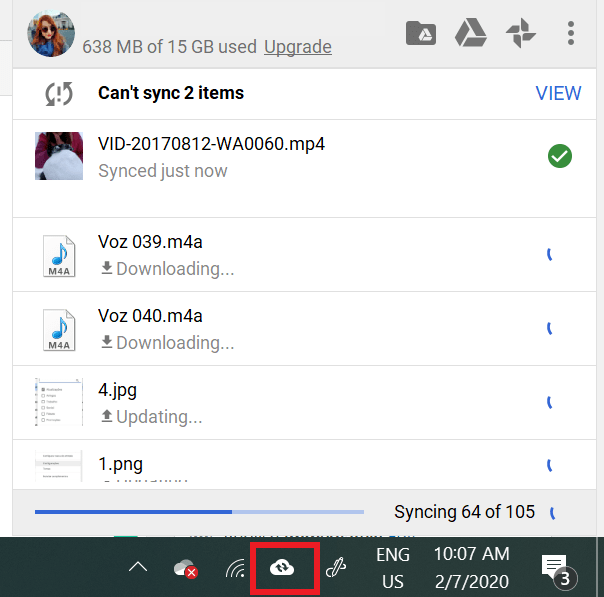 Besides that, you can click on the three dots to manage Drive for desktop. You can pause a synchronization, edit the preferences, add a new account, or quit the app. Another thing you can control on preferences is the available space on your Drive, proxy settings, as also bandwidth settings to upload and download.
Accessing through the web
If you want to access Google Drive on your browser, you just need to type the address https://drive.google.com/. Here is a list of the browsers that work well with Drive:
- Chrome
- Firefox
- Safari
- Microsoft Edge
Be aware that other browsers can present limitations and bugs. Also, the offline editing mode is only available on Google Chrome.
AI Platform
The inbox your team and your AI work in together
Shared inbox, live chat, and AI in Gmail, with an MCP server your AI tools can drive.
Google Drive Tips and Tricks
Now that you know everything about the basics of Drive, it's time to get some advanced tips and tricks that will help you to use the best way possible.
Two-step verification
Your security on Drive depends on your Google account being secure. You don't want any of your files to be accessed by some stranger, right? Fortunately, there is a simple solution you can count on to fortify your account security: the 2-step verification. It consists of confirming twice that it is you accessing the account. The first step is your password, which needs to be as strong as possible, with numbers, upper and lower case letters, and symbols. The second one is an additional security layer that can be a code sent to your cellphone, for example. You can set up your 2-step verification here. It's necessary to have your cellphone number next to you, so you can receive a code through text or call. 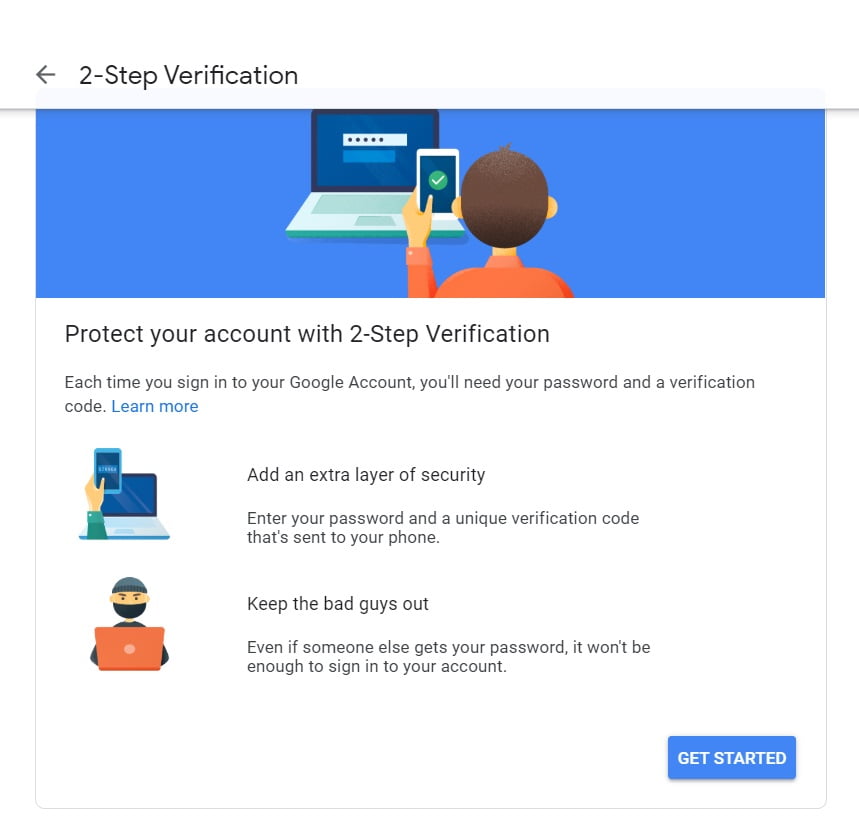
Upload existing files
There are a lot of documents, texts, photos, and spreadsheets on your computer that you may want to upload to Drive. And the process is really simple. Learn how to do it in the different channels of Drive.
Upload through the web browser
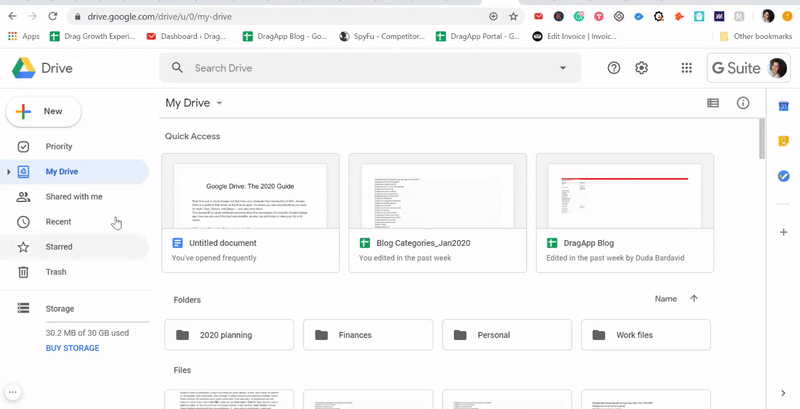
When you click on new you can import single files, or even whole folders at once. Just choose the file(s) or folder(s) from your computer and click on "Upload". A pop-up will open to confirm if you trust the files you want to do this process. After your confirmation, the files or folder will be added to your Google Drive.
 Furthermore, you can choose if you want just to store the files or convert them to the format Google uses on its apps, such as Docs and Sheets. To do that click on the gear on the top right, then on settings. Choose one of the following options:
- Storage: Here you can see how much space you have available on your Drive account. There is also a link to buy more space if you wish. As well as a session to see how much space each file is taking up. This way you can have more control of your storage limits.
- Convert uploads: Mark it down if you wish to convert the files you upload automatically. But be aware that converting some Office files can mess up their format, so it's always important to have backups before completing this process.
- Language: It changes the language of the interface.
- Offline: You can mark the selection box if you want your files to be available offline. Google recommends that you don't do this if you are using a public computer. So it's better to do that only in devices only you have access to.
- Density: You can change the view of your list of files/folders. The options are "Comfortable", "Cozy" and "Compact". The compact one is better suited for people who have small PC monitors, for example.
Upload through the App
As we have seen before, the Drive app creates a virtual folder in the computer, working like a mirror of your online storage. So if you want to upload files to Drive, you just need to copy them to this folder. It is just that simple. But, when you have a lot of files, and you have personal and work ones separated, for example, you will never want all of them mixed in the same virtual folder. Just click with the right button on the app icon, on your notification bar, and then on the three dots. Select Preferences, unmark the paste you don't want to synchronize anymore.
Useful keyboards
To be more productive and speed things up a little bit there are some useful keyboards for Google Drive. Starting for one that is important and displays the keyboard shortcuts list:
- Shift + /
- Ctrl + / (Chrome OS, Windows)
- ⌘ + / (Mac)
Here you have a list with some other keyboard shortcuts that will make your life a lot easier while using Drive:
| Open a selected file | Enter o |
|---|---|
| Rename a selected file | n |
| Share selected files | . (dot) |
| Undo the last action you have performed | Ctrl + z (Chrome OS, Windows) ⌘ + z (Mac) |
| Redo last undone action | Ctrl + Shift + z (Chrome OS, Windows) ⌘ + Shift + z (Mac) |
| Create a new document | Shift + t |
| Create a new presentation | Shift + p |
| Create a new spreadsheet | Shift + s |
| Create a new drawing | Shift + d |
| Create a new folder | Shift + f |
| Create a new form | Shift + o |
| Ctrl + p (Chrome OS, Windows) ⌘ + p (Mac) | |
| Close | Esc |
| Play/pause | Space |
| Zoom in | + or = |
| Zoom out | - |
Search Drive Bar
On the top of the page, you can find an element that is more than just a search bar inside Google Drive. It's a tool to optimize your time inside Drive, to speed your searches so you can focus on more important things, such as editing the file you are looking for. You can simply type the name of the file, or choose the type of element you want to list. Drive will filter all the documents, spreadsheets, presentations, images, and folders. This way you can find what you need more easily.  It's also possible to filter by files that were "Edited today" or "Edited last 7 days".
Collaboration in Google Drive: everything about sharing
Google Drive allows you to share files and/or folders through the platform, permitting other people to edit or just view them. This is perfect for teams that need to constantly send files to one another and need a better solution for this particular pain point.
How to share files and folders
First, when we talk about collaboration inside Drive, we need to understand how to share files and/or folders the proper way. Besides that, you need to understand the permissions you can give to people. Let's see how to do this with a simple step-by-step: 1- Select the file or folder you want to share and click with the right button on it. Choose the option " Share". 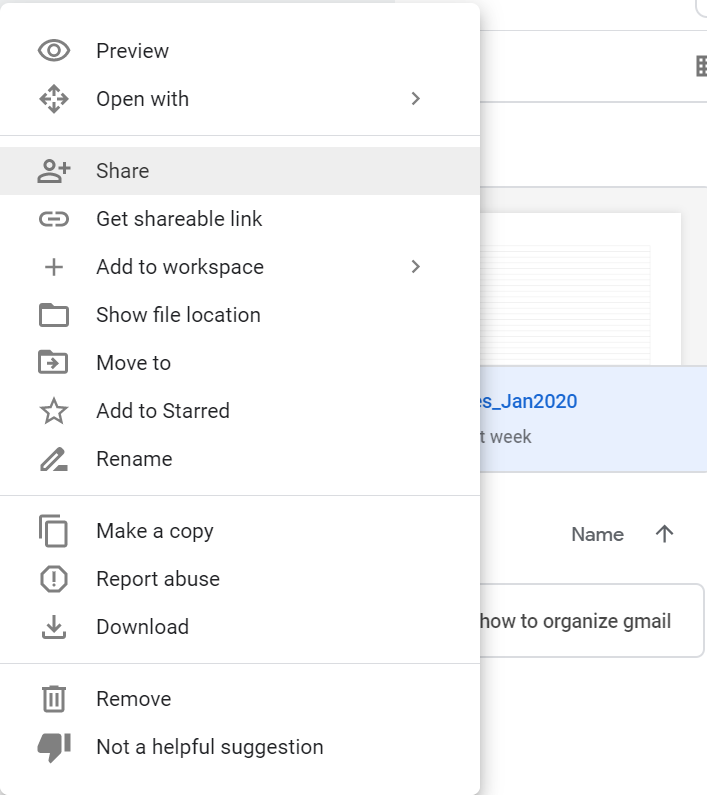 2 - Now it is time to set the permissions, that are different for folders and files. For files, you have three options:
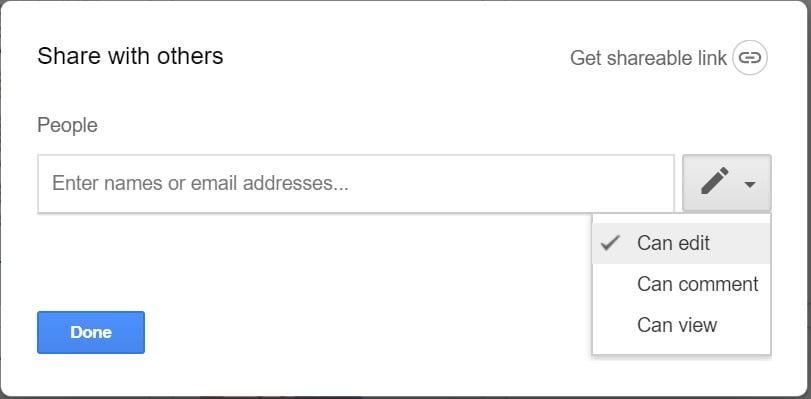
- Can edit: This gives full access and control of the document. People can view, edit, print, delete and everything they want to do. Teams that are composing documents together can benefit from this option.
- Can comment: The person can add comments on the file, which is useful when you need other people to review documents.
- Can view: This allows people only to view the document. But they can't type, download, copy, print, delete or do any other activities inside the file. Although it's possible to create a copy of the document that will be editable.
Now, for folders you have two different options:
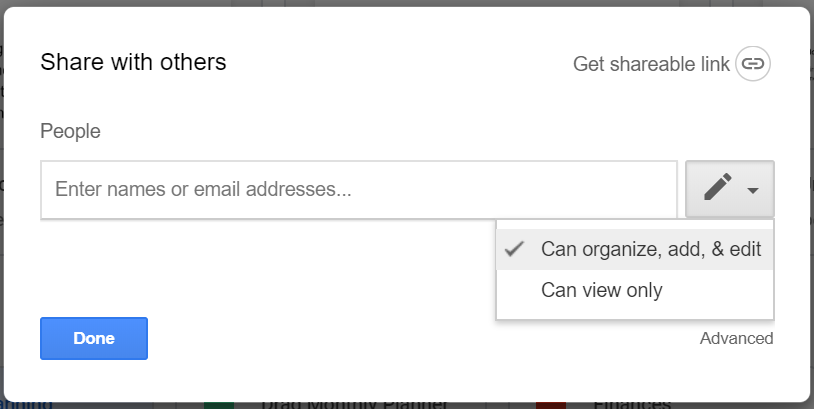
- Can organize, add & edit: People are allowed to add new files, delete existing ones, and also edit these files.
- Can view only: It allows people to visit the folder and the files inside it, but just view them. They can't delete the folder and files, nor add new ones. They can open the files just for visualization.
3 - You can also use a link to share the folder/file with anyone you want. Just click on "Get shareable link" and set the permissions you want to give. Then share this link by email, social media, or through any other channel with the people you want. Of course, this action can be unsafe, that's why we are covering this matter on a whole new and detailed topic that follows.
Advanced sharing options
There are lots of advanced settings for sharing files and folders in Google Drive. And all of them concern the security of your archives. When you share a file or folder and give full access to people, they can simply spread them to other people. This can be very harmful and dangerous. After all, you don't want your files falling into the wrong hands, right? That's why you can simply unable people to send the document to others:
- On the permissions pop up click on Advanced.
- Set the option Prevent editors from changing access.
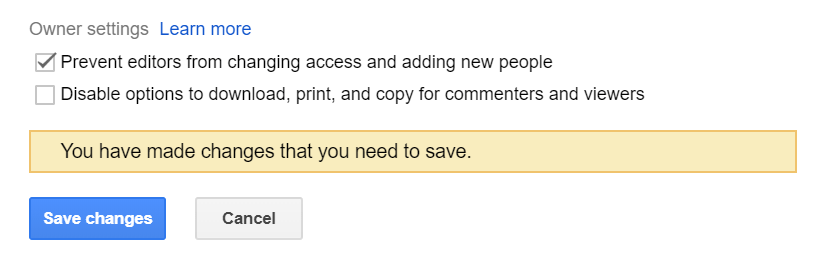 You can also change the option "Disable options to download, print and copy for commenters and viewers" when you don't want these people to perform such actions. It adds another layer of security. Still, on the "Sharing settings" you can manage who has access to the file or folder, as well as the permission given to them. Click "Change" if you want to modify anything. Then a sharing dialog will open with the access options.
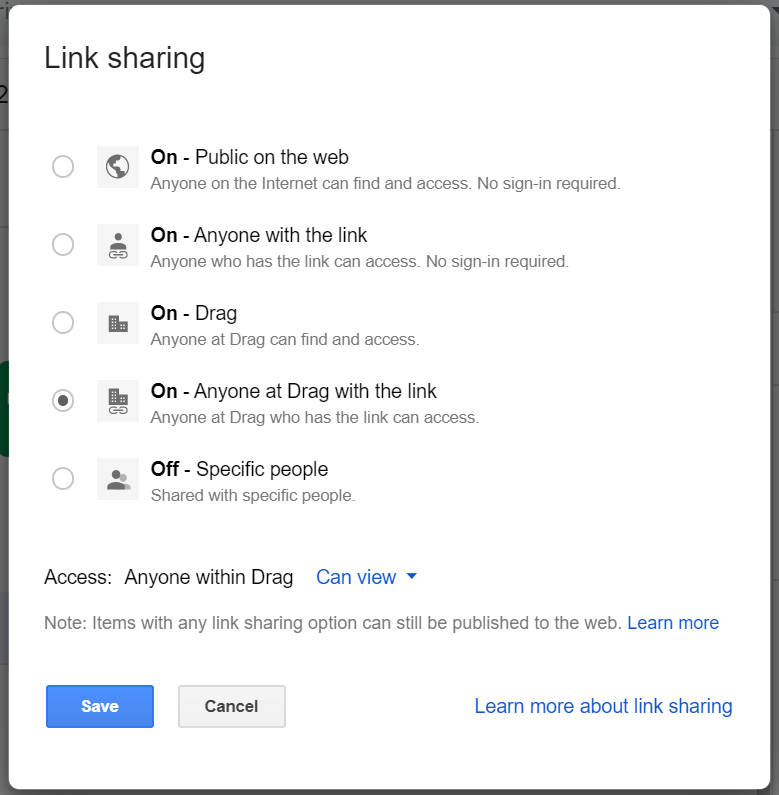 Sharing gives you two scopes: specific people you invite, or anyone with the link, with viewer, commenter, or editor roles on either.
Expiration dates
Another important and useful configuration inside the "Sharing settings" pop up is the expiration date. When you share a file/folder sometimes it's crucial to set a term for a specific person to view it. After the date you set passes, the people you've shared the document with, and chose this expiration date, will no longer have access to it. Follow these steps to complete this action:
- Access the "Sharing settings" pop up, then go to the session "Who has access,".
- Look for the person or people you want to limit the time access and hover your cursor over their names.
- A timer icon will appear along with its name "Set expiration". Click on it.
 4. Right above the person's name and email will appear the option "Access expires". Click on the drop-down box and choose between 7 days, 30 days or a Custom date, with a specific date you desire to set. Then click "Save changes"
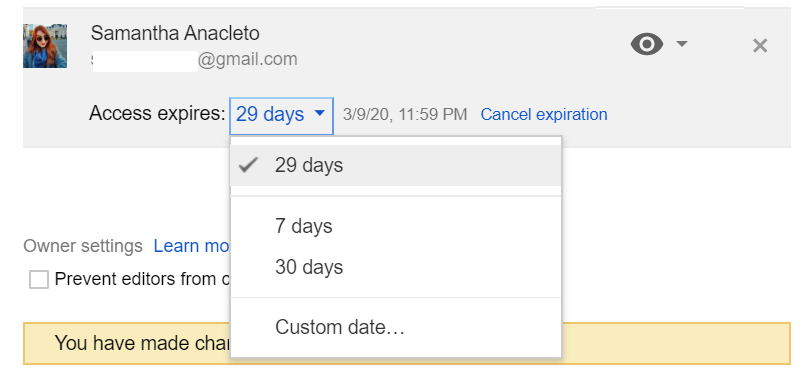 Be aware that this function is only available for people who have permission to view or comment on a file or folder. When their permission is to edit you can apply the date, but they automatically become able just to view it, losing their editing privileges.
Frequently asked questions
How much free storage does Google Drive give you?
15 GB free per Google account, shared across Drive, Gmail, and Photos. Google One paid plans start at $1.99 per month for 100 GB if you outgrow it.
What replaced Backup and Sync?
Drive for desktop. It combines the old Backup and Sync and Drive File Stream apps into one client that can stream files on demand or mirror selected folders for offline access.
Can people without a Google account open shared Drive files?
Yes, if the file is shared as "anyone with the link" they can view or comment without signing in. Assigning them as named editors, however, requires a Google account.
Wrapping up
It's great to have mobility, synchronization, and collaboration when handling lots of files and folders, mainly when you work in a team. Google Drive offers these features and it is free, besides being easy to use. Above all, we hope that now you are a Google Drive expert and you have understood this tool completely. Enjoy all our tips and share them with your team. We hope that you learn how to use it better in your personal life and at work.
Co-founder
Building Drag for nearly ten years: shared inboxes, boards, and now the AI and agent layer, all on Gmail, plus HeyHelp for the personal inbox. Writes the honest versions of the comparisons.