Filling up a blank form for a survey, usually to request something, to make a statement, an order, or even a complaint, is a widespread activity in everyone’s life. Although still used, paper forms evolved to their online versions, which you can create with software like Google Forms.
Google Forms is included in the Google Workspace, along with resources such as Google Docs, Google Sheets, and Google Slides. It’s simple to use and has collaboration features and can be accessed through the mobile apps or your desktop browser.
Find more about all the Google Forms’ features, discover its hidden tools, and tips and tricks to make the best use of this tool.
What is Google Forms, and why use it?
Google Forms is a cloud-based questionnaire and survey software. This means that you can create all your forms online in your browser.
Forms has many common characteristics with the other Google Workspace Office apps, such as real-time collaboration and personalization. Let’s have a look at these features.
All your forms are online-based
Since Google Forms is a cloud app, you don’t need to install it on your computer. It gives you the ability to edit and manage your forms from any device, anywhere, and whenever you need to. You need the internet to access it in your browser.
Since space in storage can be a challenge for today’s digital workspaces, solutions like Forms can be beneficial. First, you won’t use space on your hard drive with one more software and won’t use any additional percentage of your memory while you use it. Since all your files will be safe and sound in the cloud, you don’t need to have all your documents saved offline.
You can save time with templates
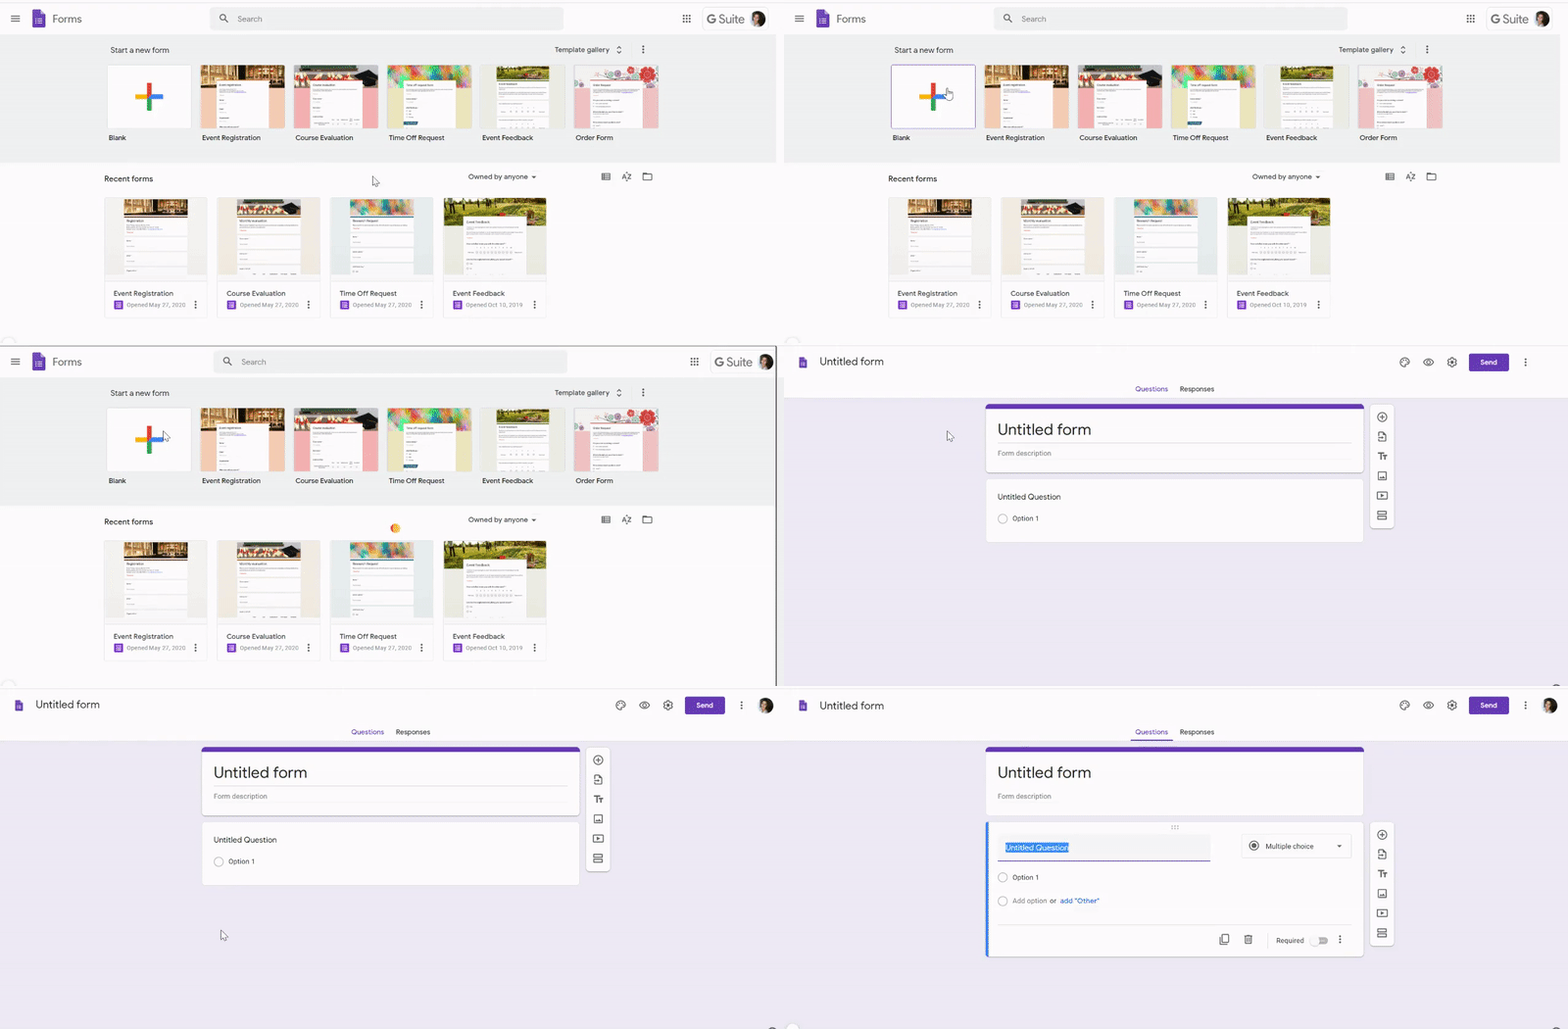
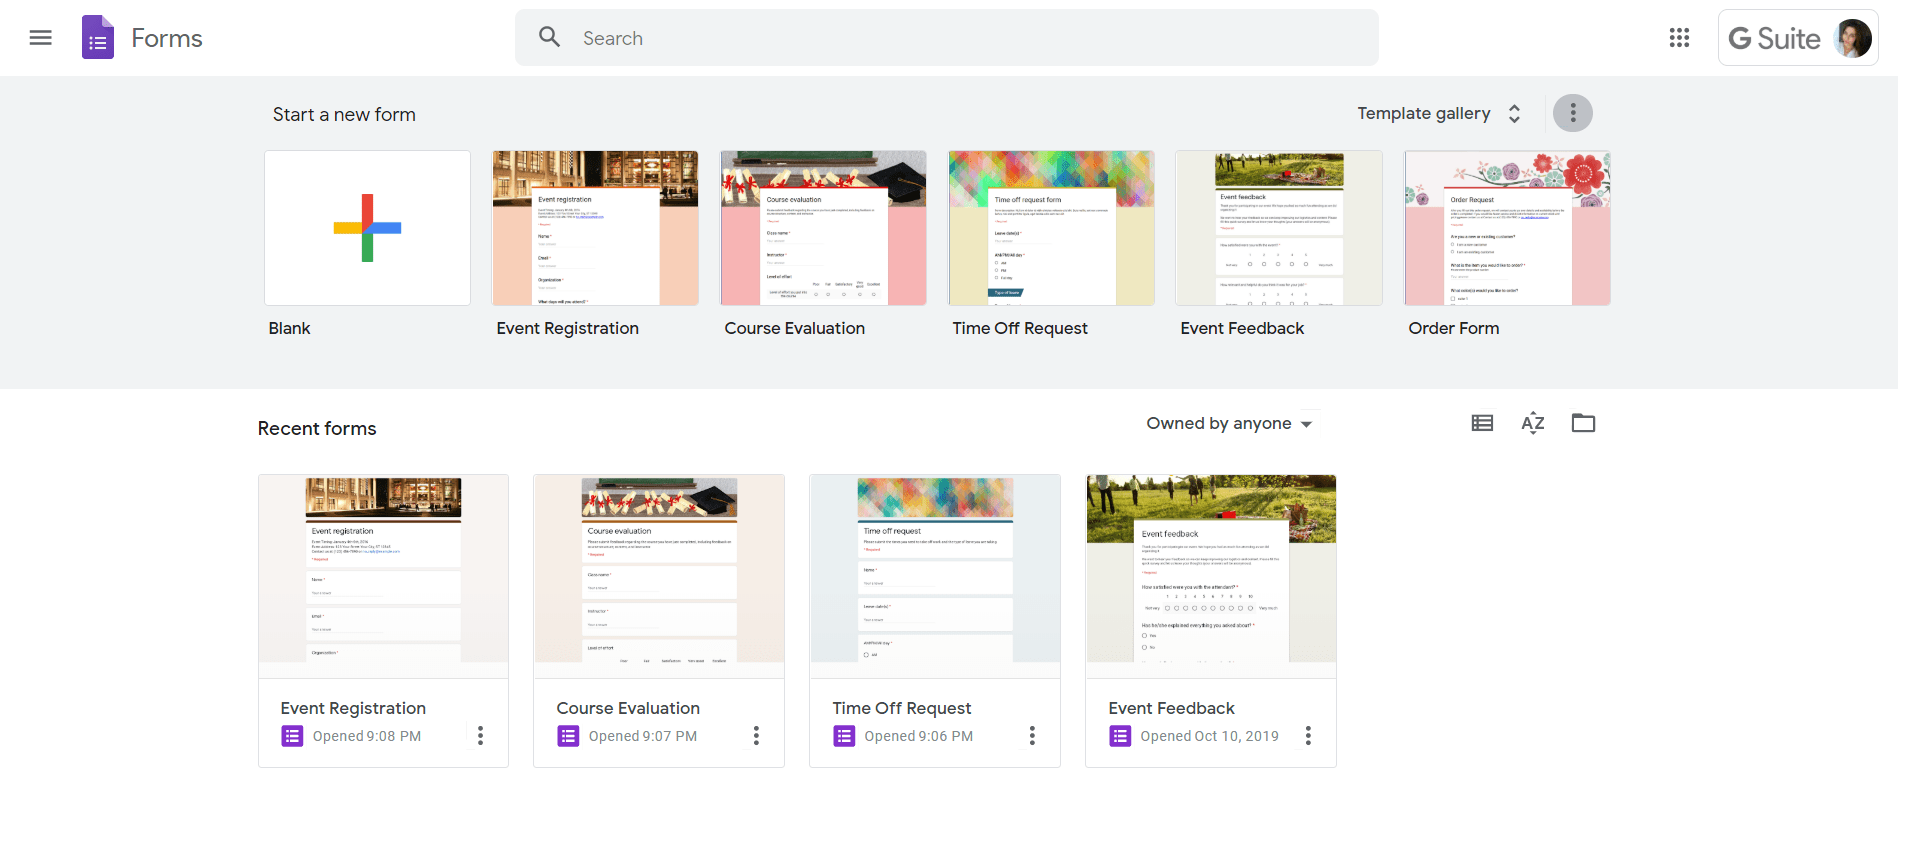
When you don’t have much time to take a blank form and personalize it, you can use templates. First, access the Forms page. There, you will find options under the Start a new form section.
Next, click on the link Template Gallery to check all the templates available. Then there will be two tabs if you are a Google Workspace user. They will be separated into categories:
- Work: Job Application, Work Request, Time Off Request, Customer Feedback, and others;
- Personal: Contact Information, RSVP, Event Registration, and more;
- Education: Assessment, Worksheet, Course Evaluation, and also the option to build a new quiz.
Remember that you can also create your templates while building new ones. They will be on the tab with your domain’s name.
Auto-save avoids data loss
If your computer shuts down by any motive, or if the internet goes down, your forms will be safe and sound in your cloud storage and with the latest version you edited.
So every time you finish writing a form, Google Forms automatically saves it. It means there is no button “Save file” that you need to remember to hit every once in a while.
Exploring Google Forms
When you select to create a new Google form or edit a template, the screen editor will appear. It has a simple layout, easy to understand, and you will be able to start using it with no difficulties. Then you are going to see the form on the center of the screen, with a title preset as “Untitled form” and right under a description. Besides, notice that above the title, there are two tabs:
- The one you are already in, Questions, where you will build your form;
- And Responses, where you will be able to see responses your Google form will get.
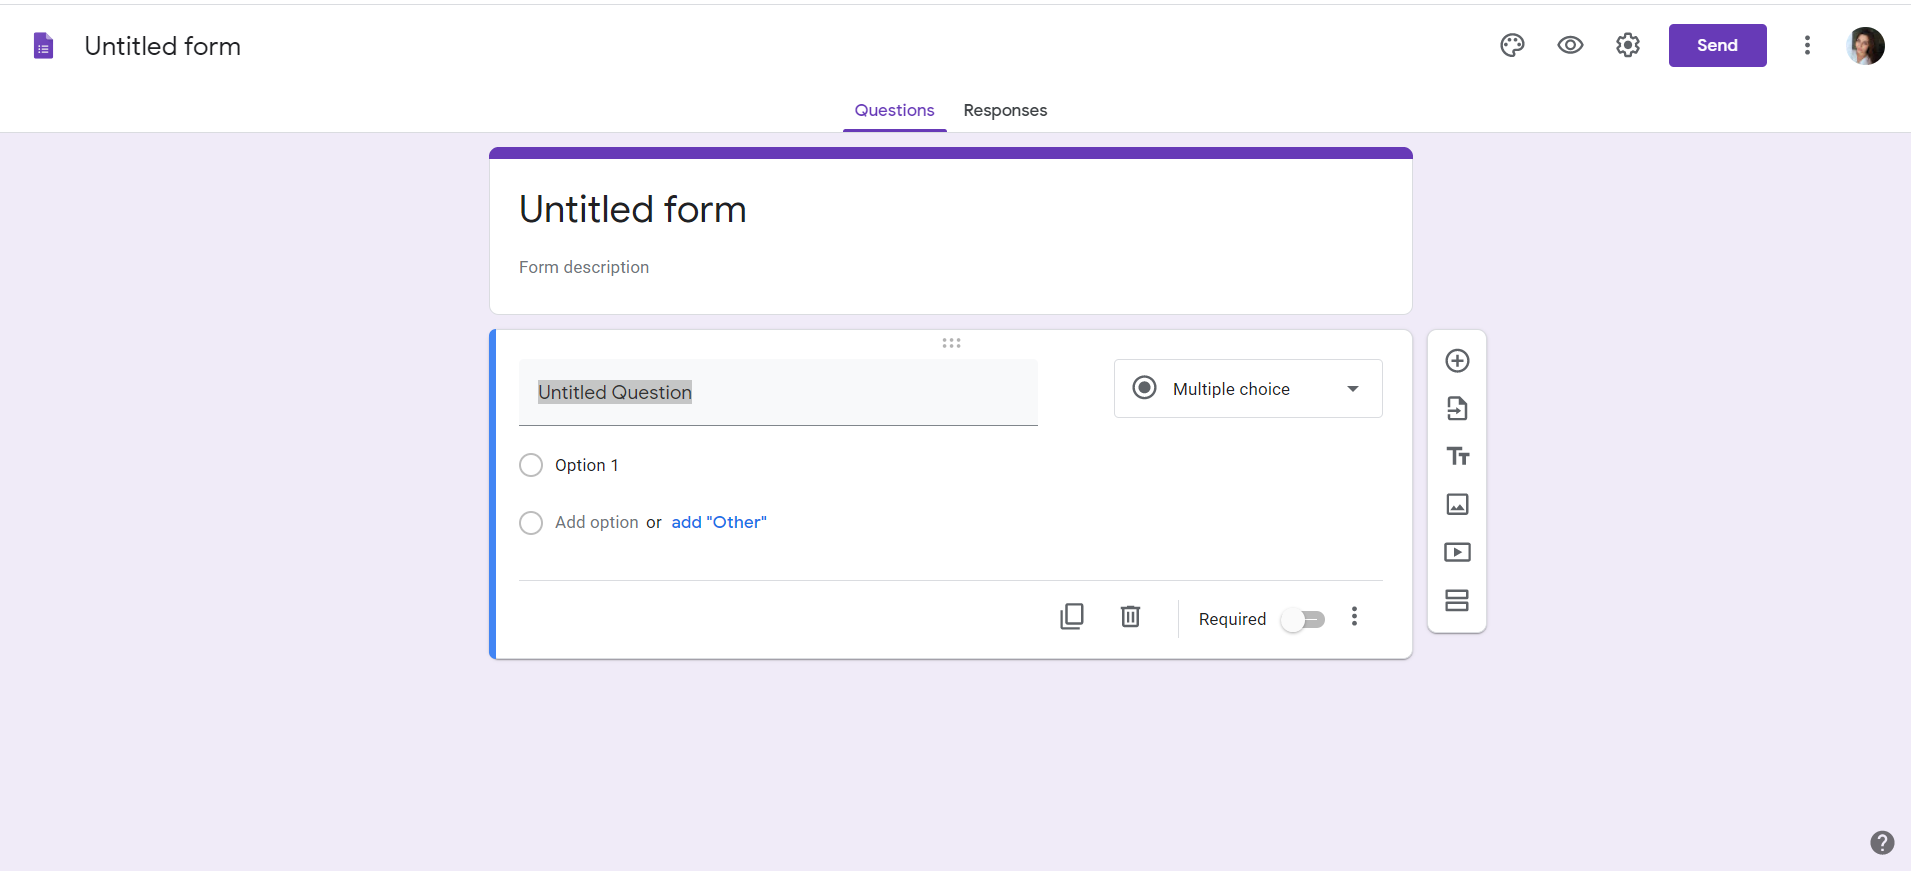
There is a toolbar on the right side of the form where you can set new form fields. The plus icon allows you to add new fields for questions in the form. The second icon representing a sheet with an arrow enables you to import questions from other existing forms.
The “Tt” icon adds another form title and description to your form, which is useful when you want to separate them into different form sections with distinct subjects.
You can also add images to your form by clicking the picture icon or even a video with the play icon. Also, the two bars-aligned icon allows you to create a section within your Google form.
Now, on the top-right menu, you will find the following icons with their respective functions:

- Customize Theme: change the theme and background color, add an image on the header, change the font style;
- Preview: See how your Google form will look like with the current editions;
- Settings: Control how your form will perform, set up a quiz, and the way it will be presented;
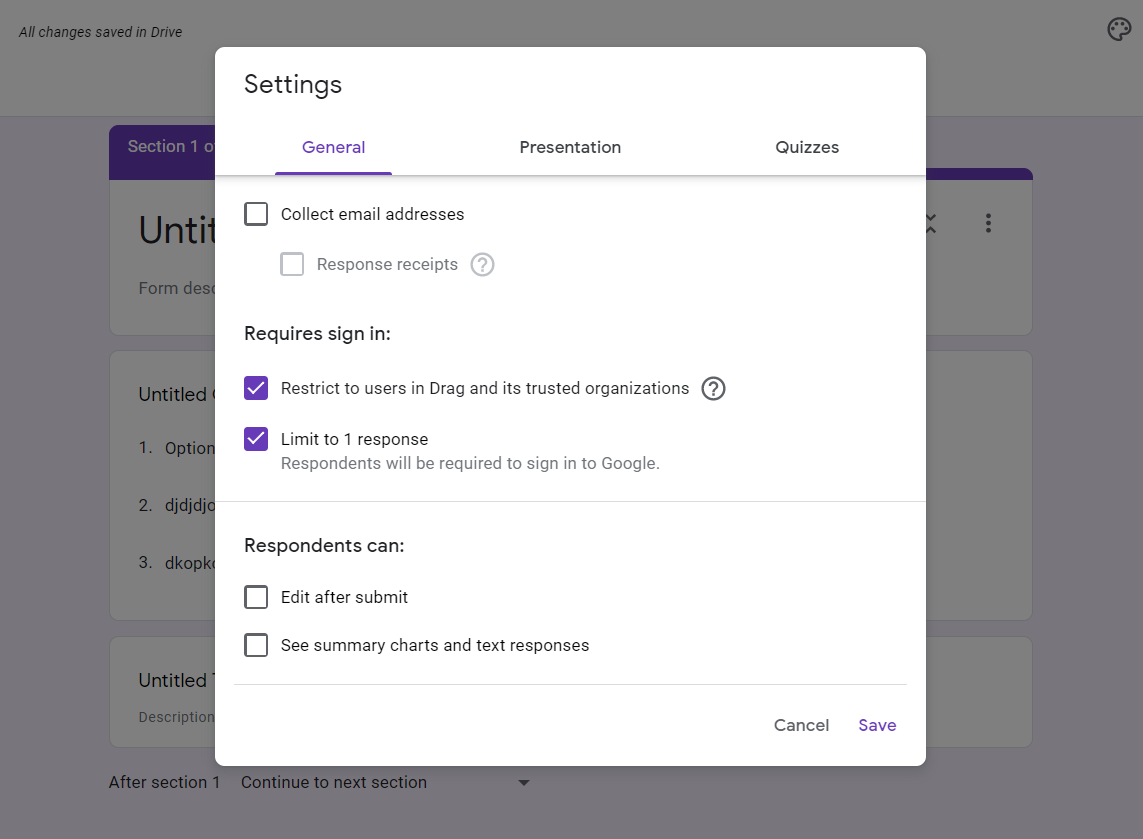
- Send: opens the popup with options to share the Google form;
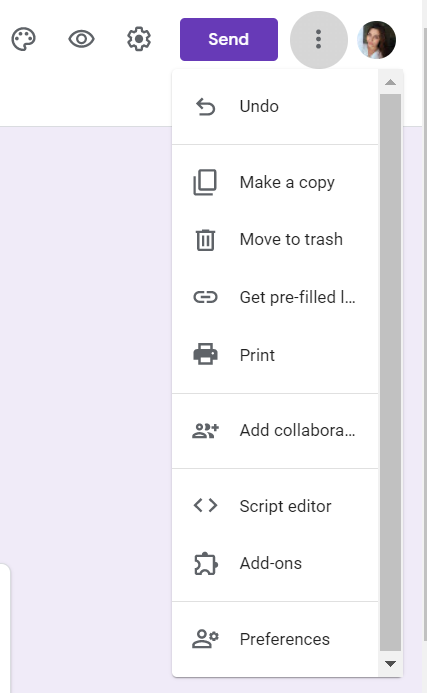
There are extra options on the three dots icon, such as Undo, Make a copy of the archive, Move to trash, Print it, and even set add-ons.
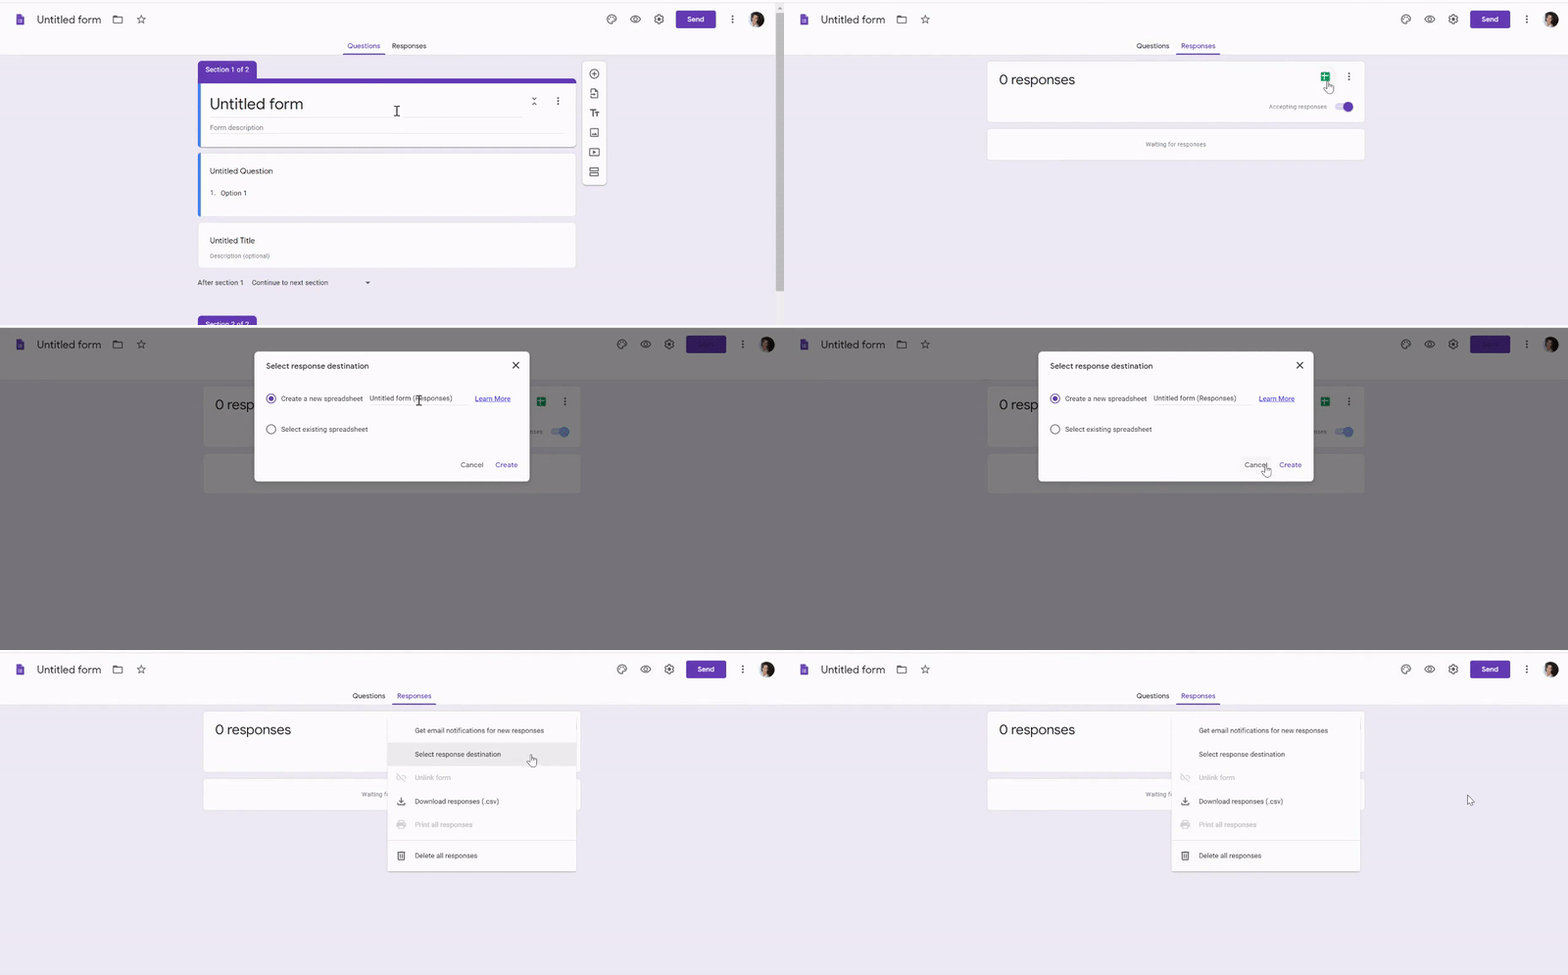
The tab Responses will contain all the form responses you have received. There you can also choose to start/stop receiving answers by clicking the toggle button that will change from Accepting responses to Not accepting responses. The latter displays a box to type a message for respondents to explain that the form has closed.
Click the Google Sheets icon on the top to link your form to a spreadsheet. This way, you can control the data in a spreadsheet, making it easier to visualize and manage. You can create a new Google Sheet or select an existing spreadsheet.
On the three dots icon, you can print, download and delete the form responses, as also unlink a form from a Google spreadsheet, choose a destination for the answer, and enable an email notification each time you receive a new response on the form.
Turn Gmail into your Team’s Workspace.
- 2.5x faster email responses.
- 20 hours less spent per month, per team member.
- 40% more deadlines achieved and happier teams.
How to build a form
Creating your new Google form is simple, and you can do it in some different ways. So first, to create forms directly on the Google Forms app. You will be able to choose Blank to start building a form from scratch or choose a template.
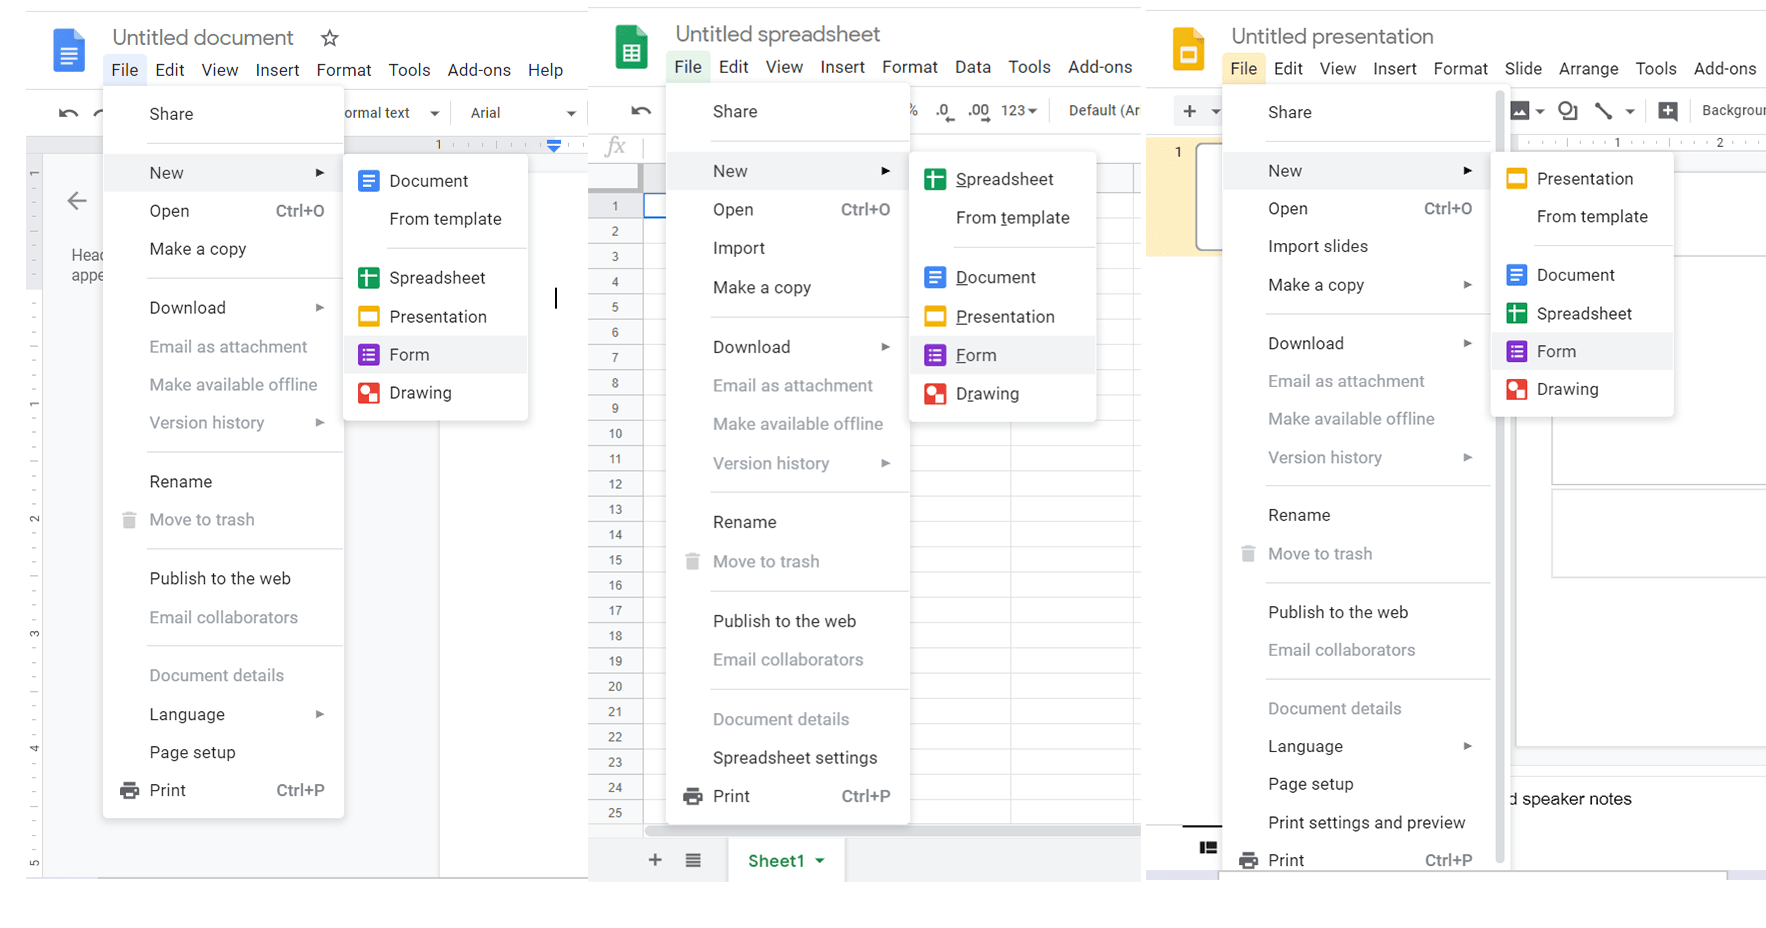
You can also create a new Google form while using any other Google Workspace apps (Docs, Sheets, or Presentations). This works as a useful shortcut while you are working on different kinds of documents. Just click on the tab File on the menu of the app you are in, then hover to New > Form.
In Google Sheets, go to the tab Tools and click Create a Form. Right after that, a form with the same title as your spreadsheet will be created.
The second step is to type the title and description of your new form. After that, it’s time to set your Google form fields to add your questions. By default, there will be a box with a multiple-choice question that you will be able to change the type by clicking on Multiple Choice. Then a drop-down list will appear, and you can choose the style that makes more sense to your forms.
Google Forms fields
There are 12 field types in Google Forms between question types, text, video, and photos.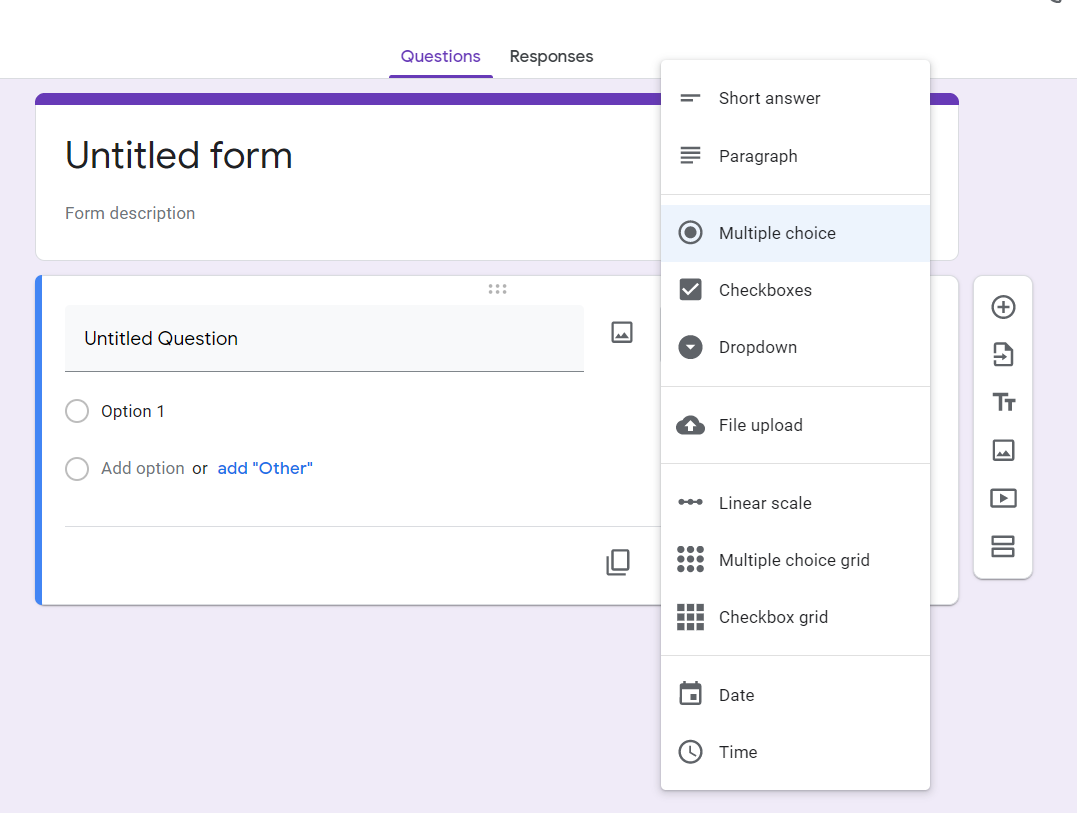
- Short Answer: This is the ideal field for requirements that need a few words, such as email addresses, names, answers that can need to be longer, and numbers. Remember to set validations on this field, so you can get the answers you expect.
- Paragraph: It’s a field for longer answers, mostly used for feedback and more detailed responses. You can validate length and regular expressions.
- Multiple Choice: It allows you to list options of answers, so the users select one. It’s possible to set the form to jump to another section depending on the response or even shuffle the answer options.
- Checkboxes: It works similarly to multiple-choice, but the respondents can select as many answers as they want. There’s a data validation for the number of replies they can choose.
- Drop-down: Creates a menu with the options. It also allows the opportunity to jump and shuffle options. Choose this option to make your form appear more condensed.
- Linear Scale: It allows the respondents to select a number in a range. So you can set a scale from 0 or 1 to 2-10, putting the adequate labels for the options.
- Multiple Choice Grid: You will add questions as rows and options about them as columns in this option. You can include as many rows and columns as you want. Also, be sure to use the preview the whole time to check how the design of the question using this style will be displayed.
- Date: Mostly used to collect birth dates or for event forms. You can ask for a day and month, but the year and time are optional.
- Time: You can request a length of time in hours, minutes, and also seconds;
- Image: You can upload an image from your computer, take a photo from your webcam, choose one from a link or your Google Drive, or search Google Images for photos.
- Video: You can add YouTube videos to your form by searching for videos or inputting a link.
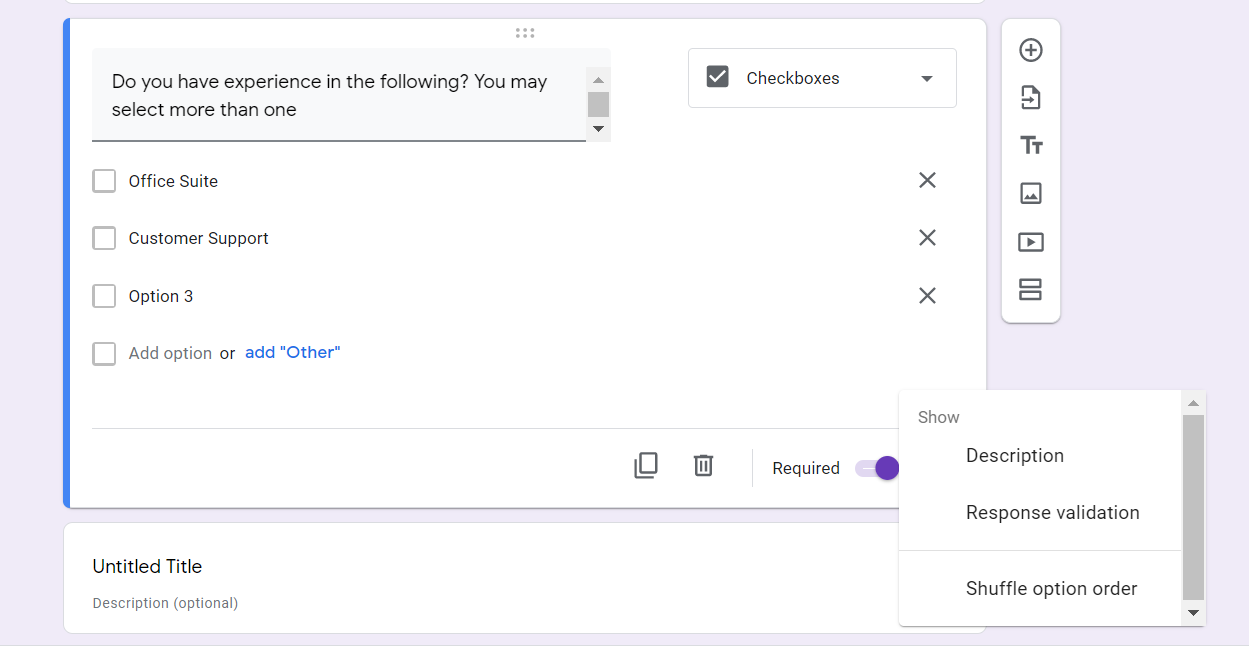
There is a copy button in each field to duplicate it and help you save time when there are similar question types. There’s also a trash can icon that allows you to delete the question. Moreover, you can click the toggle button to choose if the answer to that field is required.
When you click the three-dot sign icon, a drop-down menu will appear with other settings for your question field. You can mark the following options to be shown on the field: description, response validation, shuffle option order.
Building a quiz on Forms
In Google Forms, you can create quizzes by using the Quiz mode. To do that, click the gear icon on the top-right of the screen. A pop-up of settings will open, and you need to select the tab Quizzes. After that, click the toggle button on the section Make this a quiz to turn on this option. Right below, it’s possible to choose if you want to deliver the results “immediately after each form submission or “later, after manual review.”
Also, you can set what the respondent will be able to see: missed questions, correct answers, or point values.
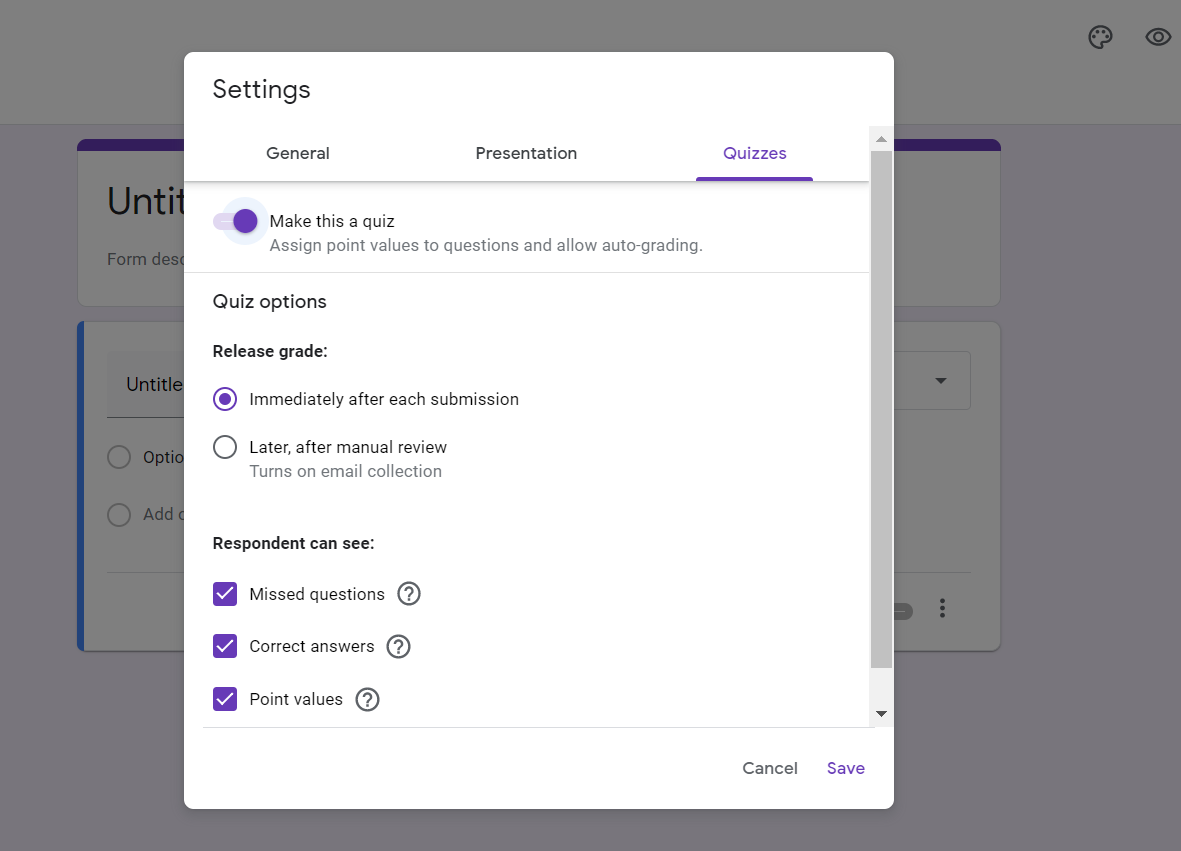
When this option, the Answer Key button will appear on the bottom left of each question. Then you need to click it to select the correct answer for the problem. There is also the possibility to add feedback on each solution, being accurate and incorrect. For example, you can include a link for respondents to check more info about that question.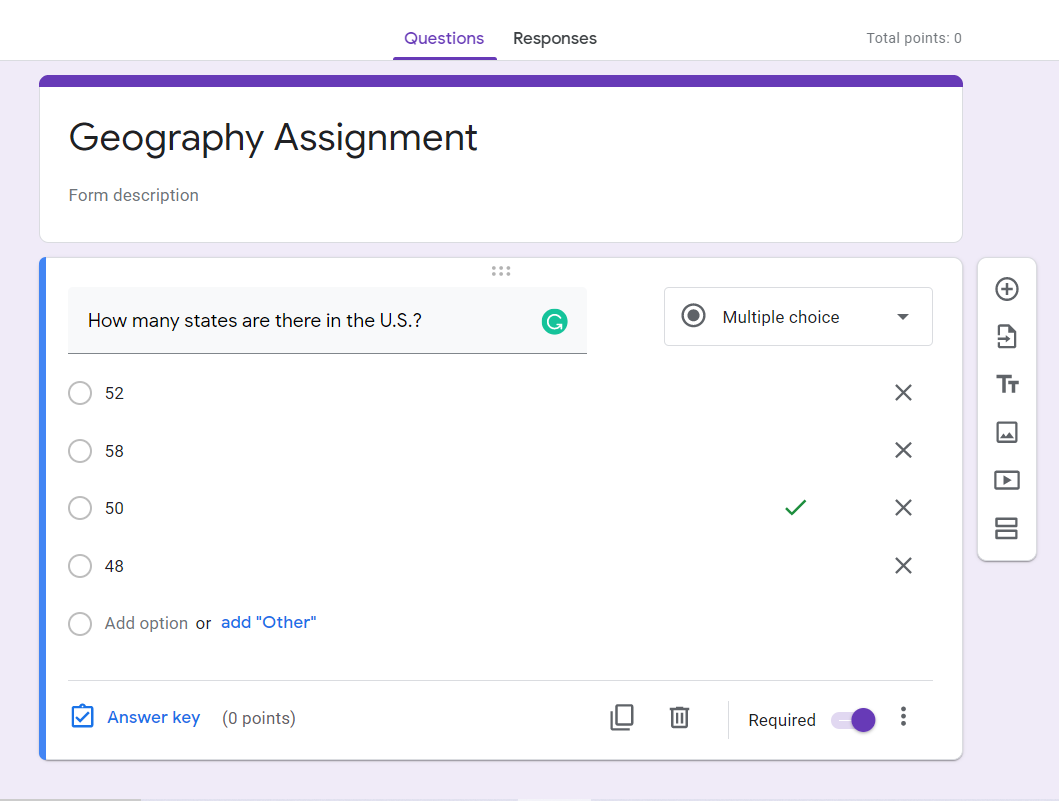
However, keep in mind that the quiz questions must be on the following types of fields: multiple choice, checkbox, and drop-down.
Why quizzes are useful in the workplace
Even though Google Form quizzes have been developed with education in mind, they can also benefit companies. Most teams are always learning new tools and best practices aligned with their daily operations and that requires training.
A Google Forms quiz can be a great way to develop a quick learning assessment in the workplace. With the feedback option, the team members can learn and practice as well.
Google Forms tips and tricks
To enhance your experience with Google Forms, we have prepared some tips and tricks to make you much more comfortable using this tool.
Collaborate in real-time
All the Google Workspace apps have this feature in stock, and with Forms, it wouldn’t be different. Presuming that you are building a form with your team, it makes sense that everyone can collaborate on it in real time.
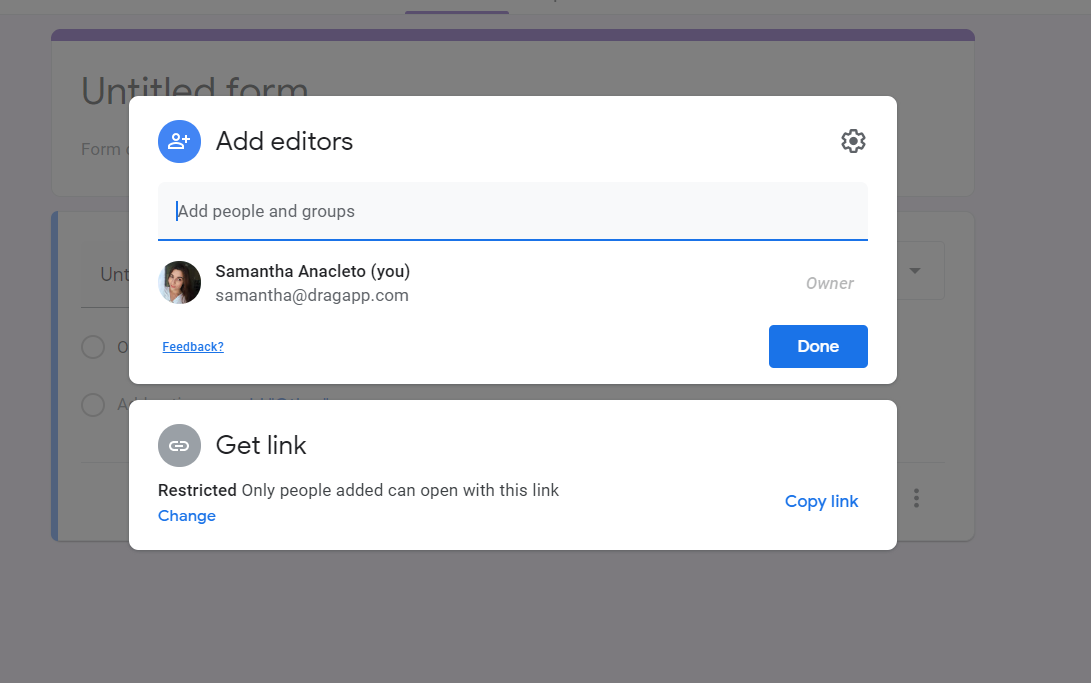
So, to start building a form together, go to the three dots icon on the top-right of your screen, and select Add Collaborators. Then a pop-up will open, and you can type each one of the collaborators’ email addresses. On the section Get Link, you can also click on Change and choose if you want the people you share to view or edit the form. Then click on Copy link and share it with your collaborators via email or other channels.
Add-ons
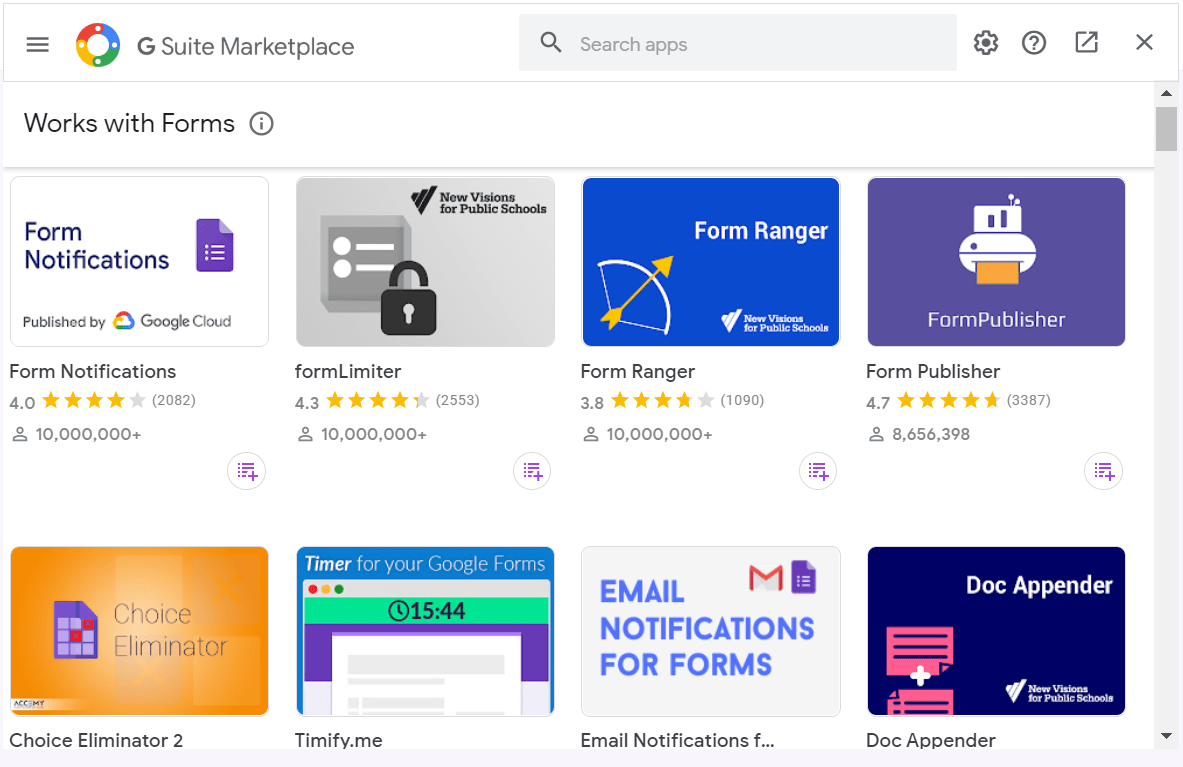
You can improve your experience in Forms with add-ons that can help you construct new surveys. Also, you can connect to third-party tools and integrate your Forms data with other Google Workspace applications (like Google Sheets). Here are a couple of examples:
Form Notifications: Use it to send custom email notifications to you and your respondents. For example, if you want to send them the details about the form results, or thank them for answering it.
Form Limiter: If you need to limit the number of responses in a poll or survey, use formLimiter to set a maximum number of responses at a date and time or when a spreadsheet cell equals a value. For instance, after achieving the limit of 1000 answers, or the date 05/05/2024, the add-on will shut off your form automatically.
Useful keyboard shortcuts for Google Forms
Keyboard shortcuts are ideal for speeding things up and improving your daily work activities. It wouldn’t be different when it comes to Forms. Here are some of them:
|
Show list of keyboard shortcuts |
Ctrl + / |
| Ctrl + p | |
| Preview | Ctrl + Shift + p |
| Settings menu | Ctrl + e |
| Insert question | Ctrl + Shift + Enter holding Ctrl, press I then i |
| Insert title and description | holding Ctrl, press I then h |
| Insert image | holding Ctrl, press I then p |
| Insert video | holding Ctrl, press I then v |
| Insert section | holding Ctrl, press i then b |
| Move item up | Ctrl + Shift + k |
| Move item down | Ctrl + Shift + j |
| Delete item | Alt + Shift + d |
| Duplicate item | Ctrl + Shift + d |
| Undo | Ctrl + z |
| Redo | Ctrl + y Ctrl + Shift + z |
| Move to next field | Tab |
| Move to the previous field | Shift + Tab |
| Mark as correct | Ctrl + Shift + c |
| Mark as incorrect | Ctrl + Shift + i |
Using AI with Google Forms
Collecting data is much easier with the help of Google Forms, but how can your team analyze and benefit from it? That’s when AI in Sales in other departments can help.
For example, say you sent out a survey through Google Forms to your customers to answer after they buy a product or service. You can access the results via Google Sheets and they’re safely stored in your Google Workspace account. That said, now you need to check the information to determine any customer trends.
A data processing tool with machine learning (a type of artificial intelligence that builds a knowledge base) can help your company archive and categorize customers’ opinions, divide them by different segmentation filters and much more. That means you can take all the information from your Google Form and use it to develop further strategies.
Google Forms and a shared inbox for marketing campaigns
Google Forms and AI tools are great when a company needs to collect and organize its consumer behavior data. It gives managers insights into what people are purchasing, what questions are commonly asked, what suggestions clients have and so on. With that in mind, marketing teams can set up more efficient email campaigns that actually reach new and existing customers.
How does a shared inbox work?
A shared inbox on Gmail allows you to build a fully functional email-based workspace and collaborate with the whole team at the same time. Instead of working individually on their personal inboxes, all team members have access to the incoming mail sent to and by the department account. So, for instance, [email protected]
Then, they can build emails based on the customers’ survey results collected on Google Forms and make sure they align with the current needs and trends of the industry. These emails are stored in a shared library, so all team members can use them to keep the brand messaging consistent and efficient.
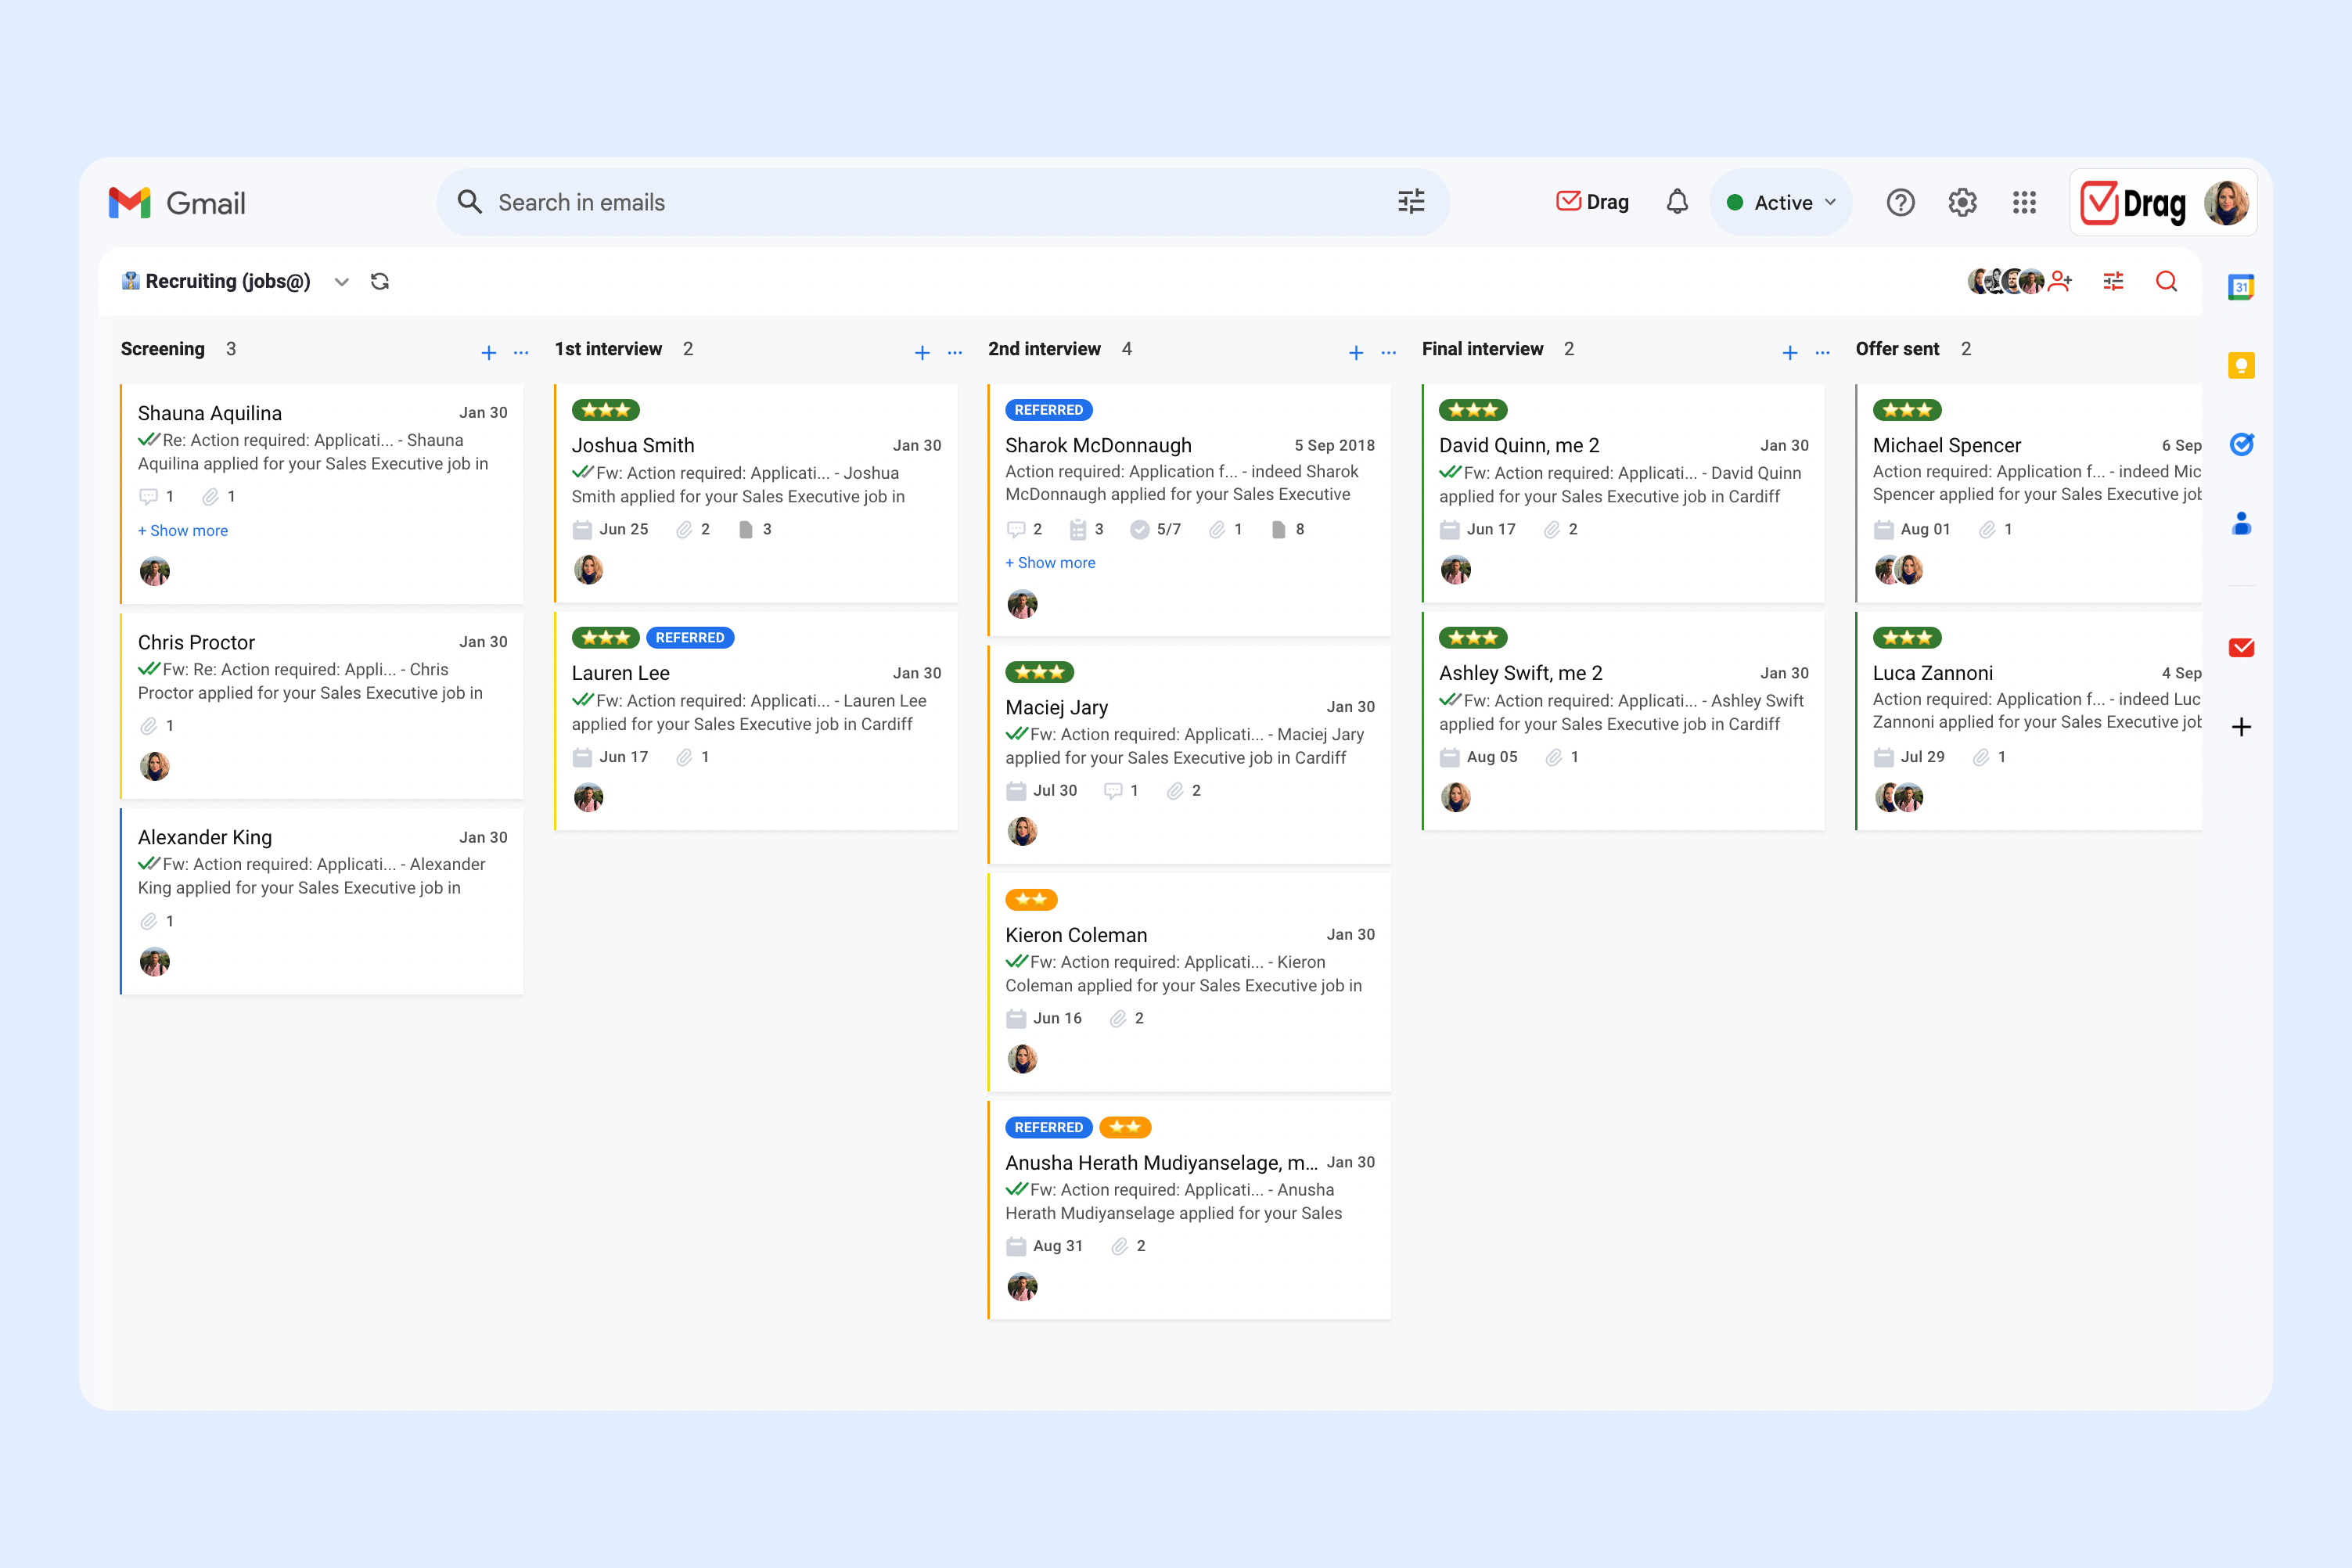
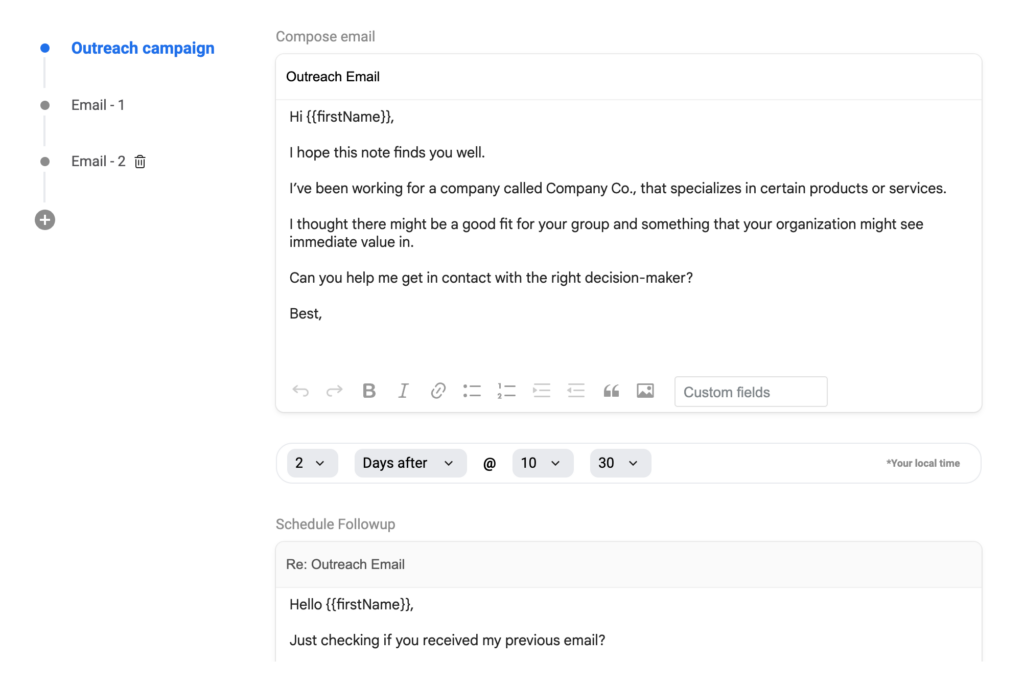
Some shared inbox tools, such as Drag, even allow you to create email sequences to keep interacting with your customers automatically. Here’s how it looks:
Wrapping up
Google Forms turns out to be an excellent choice for people who need to be quick while building forms or digital quizzes. It is effortless to use and customizable, offering templates to save you time and add-ons for a better experience within the app.
Companies can benefit from it to survey their customers, develop internal feedback sessions, set up training quizzes and even collect information to create a more fulfilling experience for client interactions.
That’ll help build a better relationship with them, which is a key factor for company and brand growth.
Turn Gmail into your Team’s Workspace.
- 2.5x faster email responses.
- 20 hours less spent per month, per team member.
- 40% more deadlines achieved and happier teams.


