The rush we live day by day forces us to keep our tight schedule very organized. That’s why there are lots of apps and software to handle this issue a lot easier. An excellent example of a scheduling app is Google Calendar: a free, web, and mobile app to help you control your time.
Still, many people don’t know how to use technology for this purpose, or simply prefer to keep their paper calendars. If you are one of these people but want a better solution, how about diving into this guide to discover everything you can do with Google Calendar?
What is Google Calendar and why to use it
Google Calendar is a multiplatform calendar application. It is more than just a calendar; it can be useful to manage your entire life, in several aspects. Furthermore, this tool is straightforward to manage, as any of the other G Suite apps, such as Google Sheets, Gmail, and Google Docs.Google Calendar offers so many features that will make you forget about paper calendars. Here are some of the main ones:
Share your calendar
With Google Calendar, you can share calendars with other people, which must be Google users as well. This feature is based on collaboration and can be very useful for teams that have standard schedules to manage. It’s valuable that everyone knows of their busy times, and also tasks in common, such as meetings.  Moreover, Calendar offers the possibility of giving different permission levels on each.Calendar. This way, you can control what other people can or can’t do inside i. For instance, they can have the power to create and change schedules or just view them.
Sync Calendar with your mobile devices
Another super important aspect of Google Calendar is the possibility of synchronizing your calendars with your phone, tablet, and any other device. Which, of course, gives you the mobility of taking your schedule with you anywhere. It is handy when you need to cancel or schedule an event, but you’re not with your computer.If your devices have Android as an operating system, when you enter your Google account on them, your calendar should be synchronized. If it doesn’t happen, you can verify what may be wrong on this Google’s article. But if you have an iPhone, don’t worry, it’s not so difficult to activate the synchronization. Just follow this Google’s step by step.
Be reminded of your schedule
Every time you schedule an event, you can add reminders of it, setting the date and time. This way, you will never lose and appointment again. There is the possibility of customizing how you are going to receive the event alert. The available options are notification popup, or via email. Not only but also you can choose how much time you want to be reminded in advance, for instance, 10, 20 minutes before the event.In your smartphone, you will receive a reminder as well, on a popup format. You can choose to set the alarm also so that it can call your attention. But of course, it depends on Google Calendar synchronizing with your phone.
Lots of calendars in just one place
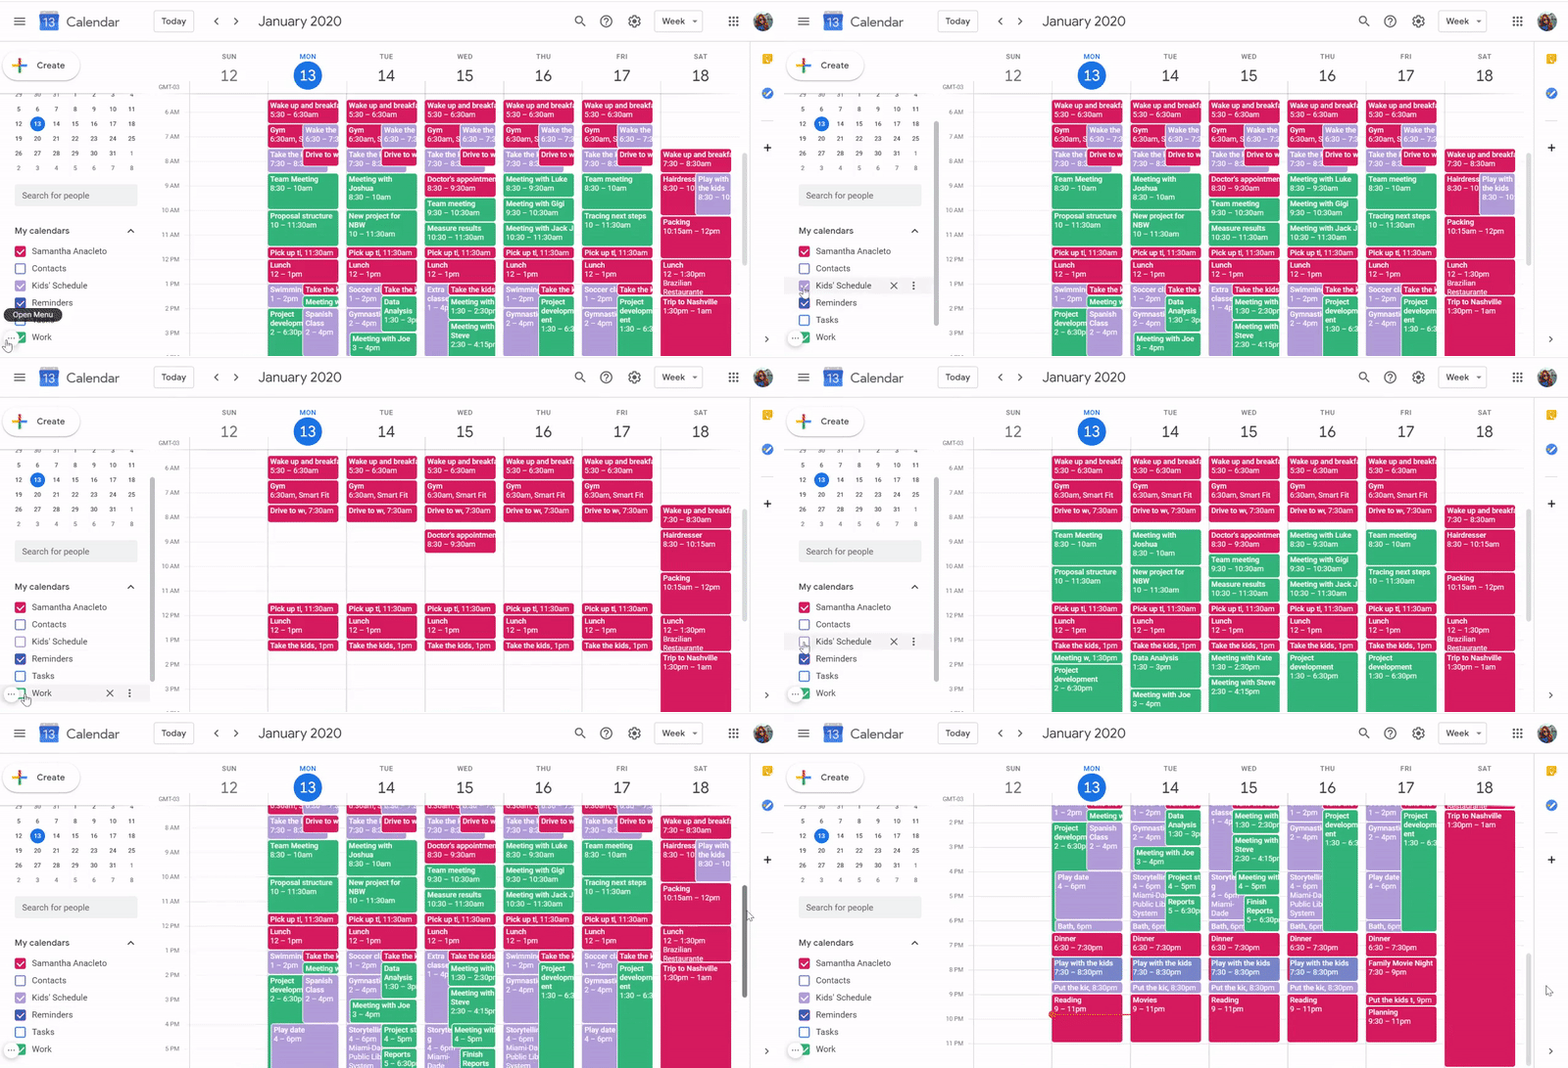
Google Calendar has the standard calendar with days, weeks, and months. But it can also have multiple calendars to attend to all the aspects of your life: business, personal, your kids’ schedule, and so on.Â
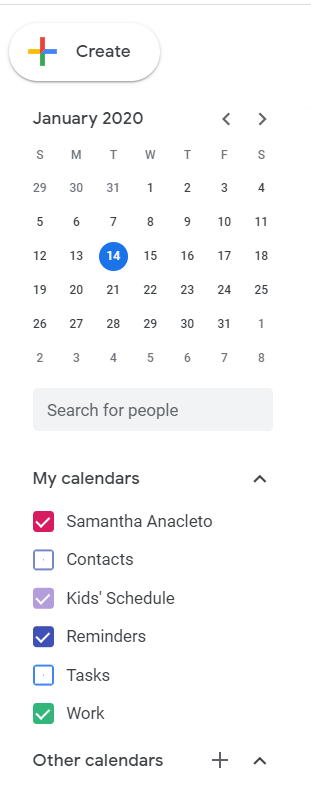
To separate your calendars, you can customize each one of them with a specific color, so you can identify quickly, to what schedule an event belongs. For instance, here it is a calendar with personal activities, represented by the color pink. The business calendar is represented by the color green, and the kids’ schedule has the lavender color. They can be mixed on the main calendar, so you have your entire schedule in one place. But it’s also possible to turn on or turn off each one of the calendars, just by marking the checkbox next to their names. This way it’s better to visualize just what matters to you at a specific moment.
Public calendars
All your country’s Holidays can be loaded automatically on your calendars, as well as other countries you may be planning to go, which is very useful when you are traveling.But not just that type of calendars, there are several Google allows you to subscribe to several calendars that are already populated, such as a sport championship schedule you like, or with astronomic events.In the same way, if you have a website or blog, you can create events on a specific calendar and put a Google Calendar widget on these channels. Then just permit your audience to add it and view it. This way, you can keep your fans updated and informed of the next steps, important dates, new releases, and whatever you need to engage with them.
Getting started with Google Calendar
First, you need to login to your Google account (if you don’t have yours yet, you can create one here), then access Google Calendar’s site. You can also download the app on your mobile devices. Usually, new Android devices come with the app installed, so you don’t have to worry about that. However, be aware that this tutorial is more focused on the web version.At Google Calendar page, you can see your current week, while in the phone’s app, you can view the whole month at first sight. It’s possible to set a different view of the calendar according to your needs.You will notice that there is a horizontal red line placed on the current day and time you are at the moment. This helps you control your time if you are constantly checking the calendar.
Recognizing the menu bars
On the top bar, you can see the current month and year, and when you hover the box “Today†it also returns the date with the day of the week. Besides that, there are two arrows, in which you can see the previous and the next week, respectively. There is a search option, so you can find your events easily, followed by the “Support†button and the “Settings†button.
You can also change the calendar’s view, from Week to Day, Month, Year, and others.

Another essential part of Google Calendar’s page is the left sidebar, where you can see the current month grid. Above that, there is an entry box to search for people with whom you may have an event. To be searchable, you have to put the person’s email on the event while creating it. Next, there is the list with all your calendars, and also an option to add more of them—everything according to your needs.
How to Schedule an Event in Google Calendar
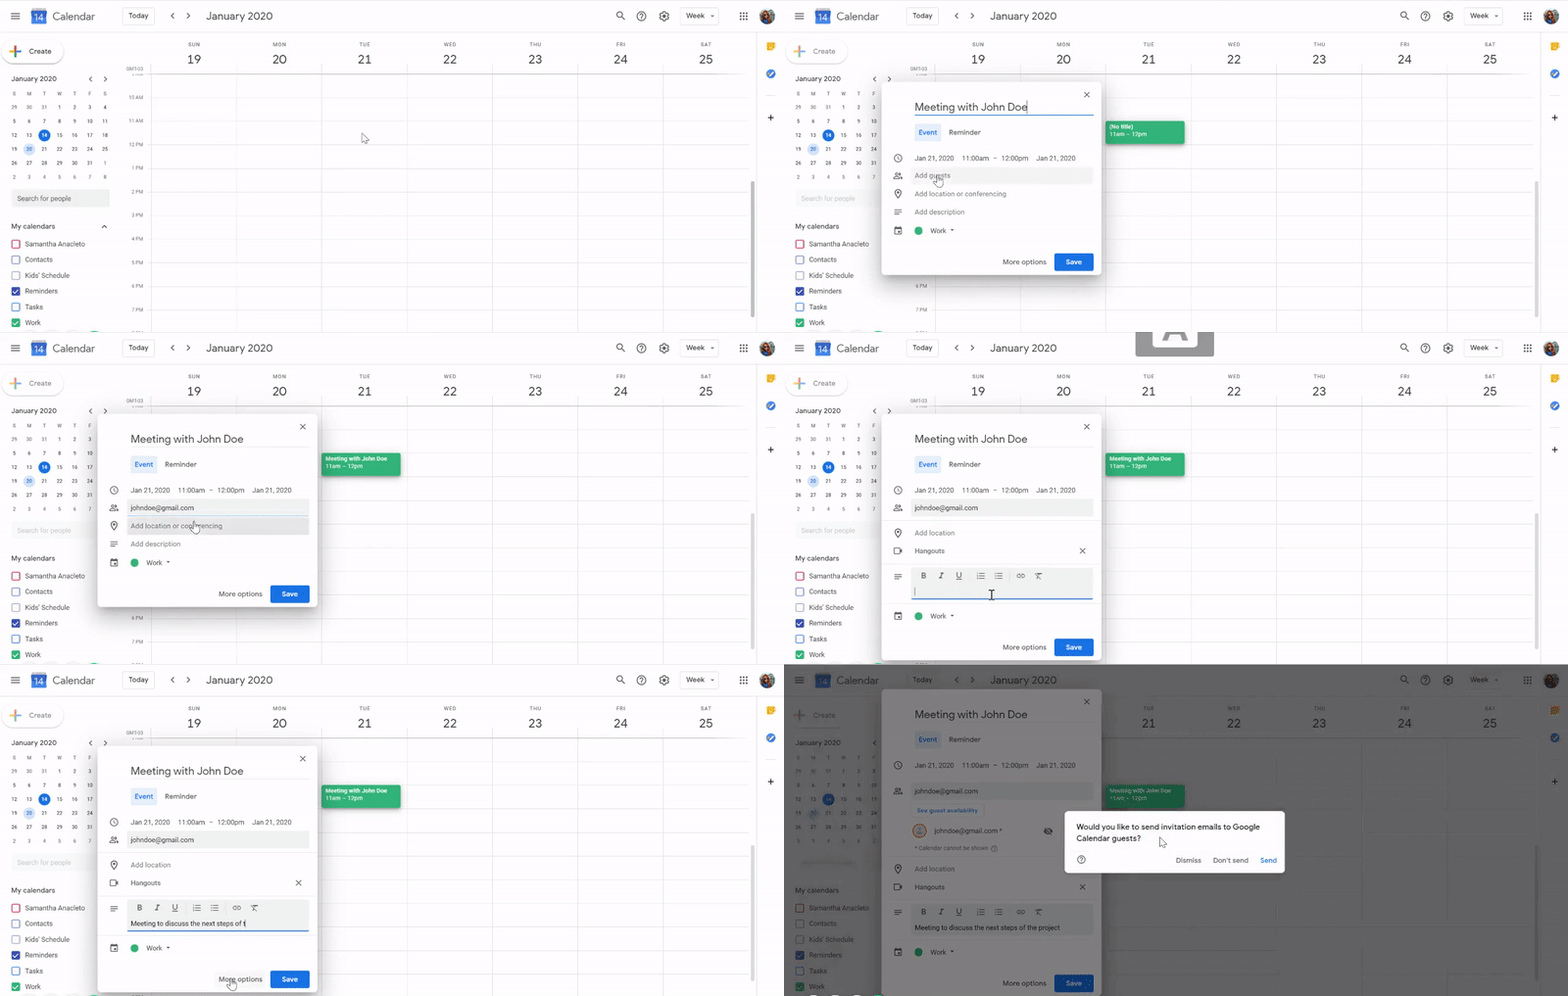
One excellent characteristic of Google Calendar is that it’s straightforward to use. Creating an event is easy and intuitive because you just need to click on the date and time you want, and start filling it with all the information you need. Or you can also press the button “+Create†on the left sidebar. For instance, we are going to show you how to create the reminder “Meeting with John Doeâ€.
Creating the event
You just need to click on the day and time you want, and then a popup will open. The first thing you need to do is type the title and then choose from Event or Reminder. Next, it’s possible to change the time or day of the week by clicking on the date and time, next to the clock icon.
Adding guests
If it is an event with someone you want to receive a reminder as well, type their email on “Add Guestsâ€. Sometimes you just need to start typing the name of the guest, and the email will appear automatically. If you want to allow the guests to make modifications in the event, or even invite more people, just click on Guest permissions and check the boxes you desire.Don’t’ forget to click on “See guest availabilityâ€, to make sure that the time you are setting is not busy for the other person.
Location or conferencing
Click on “Add location†to either put the meeting’s place or “Add conferencingâ€, if it is a remote meeting. To add a location, start typing the address, and some suggestions will appear. But if it doesn’t, type the complete address, so you and the other guests know exactly where the place is. When you choose to add conferencing, Google Calendar creates a Hangouts link for a video conference session between you and your guests. You can also install a third-party program if you don’t want to use Hangouts.
Description and attachments
The next step is to add an event description, and/or if you prefer, add attachments. Just type describing precisely what the event will be in detail, with instructions and useful links. To add an attachment, click the clips symbol, then choose the file you want. After that, just click Select or Upload, and your file will be attached to the event.
Choose a Calendar and More Options
You can choose on which calendar you want to save the event by clicking next to the calendar symbol.In the link “More Options,†you are taken for an expanded window with more advanced options:
- By clicking on “Does not repeatâ€, you can choose a frequency for the event, for example, “Every Week Dayâ€, “Every Mondayâ€.
- You can also mark the box “All Day†if it’s the duration of an event.
- It’s possible to add a notification as well if you want to be alerted about the event a couple of minutes or one hour in advance.
- Choose if you are “Free†or “Busy†during the event, which will prevent other people from inviting you in case if you are busy.
- On the right side, you can manage the guests and the permissions you want to give to them.
Save events
After finishing to complete all that is required on the event popup, you just need to save your event. But as simple as it may be, there are some things that you should know about doing this process.When you click the Save button, a pop up will open, asking if you want to send invitation emails to your guests. You can choose between:
- Send: If you want to notify the guests via email.
- Don’t send: So, the guests won’t receive any notification email for now.
- Dismiss: If you want to continue working on the invitation.
Deleting an event
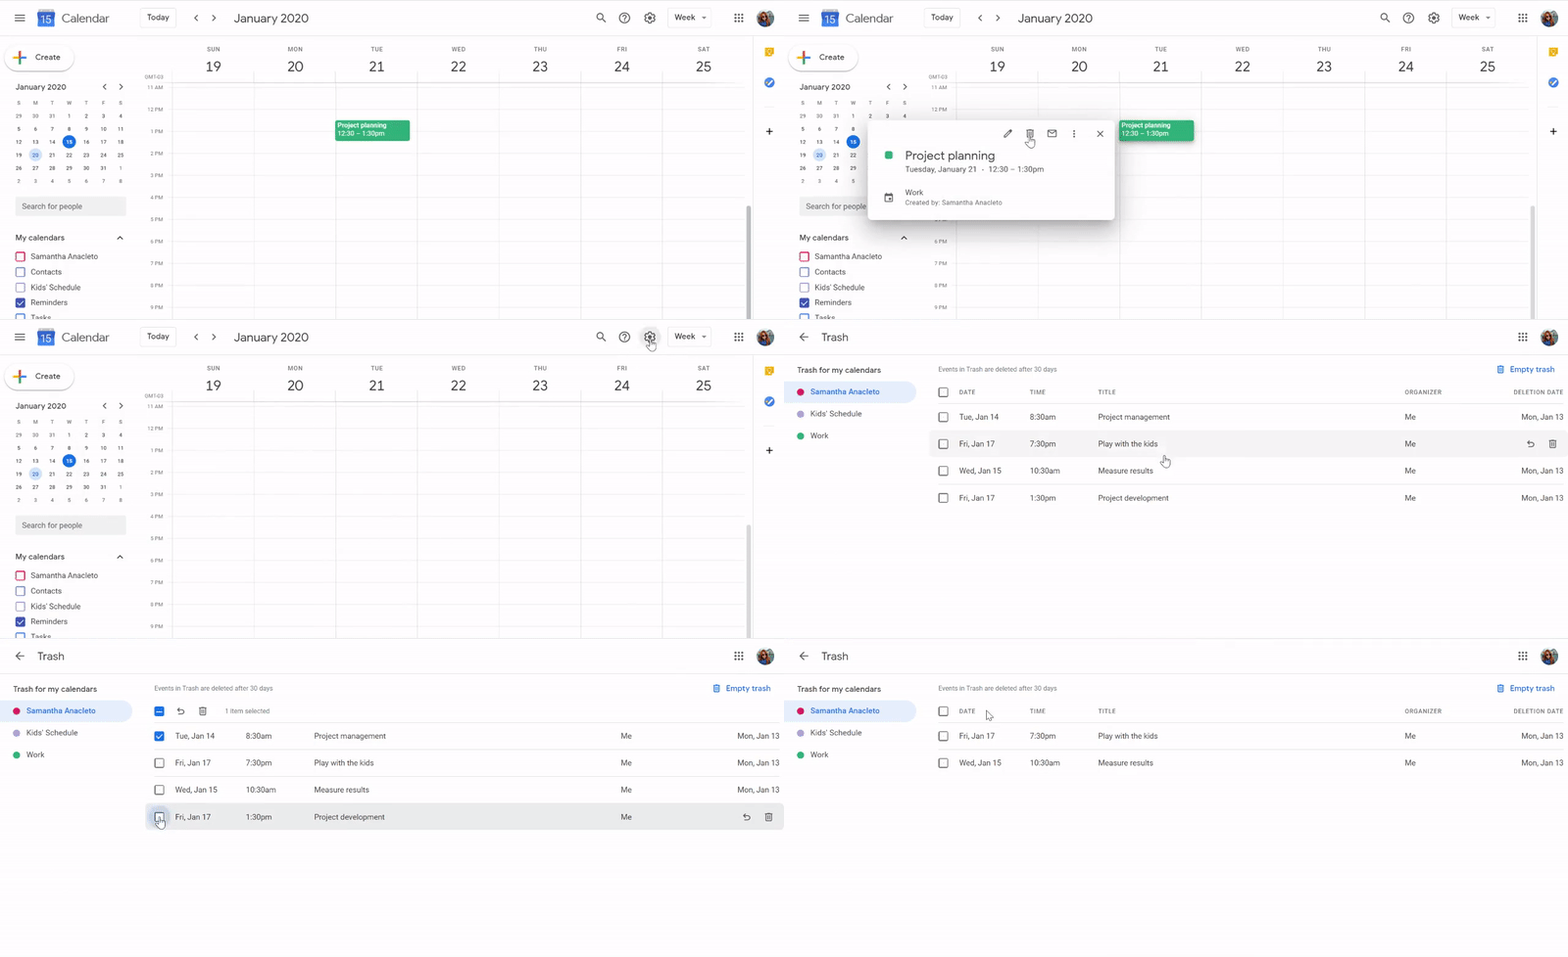
Notice that when you delete an event, it stays on the trash for about 30 days, and later it’s excluded for good. After 30 days, it’s permanently deleted, with the possibility of being manually deleted permanently if you desire.To delete an event, just click on it and choose “Delete Eventâ€, represented by the trash can symbol. But if you want to remove it permanently, go to the “Trash†following the same path as before, and check the box of the event, you have deleted. Then just click “Deleteâ€.In case you need to restore a deleted event, that hasn’t been deleted permanently, go to “Settingsâ€, then “Trashâ€. Find the deleted event and mark the box next to it. Finally, click on “Restoreâ€.
Customize an event
You can edit and customize your events accordingly to what you need. To do that, click on the event you want to customize, you can set a color for the event to be displayed on your calendar. For example, you can pick the color red when an event requires more attention than others, to signalize its importance. If you are adding an event in a specific calendar, the color will be the same as the calendar. So be careful not to put the same color in different calendars, so you don’t get confused.Also, if you want to add an event to a different calendar, just click on its name and choose a different calendar.
Managing Calendars
After learning the basics of how to create events, and manage them, now it’s time to become an expert on managing whole calendars.
How to import a calendar
If you have an existing calendar from any other calendar app, you can import it to Google Calendar. Keep in mind that it must be saved with the extension .ical. At the home page, click on the three dots located next to “Add calendarâ€, then select the option Import. Choose the desired file, and click “Import†so you can have your previous calendar inside Google Calendar.
How to export a calendar
If you need to export your calendar, it’s simple:
- Click on the Settings Menu, represented by the gear symbol, then choose “Settingsâ€.
- Then click on Import & Export, on the left. Choose “exportâ€
Your calendars will be all in a ZIP file, all with the ICS format.
How to delete a calendar
Sometimes it’s necessary to delete a calendar, and to do that you can follow these steps:
- Click on the “Settings Menu†on the top right of the page, and select “Settingsâ€.
- Next, on the left menu bar, select the calendar you want to remove.
- Then scroll to the bottom of the page to the section “Remove Calendarâ€.
- You can choose one of these options: Unsubscribe if you want to unfollow calendars that you can only read, not edit, Delete, if you own the calendar.
How to create shared calendars
If you are part of a team or whatever group of people, this feature is quite interesting and still unknown to many people. It’s possible to create a shared calendar to facilitate the tracking of activities, assignments, events, and appointments in the group.To create your shared calendar, follow these steps:
- On the left, search for “Add other calendarsâ€, then click on “create a new calendarâ€.
- Put a name and a description on the calendar.
- Select the Time Zone you are at.
- Then click on Create calendar. You will be able to see it in the session “My calendarsâ€.
- Click on the three dots next to your shared calendar’s name, and choose the option “Settings and sharingâ€.
- Scroll down to the session “Access permissionsâ€. Here you can choose to make your calendar public, get a shareable link, or share with specific people. We recommend you to select the last one.

- Click on “Add peopleâ€, and type the emails of the group. If you want to skip this manual part, you can share a link, but it may not be so secure. Then you can send this link to the group members.
- If you are on G Suite and you want to make the calendar available only for your team, check the box “Make available for My Organizationâ€.
Drag: a shared inbox integrated with Google Calendar
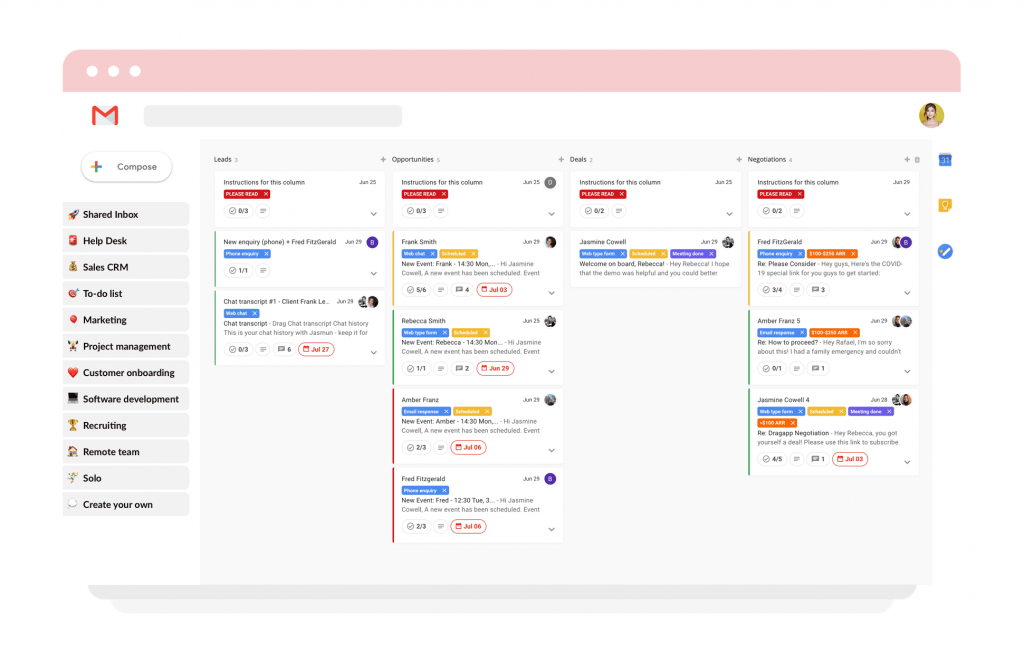
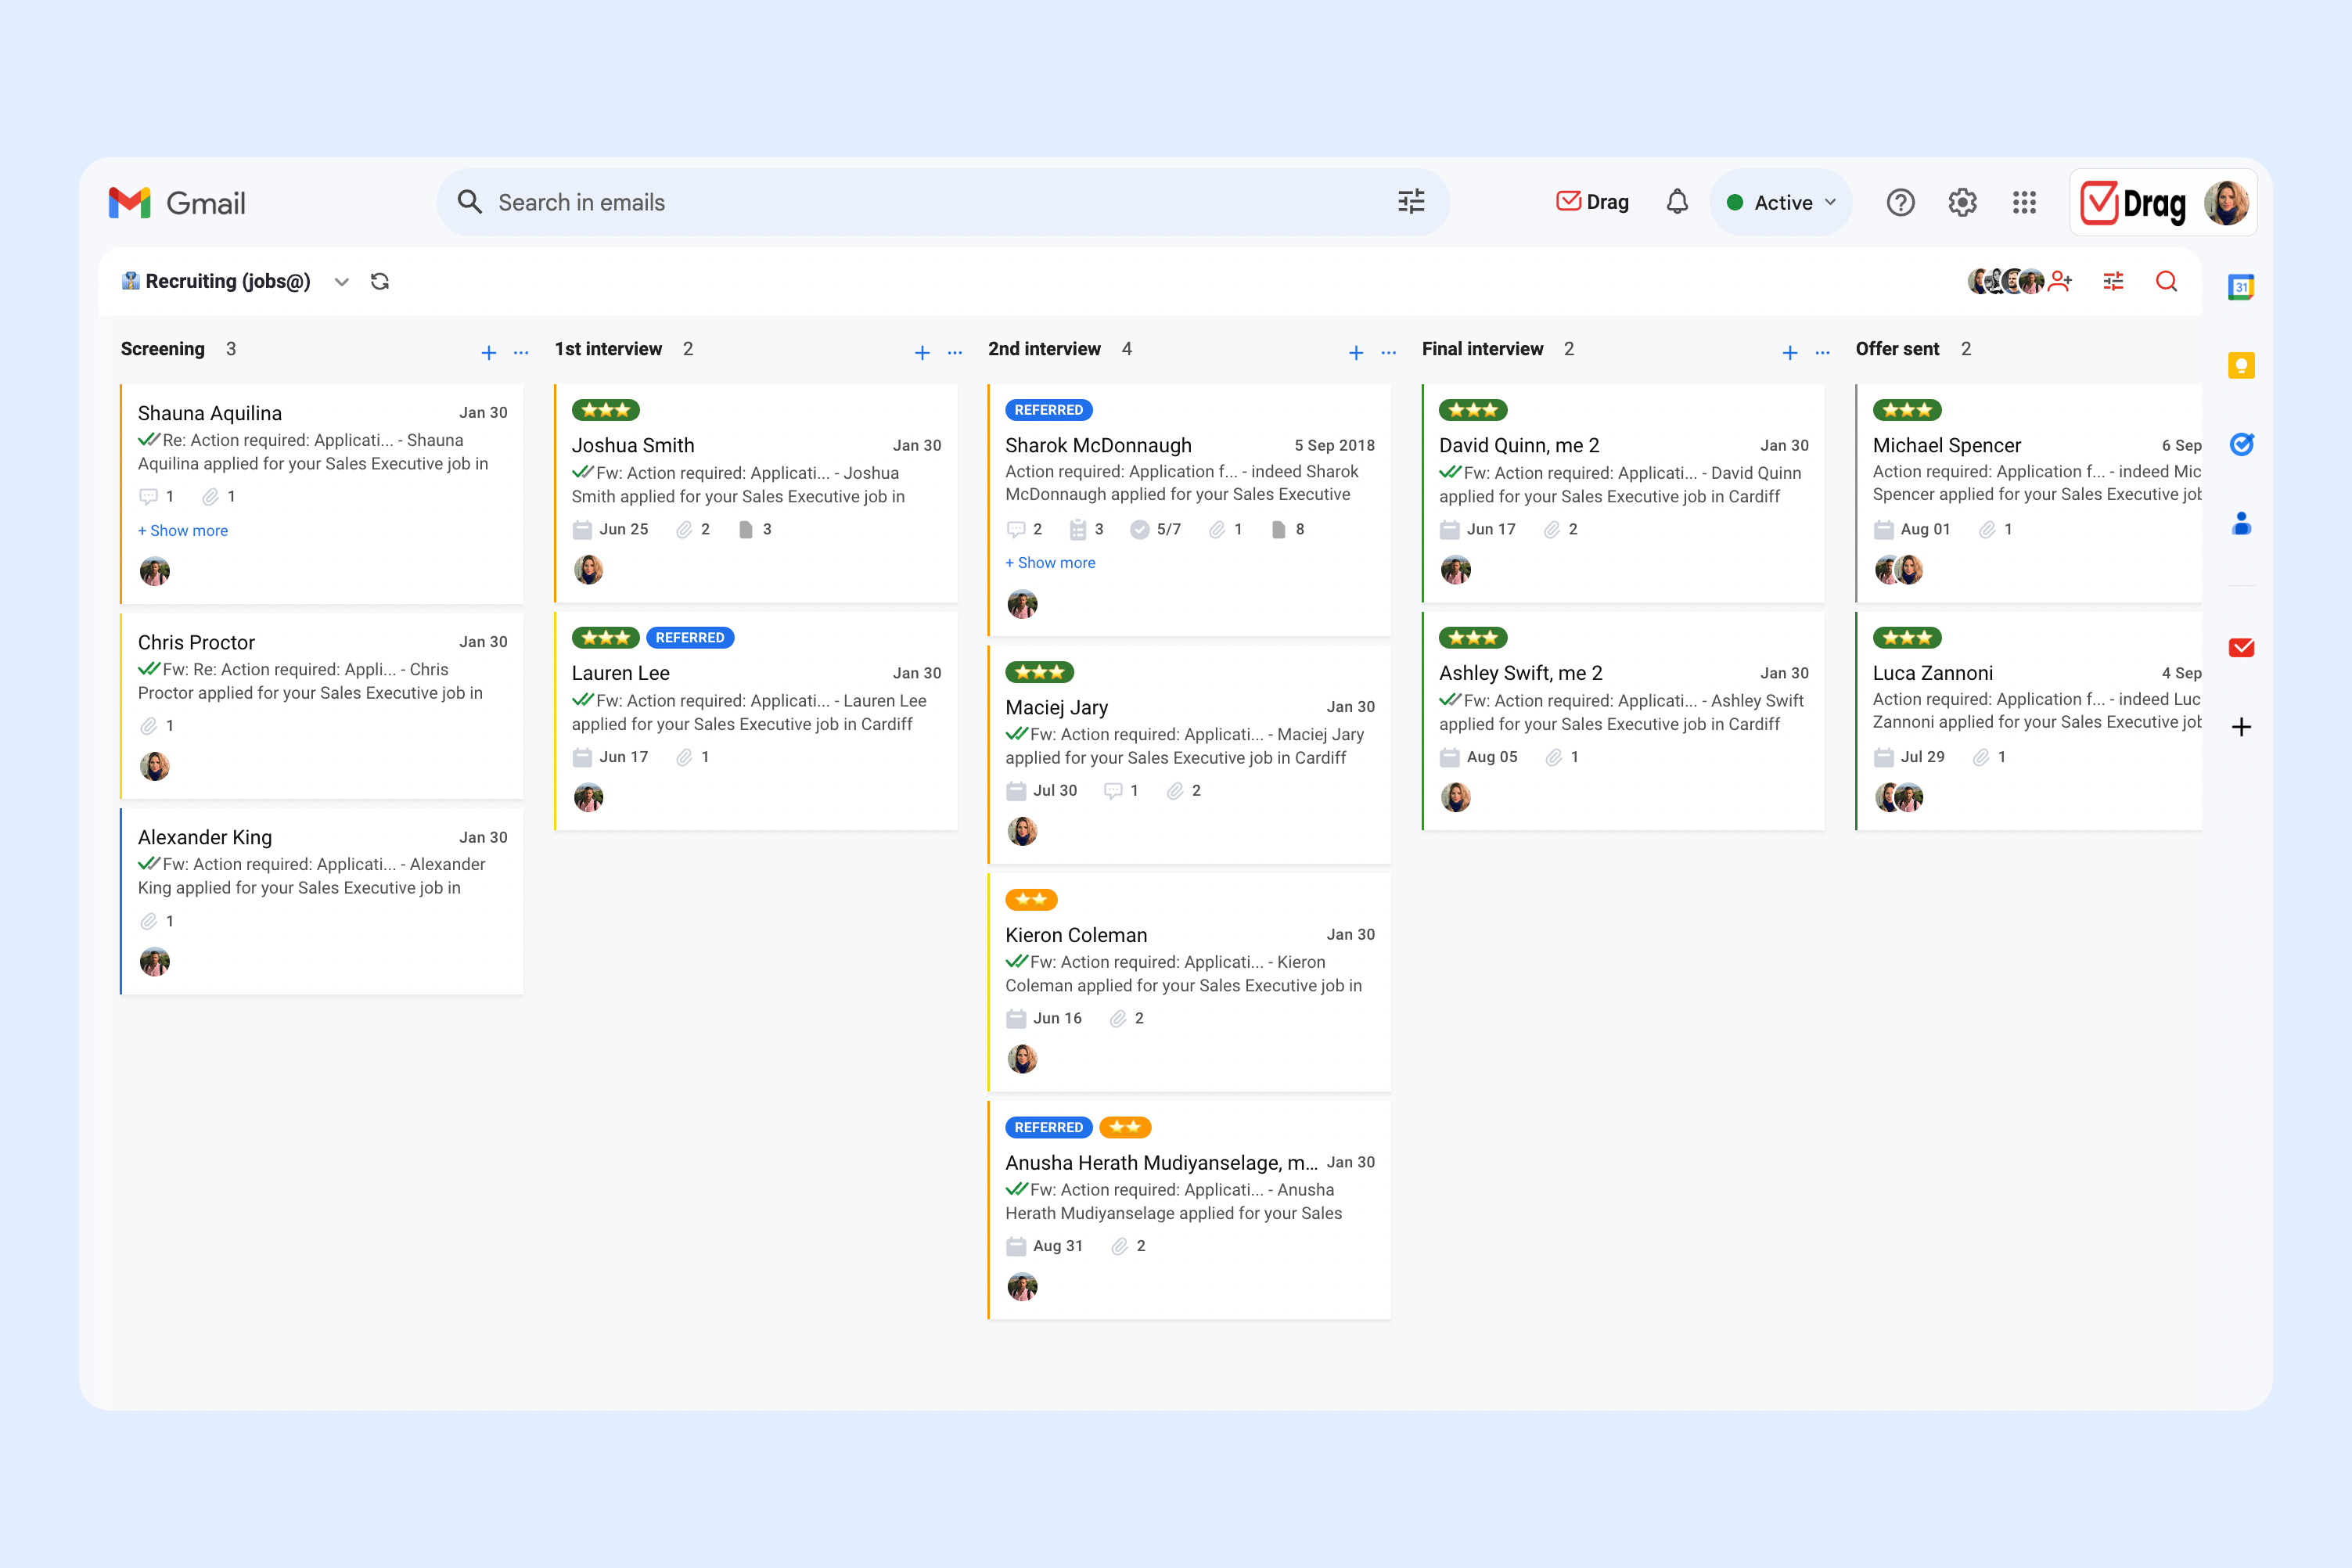
Drag is a shared inbox inside Gmail. It means you and your team can collaborate inside a shared mailbox, to improve the teamwork and eliminate possible obstacles you may be facing lately.But Drag is not just a shared inbox, it’s also a task management tool, a CRM, a Helpdesk. It can be so many things inside only one, which can replace the massive number of tools you are using for work.As we said before, Drag can be a place where you manage tasks, not only emails. And here comes the integration with Google Calendar. Drag synchronizes the tasks you create or even the emails you receive with your Google Calendar. In other words, any email or task that you attach a due date is automatically added to your Google Calendar.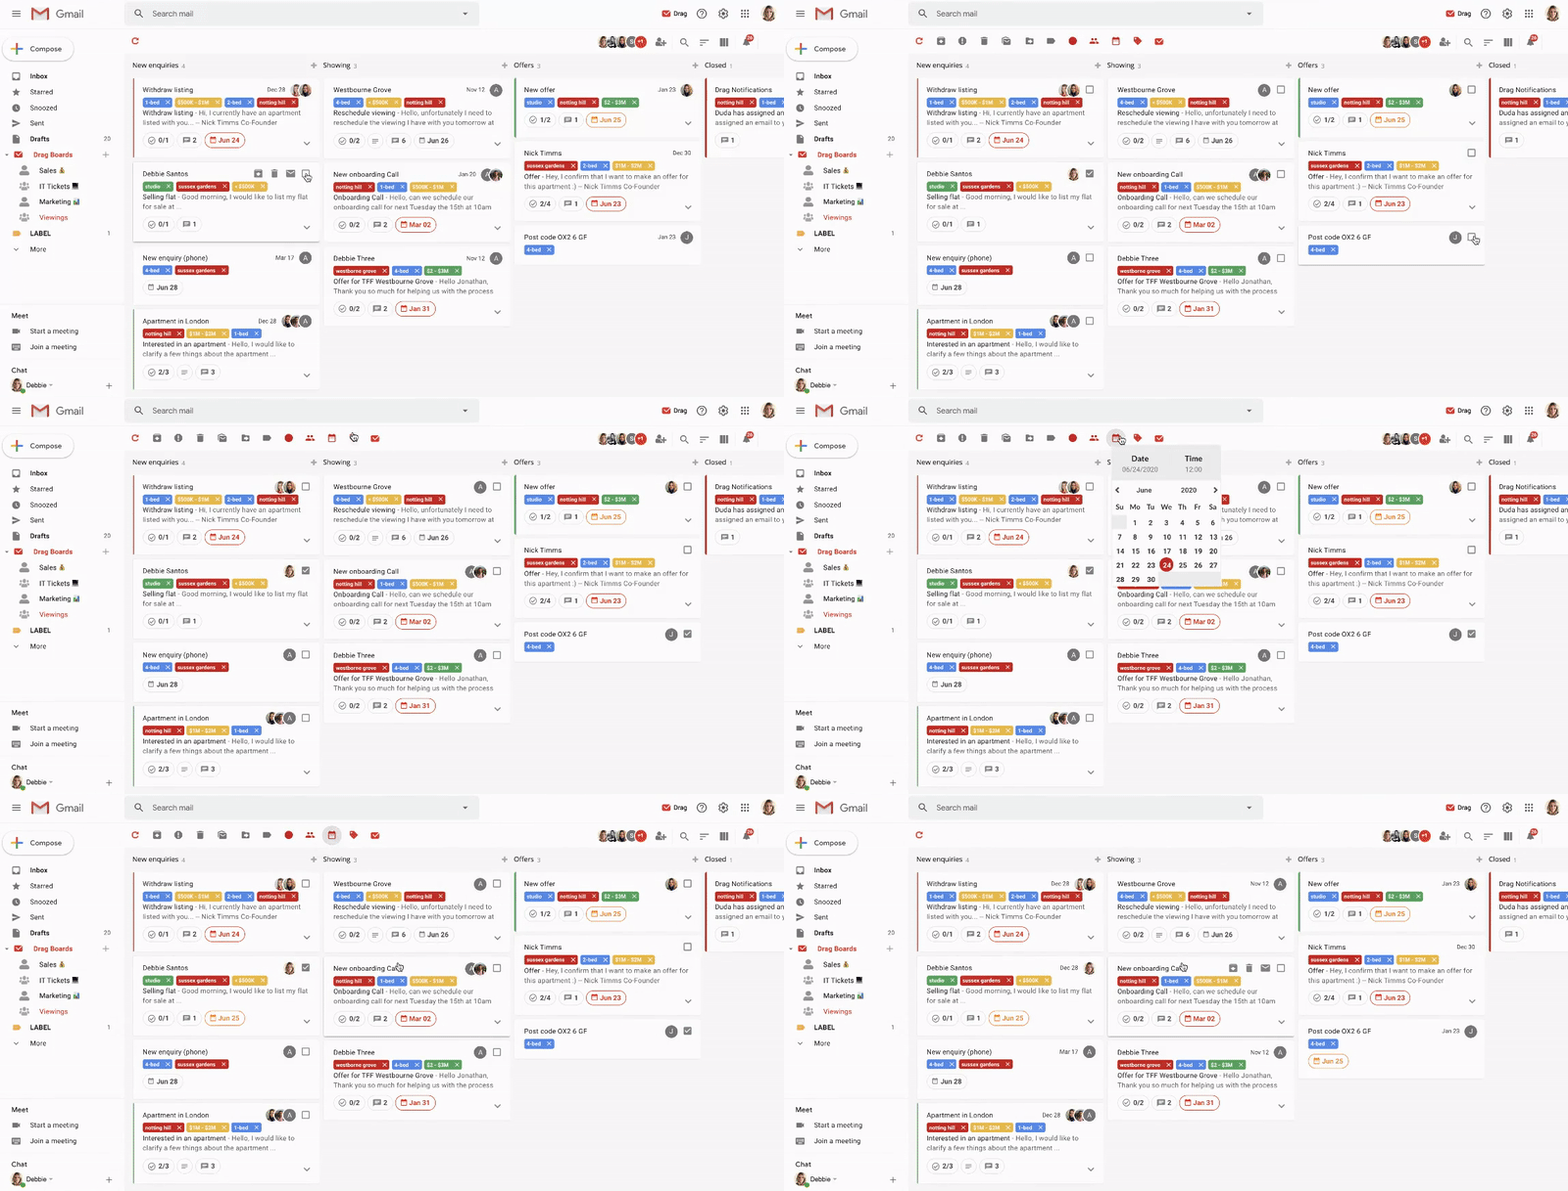
It is handy while collaborating with your team because everybody knows what each one of them is doing, and what has to be done.
Summarizing
Google Calendar is an excellent option for those who want to be more organized at work and in their daily lives. It’s incredible to have constant reminders of important events, never to miss anything important again.And now that you know that Drag can help you at work with this type of organization, including integration with your Calendar, how about to dive into the shared inbox in Gmail world? We can assure you that if productivity is something you value, a shared mailbox will take you to the next level at work.
Turn your Gmail into a Kanban board
Drag turns Gmail into your Team’s Workspace – One single place to support customers, manage tasks and close deals, from the place teams love: Gmail. We are a Techstars-backed Company, trusted by 30,000 users around the World.


